Restoring
a Corroded Lever-Action Rifle Lever
by Roy Seifert
Click here to purchase a
CD with this and all Kitchen Table Gunsmith Articles.
Disclaimer:
This article is for entertainment only and is not to
be used in lieu of a qualified gunsmith.
Please defer all firearms work to a qualified
gunsmith. Any loads
mentioned in this article are my loads for my guns and have
been carefully worked up using established guidelines and
special tools. The
author assumes no responsibility or liability for use of
these loads, or use or misuse of this article.
Please note that I am not a professional gunsmith,
just a shooting enthusiast and hobbyist, as well as a
tinkerer. This
article explains work that I performed to my guns without
the assistance of a qualified gunsmith.
Some procedures described in this article require
special tools and cannot/should not be performed without
them.
Warning:
Disassembling and tinkering with your firearm may
void the warranty. I
claim no responsibility for use or misuse of this article.
Again, this article is for entertainment purposes
only!
Tools
and firearms are the trademark/service mark or registered trademark
of their respective manufacturers.
Introduction
Many of us who participate in Cowboy Action Shooting like to
wrap leather around the bottom of the lever of our
lever-action rifles to soften the sharp contact with our hand.
Unfortunately, the leather we use is often chrome
tanned. Chrome-tanned
leather leaves tanning salts behind which will corrode metal,
even if you thoroughly oil the leather.
Leather that will sit against metal – like holsters
– should be vegetable-tanned.
Marlin®
1894 Cowboy
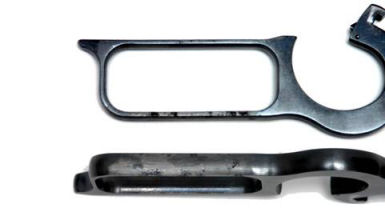
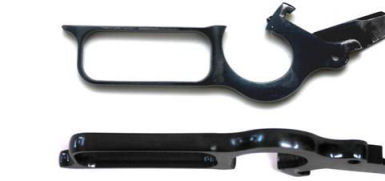
I have a
Marlin 1894 Cowboy rifle in .45LC that I purchased used many
years ago. The
previous owner had wrapped the lever with leather; you can see
the resulting corrosion in the above photo.
The resulting pits left sharp edges, not to mention how
ugly it looked. A
new lever costs about $60.00 but I restored my existing one
for much less.
Polish
out the Pits/Corrosion
Like with
most things in life, preparation is everything.
I made sure my rifle was unloaded, then I removed the
corroded lever. First
I polished out all the corrosion and pits.
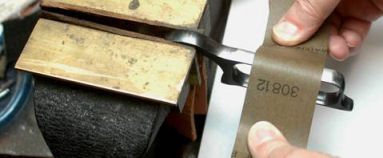
I took 150-grit sand paper wrapped around a bastard
file to aggressively sand the sides of the lever.
By doing the top and bottom of the sides I ensured they
remained flat and parallel.
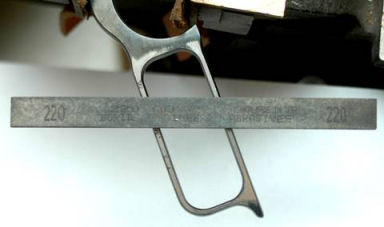
Then I took a 220-grit polishing stick (www.BorideAbrasives.com)
to remove the sanding marks.
Finally I took 400-grit wet/dry silicon carbide sand
paper, then 600-grit wrapped around the bastard file to final polish the metal.
For the
wide part of the lever I removed the corrosion by shoe-shining
first with the 150-grit sand paper, then final polishing by
shoe-shining with 220-grit, then 400-grit, and finally with
600-grit wet/dry sand paper.
Cold
Bluing
Now that the metal is prepared I needed to clean and degrease
it to remove all of the residual oil and sanding dust.
First I put on a pair of vinyl gloves so the oils from
my hands wouldn’t contaminate the clean, bare metal.
Then I used acetone and cotton swabs to degrease the
exposed metal.
I recently
found a cold blue product called Rugged Gun Blue available
from Shooter Solutions™ (www.ShooterSolutions.com).
This is probably the best cold blue I have ever worked
with (refer to my product review article Shooter
Solutions Rugged Gun Blue).
Because this product uses acid to react with the metal
I continued to wear the vinyl gloves.
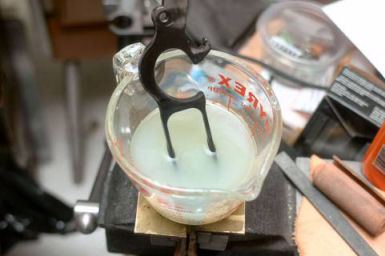
Note:
The solution is milky because I have been using it and
it has some impurities in it.
I purchased
two 4-ounce bottles which I poured into a glass measuring cup.
I dipped the lever into the Rugged Gun Blue and allowed
it to soak until it turned dark blue/black.
The exposed metal only required a few seconds to change
color. Because
Rugged Gun Blue uses acid, if you leave your part in the
solution too long it will start to eat away the metal.
I removed
the lever from the cold blue solution and placed it under
running tap water to remove the excess acid.
This step is necessary to dilute and remove all the
excess acid and stop the bluing process.
I used a hair dryer to remove the water, then applied
gun oil to the entire lever.
As you can see from the above photo the lever came out
almost factory new.
Summary
This is an easy restoration that the home hobby gunsmith can
perform to bring your lever-action rifle back to looking
almost factory new. The
polishing and preparation work took most of the time, but the
results were worth it. Not
only was the cost of materials far less than the cost of a new
lever, but I have the pride of doing the work myself.
|

