Installing a Lanyard Ring on a 1911
by Roy Seifert
Click here to purchase a
CD with this and all Kitchen Table Gunsmith Articles.
Disclaimer:
This article is for entertainment only and is not to
be used in lieu of a qualified gunsmith.
Please defer all firearms work to a qualified
gunsmith. Any loads
mentioned in this article are my loads for my guns and have
been carefully worked up using established guidelines and
special tools. The
author assumes no responsibility or liability for use of
these loads, or use or misuse of this article.
Please note that I am not a professional gunsmith,
just a shooting enthusiast and hobbyist, as well as a
tinkerer. This
article explains work that I performed to my guns without
the assistance of a qualified gunsmith.
Some procedures described in this article require
special tools and cannot/should not be performed without
them.
Warning:
Disassembling and tinkering with your firearm may
void the warranty. I
claim no responsibility for use or misuse of this article.
Again, this article is for entertainment purposes
only!
Tools
and firearms are the trademark/service mark or registered trademark
of their respective manufacturers.

From The Mexican Revolution 1910-20,
by P. Jowet and A de Quesada,
Illustrated by Stephen Walsh, Osprey Publishing
Introduction
John Moses Browning developed the M1911 handgun which was
adopted by the military in 1911. Per military
specifications he included a lanyard ring on both the pistol
and magazines to prevent cavalry soldiers from losing them
while mounted on horse-back. The officer on the far left in
the above drawing has a lanyard looped over his left
shoulder and connected to the loop on his M1911.

The
original model of 1911 had a smooth, flat mainspring
housing. When the gun was modified into the M1911A1 the
mainspring housing was arched with grooves. The arched
mainspring housing causes the gun to be tipped up in the
hand.
In this
article I’m going to discuss two methods of adding a lanyard
ring to a 1911; purchasing a new mainspring housing with the
lanyard ring already installed, and installing a lanyard
ring in an existing mainspring housing.
Purchasing a New Mainspring Housing
This method is the easiest because it is strictly replacing
a part. Personally I prefer a flat mainspring housing and
all of my 1911s have one. My Rock Island Armory M1911A1
came with a grooved, flat mainspring housing, but I wanted
the lanyard ring for authenticity. I purchased a smooth,
flat mainspring housing off of ebay which fit my RIA M1911A1
perfectly. In case you’re wondering, I slam a magazine home
with the heel of my hand; the lanyard ring never touches my
hand.
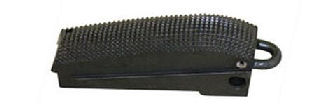
Adding
Grooves to the Smooth Mainspring Housing

I prefer
a grooved mainspring housing so I got out my 20 lines per
inch checkering file I purchased from Brownells
# 080-310-401 to add vertical grooves. I put the
mainspring housing in my vise and used the bronze vise jaws
as a guide. Notice in the above photo how the mainspring
housing is deep in the jaws. I grooved the center of the
mainspring housing keeping the edge of the file against the
vise jaw, and filed until the file wouldn’t cut metal
anymore. I cleaned up the grooves with a triangular needle
file.
I moved
the mainspring housing up so the surface was exposed. I
rotated my checkering file so I could add grooves to the
edges. The checkering file in the above photo is actually
tipped down. Although the mainspring housing is flat from
top to bottom, it is curved from side to side. I again
cleaned up the grooves with a triangular needle file. If I
had wanted to checker the mainspring housing, I would have
used the 20 LPI checkering file and filed at right angles to
the vertical grooves making nice, square points.

After the
grooves were cut to my satisfaction I bead blasted it to
remove the old finish, then Parkerized it to match the rest
of the gun. The result looks original.
Installing a Lanyard Ring in an Existing Mainspring Housing
This method is by far the most difficult because it requires
precise machining. However, rather than replacing a custom
or special mainspring housing, this method allows me to keep
it, especially if it is custom and matches the gun.
Besides, I got to do some real gunsmithing!
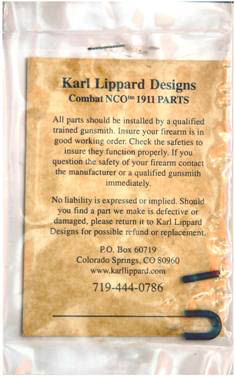
Karl
Lippard Designs sells the lanyard ring and retaining roll
pin on ebay. He also provides a copy of the M1911A1
mainspring housing mechanical drawing. Unfortunately, it is
a copy of a copy of a copy, etc. so it is somewhat difficult
to read. Fortunately Rio Benson of Benson Consulting, LLP
created a full set of M1911A1 drawings which you can
download
here. Page 30 has the exact same drawing, but much
clearer. I will not include the drawing in this article
because you can download it yourself.
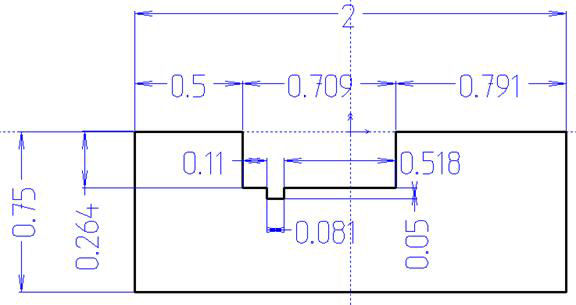
Manufacturing a Jig
I wanted to be able to mill/drill the holes accurately and
be repeatable so I designed a jig using CorelDraw v12 and
BobCAD-CAM v20. I used the dimensions from the M1911A1
mainspring housing drawing to design the jig. The drawings
below show the specifications for the jig. I never took
mechanical drawing in school so I probably haven’t followed
established guidelines, but all the numbers are there.
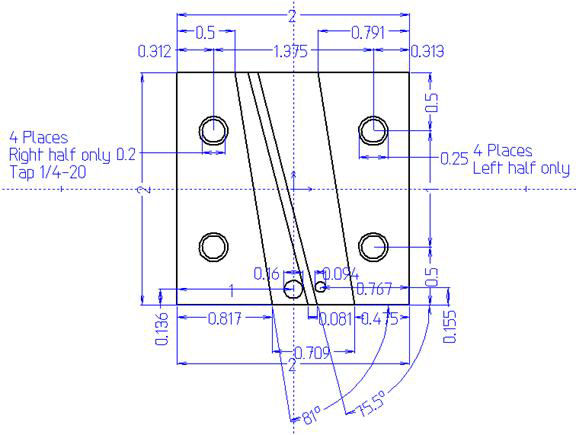
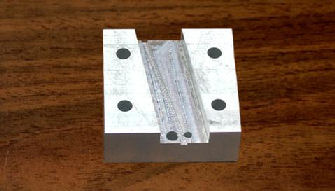
I have
trouble visualizing a three-dimensional part from a set of
drawings so I developed a 3D rendering to show what the
final jig half would look like. The right half has four
holes 0.200” in diameter which are tapped for 1/4-20
screws. The left half is a mirror image of the right half,
and has four holes 0.250” in diameter for 1/4-20 screws.
These screws hold the two halves together to hold the
mainspring housing in place for milling and drilling.
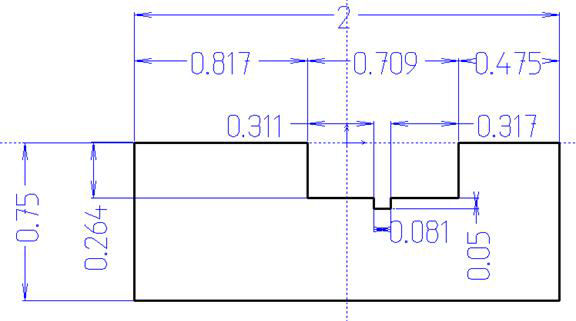
The jig
is designed so the base of the mainspring housing is
parallel to the milling table. This is because the holes
for the lanyard loop need to be perpendicular to the base.
The cutout is wide enough to accept both flat and arched
mainspring housings.
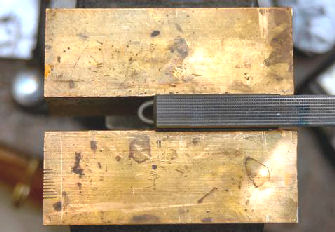
I had
some 3/4” aluminum stock so I milled two 2” x 2” blocks. In
each block I milled the design you see in the above
drawings. The width of a mainspring housing is 0.538-inches
so I milled each block 0.264-inches deep; a little less than
half. This is so when I install the mainspring housing in
the jig and install the four hex-head screws, the mainspring
housing won’t move. I also milled the holes for the two
retaining pins so the mainspring housing would be aligned
properly.
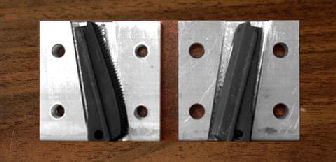
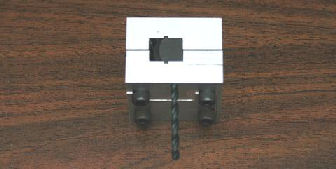
As you
can see from the above photo the jig holds both a flat, or
arched mainspring housing. I purchased a 5/32” drill bit to
act as an alignment pin when setting the mainspring housing
in the jig. This fits through the retaining pin hole in the
mainspring housing. I also purchased a 3/32” drill bit to
drill the hole for the lanyard ring retaining pin.
Milling
the Holes
I took
the original Rock Island Armory flat mainspring housing that
came with my gun and mounted it in the jig. I used the
5/32” drill bit to align the mainspring housing with in the
jig. I tightened the screws so there was an equal gap on
both sides of the housing. This ensured the jig was square
with the mainspring housing.
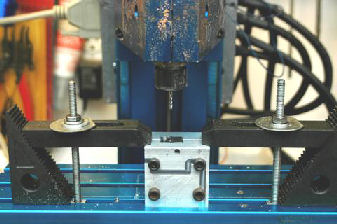
I mounted
the jig onto my CNC milling machine table so that it was
square. I installed a 3/32 square end milling bit and
positioned it 0.358” from the front edge and centered on the
base of the mainspring housing. I milled two holes 0.1065”
in diameter, 0.325” apart and 0.270” deep.
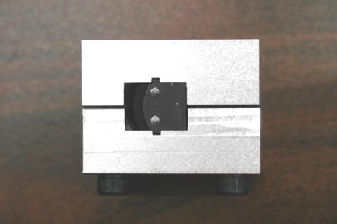
I
installed the lanyard ring in the holes, then used my bench
top mill/drill to drill the 3/32” retaining pin hole using
the jig as a guide. Drilling the hole also drills a notch
in each leg of the lanyard ring which keeps the ring in
place when the pin is installed. I installed the provided
3/32” roll pin in the retaining pin hole I just drilled.
Conclusion
It is much easier to replace a part than to modify an
existing part, but now that I have a jig I can add a lanyard
ring to any existing mainspring housing.
Addendum
11/05/2015
For the same price as one pre-formed lanyard ring I
purchased a one-pound coil of 37 gauge (0.106) steel music
wire from
MSC Industrial Supply Co. part number
31980964. This gave me about 34-feet of wire which
would make hundreds of lanyard rings. I purchased steel so
it would take bluing or Parkerizing to match the original
finish on the mainspring housing. They also sell this wire
in stainless steel part number
31981194.
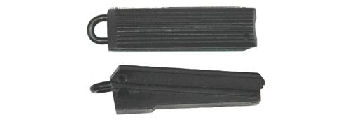
The above
figure shows the dimensions of the lanyard ring. The
distance between the two legs is 0.219” so I used a 7/32”
drill bit to form the loop.

I cut
about 2 1/2“ of wire and held it in the flame of propane
torch until the middle became bright red. I then forged the
loop around a 7/32” drill bit to form the loop. Because the
wire was so thin it cooled fairly quickly so I had to reheat
it 3 or 4 times to get the shape I wanted.

I cut the
ends off using my Dremel tool with a cutoff wheel. I
polished the loop with 400-grit wet/dry sand paper to remove
any carbon and blemishes from the metal.
I had
a blued, checkered, arched mainspring housing in my parts
bin so using my jig I installed my homemade lanyard ring
onto that mainspring housing. I cold-blued the ring to
match the housing. I fixed the loop in place with a 3/32”
roll pin I took from my black roll pin set I purchased from
Brownells
#080-518-000. By removing the roll pin I can also
remove the lanyard ring and return the mainspring housing to
its original form. The only reason I installed the ring
in this arched mainspring housing was to see if I could make
the loop myself, and to test my jig and process a second
time. Everything worked as designed and I now have a couple
of spare mainspring housings with a lanyard ring.
|
