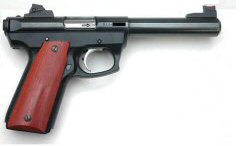
Converting a
Ruger®
22/45™
to Accept 1911 Grips
by Roy Seifert
Click here to purchase a
CD with this and all Kitchen Table Gunsmith Articles.
Disclaimer:
This article is for entertainment only and is not to
be used in lieu of a qualified gunsmith.
Please defer all firearms work to a qualified
gunsmith. Any loads
mentioned in this article are my loads for my guns and have
been carefully worked up using established guidelines and
special tools. The
author assumes no responsibility or liability for use of
these loads, or use or misuse of this article.
Please note that I am not a professional gunsmith,
just a shooting enthusiast and hobbyist, as well as a
tinkerer. This
article explains work that I performed to my guns without
the assistance of a qualified gunsmith.
Some procedures described in this article require
special tools and cannot/should not be performed without
them.
Warning:
Disassembling and tinkering with your firearm may
void the warranty. I
claim no responsibility for use or misuse of this article.
Again, this article is for entertainment purposes
only!
Tools
and firearms are the trademark/service mark or registered trademark
of their respective manufacturers.
The
other day my friend Chili Ron and I were talking about guns
and grips and he mentioned that a few folks were installing
1911 grips on a Ruger® 22/45™.
A quick search on the Internet brought up the
following links:
http://www.wiztechs.com/knightsrealm/guns/22-45/grips/grips.htm
This was the work of Matt Knighten
http://www.ar15.com/content/page.html?id=347
This was the work of guns762 (real name unknown)
http://www.guntalk-online.com/2245detailstripping.htm
Complete 22/45™ disassembly instructions
Since
I have a 22/45™ in my collection, and I make my own 1911
grips out of Brazilian blood wood, I decided to make this
modification. The
red grips would be a great contrast against the black frame.
The
steps for performing this modification are as follows:
- Completely
disassemble the grip frame
- File/sand/mill
the palm swells so the sides of the frame are perfectly
flat.
- Drill
and tap 1911 bushing holes
- Install
1911 grip bushings.
Since the frame is plastic these may have to be
epoxied in place for extra strength.
- Install
1911 grips.
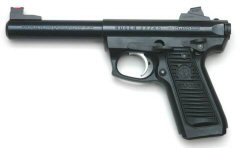
Over
the years I have made a number of improvements to my 22/45™:
- Installed
a target hammer by Volquartsen
- Installed
an over travel set screw in the trigger
- Installed
a pre-travel set screw in the trigger
- Installed
fiber optic front and rear sights by Williams Fire Sight
- Installed
extended safety and bolt stop levers by Broken Gun Ranch
Disassemble
the Grip Frame
First I completely disassembled the grip frame following the
instructions on the Guntalk-Online web site.
This is literally a matter of pushing out pins and
having parts fall out. I
was careful not to lose any!
This was also a great time to clean all the nooks and
crannies that I couldn’t reach during normal cleaning.
Many of the pivot pins are held in place by a spring
that sits in a groove; thereby allowing the spring to perform
double duty.
Mill
the Palm Swells
The instructions on the Internet say to use a high speed
rotary tool with a sanding drum, small grinding wheels, and
files to make the palm swells flat.
Since I have a milling machine at home I decided to
mill the palm swells.
I
couldn’t securely chuck the frame horizontally because of
the taper in the grip frame, so I chucked it vertically in the
machinist’s vise on my mill.
I used a four-inch long 1/4” square end bit at 700
RPM to “shave” off the palm swells.
This left a one-inch ridge at the top of the grip
frame.
I
used a high-speed rotary tool with a coarse sanding disk to
sand down the one-inch ridge.
I then used the tip of a cone grinding stone to finish
sanding down the ridge in the corners where it was recessed in
the frame.
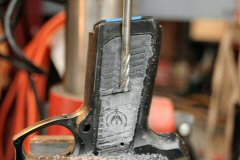
Drill
and Tap 1911 Grip Bushing Holes
I modified an old 1911 grip I had so it would fit onto the
frame on the appropriate side.
I marked the location of the grip bushing holes, then
drilled using a #3 drill bit.
I then tapped the holes using a 1911 bushing tap I
purchased from Brownells
#080-598-236.
Install
1911 Grip Bushings
Long ago I purchased a 1911 Auto Bushing Driver bit from Brownells
#080-434-045.
This is the right tool for installing and removing 1911
grip bushings. Although
I was able to get the bushings snug onto the frame, I still
epoxied them in place so they would not come loose.
Reassemble
the Pistol
After I reassembled the gun I noticed that the sear pivot pin
protruded about 1/16” from each side of the frame.
I took a round-end rasp and my high-speed rotary tool
and cut an indentation in the grip to accommodate the pin.
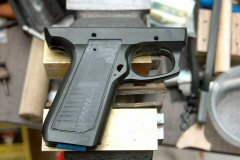
Install
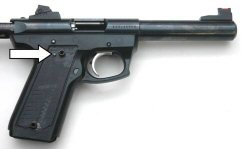
1911 Grips
Since the grips were already fitted to the frame prior to
installing the grip bushings, the grips fit perfectly.
I had to file a small cutout in the top left corner of
the left grip to accommodate the bolt lock lever.

Because
the grip frame of the 22/45™ is wider than a 1911 grip frame,
once the 1911 grips were installed, the grip felt much
beefier. The gun
itself also felt heavier, which should help with accuracy.
Even
though I used a mill to remove the palm swells, the
instructions on the Internet showed how to make this
modification using a rotary tool and files.
Now, with a few modifications, I can use 1911 grips on
my Ruger® 22/45™.
|