Adding
a Laser to a Taurus® 24/7
by Roy Seifert
Click here to purchase a
CD with this and all Kitchen Table Gunsmith Articles.
Disclaimer:
This article is for entertainment only and is not to
be used in lieu of a qualified gunsmith.
Please defer all firearms work to a qualified
gunsmith. Any loads
mentioned in this article are my loads for my guns and have
been carefully worked up using established guidelines and
special tools. The
author assumes no responsibility or liability for use of
these loads, or use or misuse of this article.
Please note that I am not a professional gunsmith,
just a shooting enthusiast and hobbyist, as well as a
tinkerer. This
article explains work that I performed to my guns without
the assistance of a qualified gunsmith.
Some procedures described in this article require
special tools and cannot/should not be performed without
them.
Warning:
Disassembling and tinkering with your firearm may
void the warranty. I
claim no responsibility for use or misuse of this article.
Again, this article is for entertainment purposes
only!
Tools
and firearms are the trademark/service mark or registered trademark
of their respective manufacturers.
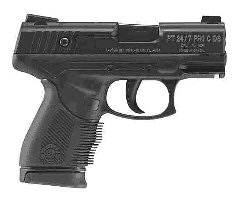
I recently
purchased a Taurus® 24/7 compact in .45 ACP.
I wanted to add a laser to this pistol to help me
acquire a target in low-light conditions or in situations
where I can’t get a good sight picture.
Also, I am now finding it difficult to focus on the
front sight with my tri-focal glasses!
There are
currently a number of methods for mounting a laser to a
pistol. All are
equally effective in helping to guide a shot to the target,
but not every method is suitable for every gun; especially
this gun.
- Grip
mount - This gun does not have removable grips so a
grip-mounted laser would not work.
- Guide
rod mount – This pistol uses a two-piece telescoping
guide rod which does not allow for a laser, nor does
anyone make one for this pistol.
- Sight
mount - LaserLyte®
manufactures a laser that replaces the rear sight so you
can use both the standard notch and post sighting as well
as the laser. Unfortunately,
they don’t have a rear sight to fit this gun.
- Rail
mount - The accessory rail for this compact gun is very
short so a standard rail-mounted laser would protrude too
far in front of the muzzle.
Also, I have found that most rail-mounted lasers
won’t lock into the notch on this short rail because the
lock is too far in front of the mount.
- Trigger
guard mount – I’ve never really liked this method of
attachment. The
laser sticks out too far in front of the muzzle and there
is nothing to support the laser vertically.
It just seems to me that it could be too easily
jarred out of position.
- Separate
rail mount and round laser – Way too bulky and again,
can’t be firmly attached to the rail and protrudes too
far forward of the muzzle and too far below the trigger
guard.
So, was my
search for the perfect laser for this pistol to be in vain?
Well, after doing a lot of research on the Internet, I
found the ArmaLaser
RSS built especially for this pistol.
It’s a bit more expensive than other rail-mounted
lasers, but only about half the price of a grip laser.
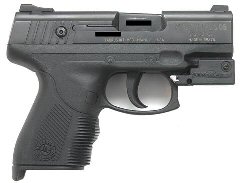
It is one of the smallest rail-mounted lasers I have
found. Once
mounted, it is flush with the front of the gun and protrudes
below the front of the frame less than half of the length of
the trigger guard. This
has to be the perfect laser for this gun.
Installation
There’s
not really much gunsmithing involved here.
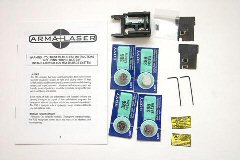
The ArmaLaser was packed in a foam-lined, cardboard
box. Apparently,
the earlier models came in a hard plastic case, but consumers
suggested that the ArmaLaser folks use a cheaper box and save
us a few bucks. Included
in the box were:
- Laser
unit
- 4
type 386 batteries
- 2
long trigger guard stabilization set screws; short set
screws were already installed
- 2
battery covers, one for steady beam, and one for pulsed
beam
- 2
warning labels
- 2
hex keys
- Instruction
manual
Following
the instructions that came with the unit, I installed the four
type 386 batteries. These
batteries are common and are available pretty much anywhere.
In order to get the batteries installed I first had to
remove the barrel nut and screw.
This was not in the instructions.
The batteries all went in the same direction; positive
side down.
Next I
installed one of the two battery cover plates.
I prefer a pulsed beam so I installed the plate with
the P on it. I
would have preferred having an external switch to be able to
switch between a pulsed and steady beam, but there’s just
not enough room on this small laser for extra switches.
I slid the
unit over the rail and installed the barrel nut.
The unit fit on the rail tightly and I snugged the
barrel nut according to the instructions.
Laser
Adjustment
With the pistol unloaded and the laser turned on I adjusted
the windage and elevation set screws using one of the included
hex keys so the laser dot was on top of my front sight at 13
feet. It was nice
of the ArmaLaser folks to include two of these small hex keys
in case I lost one. The
set screws were stiff, which I believe helps keep the laser
adjusted. There
was more than enough adjustment for both windage and
elevation; in fact each required less than 1/4 turn for my
pistol.
Pros
and Cons
Wow, this unit is really tiny and weighs practically nothing!
It is the same width as the slide, and is flush with
the end of the muzzle so nothing protrudes.
There are no sharp edges or corners, and it doesn’t
get in the way of my trigger finger.
To activate the laser all I have to do is touch the
metal end with my straightened trigger finger.
This laser is bright enough that I can even see it in
bright sunlight.
However,
there are a couple of things I don’t like about this unit.
First of all, as mentioned before, to activate the
laser all I do is touch the metal coated end near the trigger
guard. Unfortunately,
if I touch it again it turns off.
I’m going to have to train myself to keep my trigger
finger high along the frame to keep from deactivating the
laser. It’s
interesting that the gun comes with an indentation on the side
of the frame specifically for the trigger finger.
The second
thing I don’t like is the fact that I can’t completely
turn off the power when I store the gun in my gun safe.
The power is always on waiting for me to touch the
sensor. I can see
I’m going to have to keep some spare batteries on hand.
I thought about placing a piece of paper between the
battery cover and the batteries so there is no current flow,
but that required that I remove the unit from the gun, and I
found that every time I did that I would have to readjust it.
However,
other than these issues, the ArmaLaser was a worthwhile
purchase and enhances the tactical use of this pistol.
It’s just going to take some practice to get used to
it.
Addendum
March, 2011
The biggest problem with the RSS was the fact that
it couldn’t be shut off.
Although the laser was not illuminated, the logic was
always on waiting for me to touch the sensor, which used
battery power. I
don’t always carry this pistol, but when I wanted to carry
it, the batteries in the laser were always dead.
I had to keep fresh batteries in it just to store it!
ArmaLaser
has an exchange program in place of which I decide to take
advantage. Kudos
to ArmaLaser! A
couple of emails later I returned my model RSS with $35.00 and
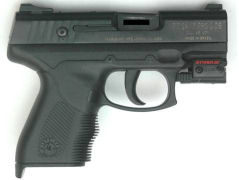
requested a model Stingray
SR2-635. The
SR2-635 has a tactile switch that completely removes power
from the laser. It
can be activated by either hand and should allow the batteries
to last longer. It
took one month for the replacement laser to be delivered, but
the Stingray SR2-635 was in very high demand.
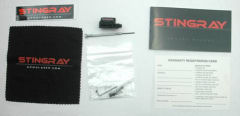
The package
included an instruction manual, warranty card, and tool kit.
The tool kit included a small screwdriver for replacing
batteries, hex wrenches for adjusting windage and elevation,
spare mounting screws, cleaning swabs and cloth.
It also included a sticker.
Following
the instructions I installed the laser.
Again, it was a simple matter of removing the screws,
installing the laser on the pistol, and tightening the screws.
I put a little blue thread-locker on the nuts to
prevent them from loosening up under fire.
As you can see from the above photo the laser is very
compact and fits the pistol perfectly.
Using one of the included hex wrenches it took me
about one minute to adjust the laser.
I had
designed a concealed carry holster for this pistol (refer to
my article Making
a Custom Leather Holster for a Taurus® 24/7).
The
gun with the new laser fit perfectly into the holster.
Some reviewers on the Internet stated that the switch
would hang up on the edge of a holster, but I didn’t have
that problem. So
again, my CCW pistol is now armed with a laser that hopefully
will last much longer without having to change out the
batteries so often.
I want to
state again how pleased I am with ArmaLaser products and
especially with their exchange program.
One product did not fit my needs, but for a few dollars
I was able to exchange it for a product more suitable for me.
Thank you ArmaLaser.
|
