Fitting a
.45 ACP Conversion Cylinder
by Roy Seifert
Click here to purchase a
CD with this and all Kitchen Table Gunsmith Articles.
Disclaimer:
This article is for entertainment only and is not to
be used in lieu of a qualified gunsmith.
Please defer all firearms work to a qualified
gunsmith. Any loads
mentioned in this article are my loads for my guns and have
been carefully worked up using established guidelines and
special tools. The
author assumes no responsibility or liability for use of
these loads, or use or misuse of this article.
Please note that I am not a professional gunsmith,
just a shooting enthusiast and hobbyist, as well as a
tinkerer. This
article explains work that I performed to my guns without
the assistance of a qualified gunsmith.
Some procedures described in this article require
special tools and cannot/should not be performed without
them.
Warning:
Disassembling and tinkering with your firearm may
void the warranty. I
claim no responsibility for use or misuse of this article.
Again, this article is for entertainment purposes
only!
Tools
and firearms are the trademark/service mark or registered trademark
of their respective manufacturers.
Introduction
A little while ago my friend Chili Ron showed me a
stainless-steel large-frame Ruger Vaquero that came with two
cylinders; one in .45 LC (Long Colt), and a second one in
.45 ACP (Automatic Colt Pistol). I thought that was a great
idea, and I’m a big fan of convertible revolvers. I own two
Ruger Single Six convertible revolvers that came with two
cylinders; one for .22 short/long/long rifle, and a second
one for .22 magnum. I converted one of those Single Six
revolvers into a trail gun, refer to my article
Building the Ultimate .22 Trail Gun. I thought it
would be fun to shoot .45 ACP out of my Ruger large-frame
.45 LC Vaqueros, not to mention the lighter rounds would be
good for cowboy action shooting. .45 ACP is the caliber
also used for Wild Bunch matches in 1911 pistols.
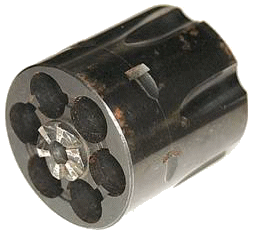
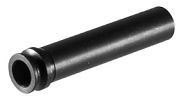
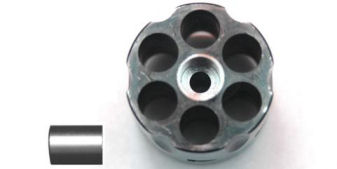
I found a
Ruger .45 ACP cylinder on eBay that came from an old-model
Blackhawk for a fairly reasonable price. Ruger used to
provide their extra cylinders in a red felt bag; the spare
cylinder for my Single-Six liberty gun had one. The problem
with these bags was that they absorbed moisture. Most
people never removed the spare cylinder from the bag so
eventually the cylinder developed rust as you can see from
the above photo.
This
cylinder had been fired, but never cleaned; I hate working
on dirty guns. If I were a professional gunsmith I would
charge an extra $40 just for cleaning! I soaked a cleaning
patch in
Ed’s Red and liberally swabbed each chamber. I then put
a .45 caliber bronze cleaning brush on the end of an
aluminum rifle cleaning rod segment and chucked the rod into
my cordless drill. I ran the drill at a slow RPM and moved
the brush in and out of each chamber. Years of dried, caked
on power residue came off in my hand. I dried each chamber
and coated each one with Breakfree CLP.
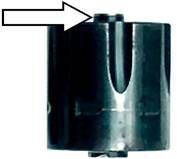
Fitting
to the Frame
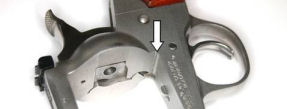
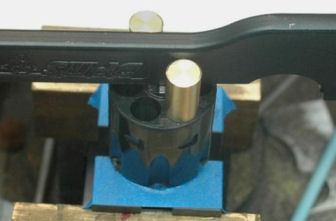
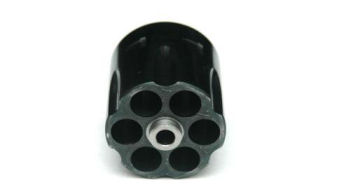
I tried
fitting the cylinder into my .45 LC Bisley Blackhawk but it
just wouldn’t fit. After some careful examination I
discovered that the .45 ACP cylinder was longer than the
Blackhawk cylinder. This was because the rims of .45 LC
cases sat above the rear face of the Blackhawk cylinder, but
.45 ACP cases sit flush and even with the rear of the .45
ACP cylinder. The cylinder had to be longer so the firing
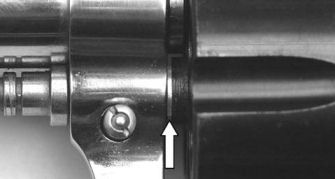
pin could reach the primers. The rear outside edge of the
.45 ACP cylinder was hitting a raised ridge left in the rear
bottom corner of the frame as shown in the above photo.
This ridge was obviously left over from the manufacturing
process.
Both of
my Vaqueros had this same ridge. I carefully filed off the
ridge with a safe-edge file until the corner was square and
the edges were flat. Now the cylinder fit into the frame
and rotated freely.
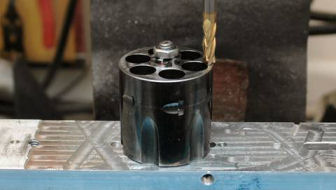
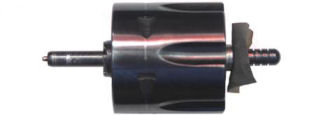
Milling
the Ratchet
The diameter of the ratchet for the .45 ACP cylinder
measured 0.611”, but the diameter of the ratchet for my
Vaqueros and new model Blackhawks measured 0.560”. Although
the cylinder functioned properly, and was timed properly, my
homemade free spin pawls no longer worked. (Refer to my
article
Making a Free Spin Pawl for a Ruger® Single-Action Revolver.)
The ratchet was so wide it was still engaging the top tooth
of the pawl.
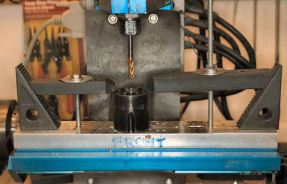
The front
pivot on the cylinder measured 0.435” wide by 0.095” high,
so I milled a 0.436” hole 0.100” deep in a piece of aluminum
I had set up and leveled for another project. I set the
cylinder in the hole with the ratchet facing up and secured
the cylinder in place. I carefully centered the mill and
milled the outside of the ratchet. I milled down 0.100”
because I didn’t want to touch the face of the cylinder.
This left a small raised ring of metal around the ratchet,
but this does not interfere with the cylinder. After the
milling was completed I cold-blued the exposed metal. The
cylinder now functioned perfectly just like my other
cylinders.
End Shake
Although
the cylinder now fit into the frame, there was a large gap
between the frame and the end of the cylinder. This is
called “end shake” and when it is pronounced like this will
cause the front of the cylinder to rub against the rear of
the barrel and possible misfires caused by the cylinder
moving away from the firing pin.
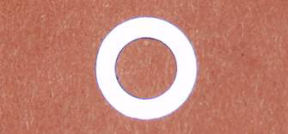
This gap
measured 0.030” so I fabricated an end shake shim to keep
the cylinder in position. I took a piece of 3/64” tool
steel and milled it down to 0.030”, then milled out the shim
with my hobby CNC mill. The center hole measured 0.270” and
the outside diameter was 0.436”. I polished the side of the
shim that rotated against the frame with 1,000-grit paper to
make it very smooth.
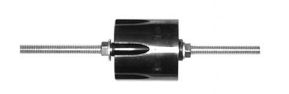
The end
shake shim fit perfectly; it allowed the cylinder to rotate
freely with just a hint of front-to-back movement. To
hold the new shim in place I used a toothpick to spread a
thin layer of superglue gel on the surface of the shim and
set it in place onto the front of the cylinder. I prefer
using the gel because it doesn’t run all over the place like
the liquid does. I
ran a piece of 1/4-20 threaded rod through the pivot hole
and snugged a 1/4“ washer and nut on each end. I left the
nuts and washers in place for 24 hours to allow the adhesive
to set up. Now I can install and remove the cylinder in the
frame without having to worry about losing the end shake
shim.
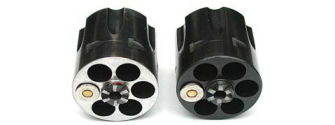
Summary
So now I have one Vaquero with an interchangeable .45 ACP
cylinder. The cylinder did require some minor fitting. I
really didn’t have to reduce the circumference of the
ratchet, it would have worked perfectly well in an
unmodified Vaquero, but it wouldn’t work with my homemade
free-spin pawls. I also didn’t have to fabricate the end
shake shim; Brownells sells a 10-pack of 0.0045” Single
Action Revolver Gas Ring Shims
#713-000-080 which I could have stacked to fit.
Now all I have to do is polish out and remove all the
pitting left from the rust and refinish the cylinder. This
will be another article.
Addendum
It wasn’t any more than a week after I published this
article that another Blackhawk .45 ACP cylinder appeared on
ebay. My friend Chili Ron was right; they do show up
regularly! This one fit in my second Vaquero almost
perfectly, and the blued finish was flawless with no rust.
Because it had been fired it had the drag ring around the
outside, but unlike the first cylinder this one had been
cleaned.
The
ratchet measured 0.577” and was just barely touching the top
tooth of my homemade free-spin pawl. I reduced the diameter
of the ratchet to 0.560” and cold blued it to match my other
cylinders.
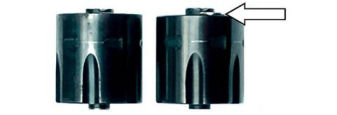
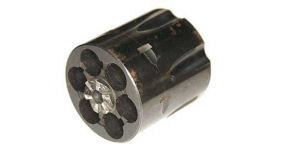
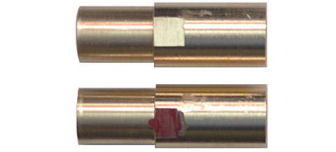
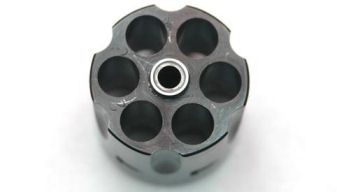
This
second cylinder was shorter than the first one; the rims of
the .45 ACP cartridges sat above the rear face of the
cylinder rather than flush like the first cylinder I
purchased. Both cylinders in the above photo have a
cartridge in one of the chambers, but the rim of the
cartridge is exposed in the right cylinder.
I drilled
and tapped a 1/4-20 hole in the center of the 0.436” hole I
milled in my jig. I mounted the first cylinder in that hole
with the ratchet up and secured it with a 1/4-20 rod and a
nut.
I milled
0.038” off the rear face of the first cylinder so the rims
of the cartridges would sit above the cylinder face like the
second cylinder. This left a lot of bare metal exposed but
I plan to refinish this cylinder anyway. I beveled the rear
edge of the cylinder, and chamfered the chambers to remove
the sharp edges left from the milling process. The raised
rims make it easier for the loading marshal to see an empty
chamber during a cowboy match. It is almost impossible to
see an empty chamber if the cartridge rim sits flush with
the rear face of the cylinder.
There was
a 0.014” end shake gap so I had to fabricate an end shake
shim like I did before. The shim I fabricated was just a
bit too thick so I polished it with 400-grit wet/dry sand
paper until the cylinder rotated freely. I again used
superglue gel to hold the shim in place.
I took an
electric engraver and engraved the last three digits of the
Vaquero’s serial number on the front face of each cylinder
similar to the way Ruger does at the factory so I can tell
which cylinder goes with which gun. Now both of my Vaqueros
have a .45 ACP conversion cylinder.
Addendum
02/19/2020
I have had some readers of The Kitchen Table Gunsmith tell
me that super glue is probably not the best method for
attaching an end shake washer to the cylinder. As it turns
out, they were right. The blast coming from the barrel to
cylinder gap caused the super glue to loosen, and when I
took the cylinder out for cleaning, I would have to chase
after that little washer. Loctite didn’t hold the washer
either.
There are
three schools of thought on how to fix end shake:
1.
Install
end shake washers like I did in the first place. This works
well for a double-action revolver because the washer is
captured, but not so well for a single-action revolver.
2.
Stretch
the gas ring. The gas ring is the front part of the
cylinder that sets against the frame. This can be stretched
to take up the cylinder to frame gap. This worked for one
of the cylinders, but not both.
3.
Install a
base pin bushing like a Colt Single Action Army. Now that I
have a lathe, I could mill out the center of the cylinder to
7/16” – the width of the gas ring – and fabricate a
stainless-steel bushing with an outside diameter of 7/16”
and an inside diameter of 1/4”. I did this for the other
cylinder.
Brownells sells a
Single Action Gas Ring Stretcher designed to work with
Ruger single-action revolvers. The instructions say to
stretch the gas ring 0.015” to 0.025” longer than required,
then polish the front of the gas ring with 320-grit paper
and the support tool to achieve the appropriate fit. My
wife bought me the gas ring stretcher for Christmas, so I
decided to use that method.
I turned
two brass pins that fit into a chamber. I discovered that
the stretching tool clamped the gas ring so tightly I
couldn’t turn the cylinder. The two brass pins allowed me
to use a metal bar to turn the cylinder.
I placed
the stretching tool in my vise with bronze jaws so I
wouldn’t damage the tool. I put painter’s tape on top of
the tool so I wouldn’t scratch the cylinder. I placed a
Ruger cylinder base pin through the base pin hole from the
bottom so it wouldn’t interfere with the bar. The base pin
prevented the hole from collapsing. The instructions said
to use the support pin in the base pin hole, but then I
couldn’t turn the cylinder with a tool. I lubricated the
gas ring, then set the cylinder so the ratchet was up, and
the gas ring was down in the tool.
I
tightened the vise until the stretching tool was tight
against the gas ring. I used an AR-15 tool between the pins
to turn the cylinder while pressing down to keep the
cylinder even. I tightened the vise and turned the cylinder
until the gas ring measured ~0.015” over my target length.
I used
220 and 320-grit polishing sticks to reduce the length of
the stretched gas ring, then final polished with a piece of
400-grit wet/dry sandpaper against the flat end of a
cylinder base pin. I polished and tried for fit frequently
until the cylinder fit into the frame. The diameter of the
base pin hole was reduced a bit at the gas ring, but I ran a
1/4” square end milling bit to open it up, then chamfered
the hole with a countersink bit. Now this cylinder fits
perfectly in my Vaquero and I don’t have to worry about
losing that pesky little end shake washer!
After
stretching and polishing, the gas ring looks like the above
photo. There is not as much bearing surface as factory, but
it should suffice. The stretching process left a sharp
outer edge on the gas ring, but the polishing made that edge
flat. That’s why the instructions say to stretch the gas
ring 0.015” – 0.025” over the required length so the sharp
edge can be polished flat.
I
couldn’t use the stretcher on the cylinder with the shorter
gas ring because the gas ring kept coming out of the tool.
So, I decided to try the bushing method. I chucked the
cylinder in the 4-jaw chuck of my lathe and made sure it was
perfectly centered and flat. I used a 7/16” square end mill
to mill out the center of the cylinder toa depth of 1/2”. I
then turned a piece of stainless-steel to fit into the
hole. I first drilled a 1/4” hole in the center of the
bushing, then reduced the diameter until it fit into the
hole in the cylinder. I measured the length of the .45 Colt
cylinder that came with the gun, then faced off the bushing
until the overall length of the cylinder and bushing matched
the .45 Colt cylinder.
I cleaned
the bushing and bushing hole with acetone, then installed
the bushing with Loctite 609. Once the 609 cured I had a
permanent bushing that won’t come out.
So
now my two conversion cylinders fit their respective
Vaqueros perfectly with no end shake, and I don’t have to
chase after those little washers every time I disassemble
the revolver for cleaning. |