Disassembling the Winchester/Rossi 92
by
Roy
Seifert
Click
here to purchase a CD with this and all Kitchen Table Gunsmith
Articles.
Disclaimer:
This article is for entertainment only and is not to
be used in lieu of a qualified gunsmith.
Please defer all firearms work to a qualified
gunsmith. Any loads
mentioned in this article are my loads for my guns and have
been carefully worked up using established guidelines and
special tools. The
author assumes no responsibility or liability for use of
these loads, or use or misuse of this article.
Please note that I am not a professional gunsmith,
just a shooting enthusiast and hobbyist, as well as a
tinkerer. This
article explains work that I performed to my guns without
the assistance of a qualified gunsmith.
Some procedures described in this article require
special tools and cannot/should not be performed without
them.
Warning:
Disassembling and tinkering with your firearm may
void the warranty. I
claim no responsibility for use or misuse of this article.
Again, this article is for entertainment purposes
only!
Tools
and firearms are the trademark/service mark or registered trademark
of their respective manufacturers.


1.
Unscrew the tang screw and remove the butt
stock.
2.
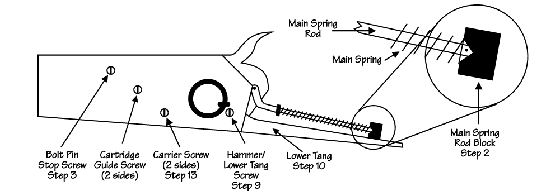
Slowly pull back the hammer until the small hole
in the main spring rod is visible in the ‘V’ of the main
spring rod block. Insert
a pin or needle into the hole to retain the main spring.
3.
Remove the bolt pin stop screw.
4.
Drive out the bolt pin from the right side.
5.
Swing down the lever and open the bolt. Be careful not to lose
the ejector, ejector spring, and ejector collar.
These will protrude from the front of the bolt
assembly.
6.
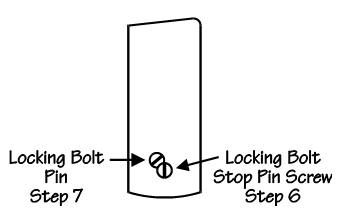
Remove the locking bolt stop pin screw from the
left locking bolt.
7.
Remove the locking bolt pin.
8.
Remove the lever.
9.
Remove the hammer/lower tang screw.
10.
Place your index finger on the rear of the lower
tang. Compress the
trigger with your thumb, and remove the lower tang by pulling
straight back from the receiver.
11.
Remove the hammer assembly.
12.
Remove the bolt assembly.
13.
Remove the ejector, ejector spring, and ejector
collar from the front of the bolt.
14.
Remove the two carrier screws and remove the
carrier.
15.
Reassemble in the reverse order.
Assembling the bolt, ejector, and lever is tricky.
Proceed as follows:
15.1.
Insert the assembled ejector, ejector spring,
and ejector collar into the front of the bolt.
15.2.
Insert the bolt half-way into the receiver.
15.3.
Insert the lever into the bolt.
15.4.
Ensure the ejector is aligned properly in the
bolt, then close the bolt with your thumb pressing the back of
the bolt.
15.5.
Press forward on the lever to seat it completely
into the receiver.
15.6.
Insert one of the locking bolts from the top of
the receiver to hold the bolt closed.
15.7.
Align the holes in the bolt and lever with the
pin hole in the receiver, and insert the bolt pin.
|