Improving the FEG PA63 Trigger
by Roy Seifert
Click here to purchase a
CD with this and all Kitchen Table Gunsmith Articles.
Disclaimer:
This article is for entertainment only and is not to
be used in lieu of a qualified gunsmith.
Please defer all firearms work to a qualified
gunsmith. Any loads
mentioned in this article are my loads for my guns and have
been carefully worked up using established guidelines and
special tools. The
author assumes no responsibility or liability for use of
these loads, or use or misuse of this article.
Please note that I am not a professional gunsmith,
just a shooting enthusiast and hobbyist, as well as a
tinkerer. This
article explains work that I performed to my guns without
the assistance of a qualified gunsmith.
Some procedures described in this article require
special tools and cannot/should not be performed without
them.
Warning:
Disassembling and tinkering with your firearm may
void the warranty. I
claim no responsibility for use or misuse of this article.
Again, this article is for entertainment purposes
only!
Tools
and firearms are the trademark/service mark or registered trademark
of their respective manufacturers. All tools were
purchased from Brownells
unless otherwise indicated.
Introduction
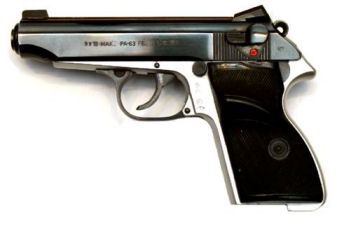
My Hungarian-made FEG PA63 in 9mm Makarov caliber is my
summertime everyday carry (EDC) gun. It is small,
lightweight, easy to conceal and carry, and packs a bit more
punch than the .380 Auto (9mm Kurz). Hornady makes their
Critical Defense cartridge in 9mm Makarov which is my chosen
defense cartridge for this gun. I have two articles on
improving the PA63 and correcting ammo feeding problems
(refer to my articles
Improving the FEG PA63 9x18 Makarov and
PA-63Feeding Problems.) Now it’s time to continue
the improvements and do a little trigger work.
I
significantly lightened the double-action trigger pull by
installing a 19-pound Walther PP hammer spring. Wolff
Gunsprings is now selling hammer and recoil spring packs for
the FEG PA63 9x18 Makarov only. These are available
directly from Wolff
https://www.gunsprings.com/FEG/PA-63/cID1/mID20/dID103
but are
also available from MidwayUSA.com.
https://www.midwayusa.com/product/1004183399?pid=437714.
I haven’t
tested these springs, but I believe the PA63 9mm Makarov
would need the lighter hammer spring and heavier recoil
spring as I installed in my own pistol.
WARNING: These Wolff PA63 spring kits are only for the 9x18 Makarov
caliber, NOT the .380 Auto caliber.
Disassembly
The PA63
is an exact copy of the Walther PP so I referred to books
and YouTube videos on how to disassemble the Walther PP.
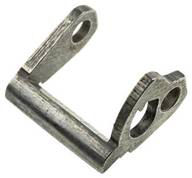
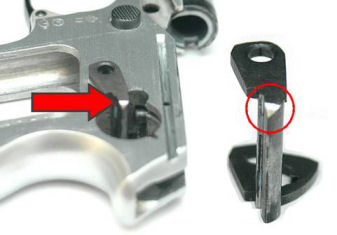
The most difficult part to remove was the pesky U-shaped
sear or cocking lever/cocking piece as it is called in the
schematics. This is where most of the work needs to be
performed, so it must be removed from the frame. There are
some things you need to be careful of during disassembly:
1.
The
ejector has a small spring on top that sits in a groove in
the frame. Use a small, thin, flat-blade screwdriver to
depress the spring and lever it out of the frame. Now you
can pull the ejector from the frame. Don’t lose the spring!
2.
Remove
the trigger pivot pin first before removing the trigger bar.
3.
The
cocking piece is probably the most difficult to remove; at
least it was on my PA63. Here’s the trick:
a.
Knock off
the left rear corner of the cocking piece. I used a fine
sanding drum on my Dremel tool while the piece was in the
gun. This makes it easier to remove.
b.
Remove
the two pivot pins from either side of the cocking piece.
c.
Rotate
the cocking piece so the left side falls inside the hammer
pin opening.
d.
Looking
at the right side of the frame, position the cocking piece
so it is at the bottom of the kidney-shaped cut in the
frame.
e.
Rotate
the cocking piece to the left and up so the left leg clears
the kidney-shaped cut and you can remove the cocking piece
from the frame. Knocking off the corner should make this
easy.
Springs
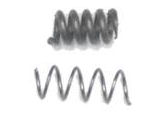
If your
gun is like mine, it was probably built with a truck
suspension spring installed in the magazine release. I
replaced it with a 1/4” length of 0.118 diameter spring from
Brownells spring kit #69
025-069-000. I used a Cratex tip to polish the inside
of the magazine release hole in the frame. I applied SFL-0
grease to the outside of the magazine release, then
reinstalled it in the frame with the lighter spring. This
made the magazine release easier to manipulate, but still
held a magazine in place.
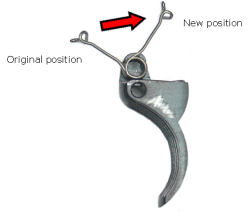
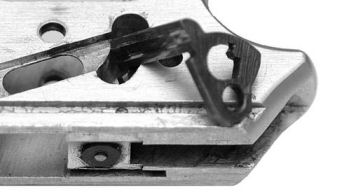
To
reduce the trigger pull I bent the trigger return spring
90-degrees to the rear of the trigger as shown in the above
photo. Don’t go too far or the trigger will not return
properly, and the trigger bar/disconnector will not
function. My trigger return spring required that I move it
90-degrees. Yours may require less, but it should be bent
to the final position shown above. The shiny area on the
left side of the trigger was caused by a burr in the frame.
I took a flat jeweler’s file and removed the burr. The burr
was causing the trigger to drag which affects the trigger
pull.
Sear Work
Makarov.com has a write-up on how to perform a trigger job
on the PA63, which was my primary source; here is the link:
http://makarov.com/tech.html.
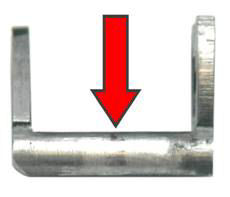 
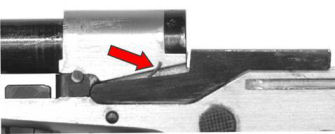
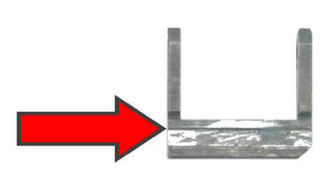
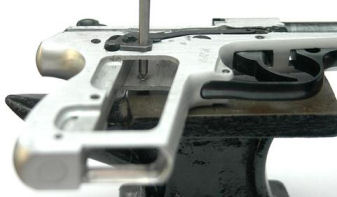
You
should see a wear mark on the top of the cocking piece (left
arrow above). This is where the hammer dog rides in
double-action mode. This area and the underside of the
hammer dog need to be polished. Use a ceramic stick or fine
Arkansas stone.
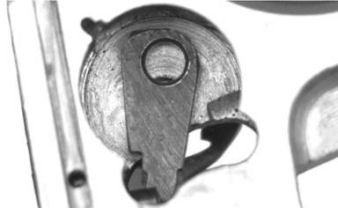
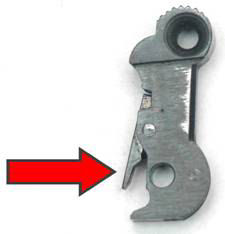
On the
underside of the cocking piece is the single-action sear
ledge. I first polished this ledge with a fine ceramic
stone. The stone is square so I would not change the
angle. The ledge on my pistol measured 0.038-inches, which
is why the single-action trigger pull had so much creep. I
stoned the top of the ledge to reduce it to 0.020-inches.
I
reassembled the pistol using SFL-0 grease on the magazine
release, cocking piece single and double-action sears, and
on the slide rails. I lubricated all pins with FG 68 oil
(refer to my article
The Search for the Perfect Firearms Lubricants), and
wiped down the gun with a gun rag impregnated with FG 68
oil.
Results
The single-action trigger breaks at 3-lbs, 10-oz., and the
double-action trigger breaks at 9-lbs, 13-oz. The
double-action trigger pull is very smooth, but the
single-action still has a bit of creep which means the sear
ledge could be reduced a bit farther, but I think I’ll leave
it alone. The magazine drops with a firm, but not heavy
press of the magazine release. Overall, I am pleased with
the continued improvements to my FEG PA-63 9mm Makarov
pistol.
A word of
caution here; you may have an original PP, PPK or PPKS or a
clone built by any one of several manufacturers. Some of
the springs and parts pictured here for my FEG PA63 may be a
bit different for your gun so work slowly and carefully.
Addendum
9/27/19

I wanted
to try fabricating new sear rivets (cocking piece pivot
pins) as suggested by the Makarov.com article. My pins fit
loosely in the frame and would fall out without spring
pressure on the cocking piece. Don’t ask me how much
swearing I did during reassembly each time a pin fell out,
rolled off my worktable, and fell onto the floor!
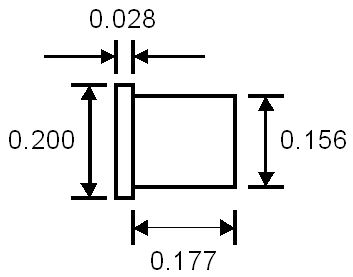
I
carefully measured the existing pins, the holes in the
cocking piece, and the holes in the frame. I wanted the
pins to fit snuggly in the frame but not require that they
be press-fit, and still have the cocking piece rotate
freely. After measuring, the new pins would have the
dimensions shown above. I took a piece of 1/4“ round steel
stock and turned the two pins on my lathe. I cleaned and
cold-blued the pins with Brownell’s
Oxpho-Blue.
Because
the hole in the frame was the same size as the hole in the
cocking piece, I couldn’t get a snug fit in the frame. So,
I used a trick I learned working on 1911 hammer pins.

I took
the large taper alignment pin from the alignment pin set I
purchased from Brownells
#080-645-000, chucked it in my drill, and turned the end
against a rotating cutoff wheel in my Dremel tool until the
end came to a point.
I
installed one pin through the cocking piece and into the
frame and set the head of the pin on a steel surface; I used
a small anvil, but a vise jaw will work. I put the
sharpened alignment pin through the hole in the other side
of the frame to punch the center of the installed pin. This
spread the pin so it would fit tightly in the frame, but the
cocking piece still rotated freely. I removed that pin with
a punch, then staked the other pin in place, then installed
the first pin. Now both pins fit snuggly into the frame,
but the cocking piece still rotates freely.
Staking the pins changed the amount of take-up in the
double-action trigger, but did not change the trigger pull
weight. At least those pins won’t fall out during
disassembly/reassembly anymore!
|