Improving the Kel-Tec Sub 2000 Trigger
by Roy Seifert
Click here to purchase a
CD with this and all Kitchen Table Gunsmith Articles.
Disclaimer:
This article is for entertainment only and is not to
be used in lieu of a qualified gunsmith.
Please defer all firearms work to a qualified
gunsmith. Any loads
mentioned in this article are my loads for my guns and have
been carefully worked up using established guidelines and
special tools. The
author assumes no responsibility or liability for use of
these loads, or use or misuse of this article.
Please note that I am not a professional gunsmith,
just a shooting enthusiast and hobbyist, as well as a
tinkerer. This
article explains work that I performed to my guns without
the assistance of a qualified gunsmith.
Some procedures described in this article require
special tools and cannot/should not be performed without
them.
Warning:
Disassembling and tinkering with your firearm may
void the warranty. I
claim no responsibility for use or misuse of this article.
Again, this article is for entertainment purposes
only!
Tools
and firearms are the trademark/service mark or registered trademark
of their respective manufacturers.
Kel-Tec
makes a very innovative rifle called the Sub 2000.
This carbine-style rifle folds in half for easy
transport and takes the same magazines as your favorite
pistol. However,
this little rifle requires some minor work to improve its
overall function.
Disassembly
I first make sure the rifle is unloaded and no magazine is
installed. Then I
disassemble the rifle according to my article Kel-Tec
SU 2000 Disassembly.
Relieving
the Magazine Well
My Sub 2k takes Beretta magazines because I have a Beretta
92FS, but both the factory Beretta and after-market magazines
fit very tightly. I
relieved the magazine well on both receiver halves as follows:
I completely disassembled the rifle, then wrapped a piece of
400-grit wet/dry paper around a magazine. I carefully
sanded the rails inside the magazine well on each side of the
receiver. I put
the receiver halves together with the screws and magazine
catch to test for functioning. I
also beveled the edge of each magazine where it met the
magazine catch.
Working
the Hammer and Sear
Caution: This
procedure requires special tools.
Unless you are familiar with working with hammers and
sears, please do not attempt these procedures.
Required
Tools
Please do not attempt to cut/polish the hammer and sear mating
surfaces without the correct tools.
Without the correct tools you could round the surfaces
making them unsafe and/or inoperable.
I used the following tools to modify the hammer and
sear.
As
mentioned on the KTOG bulletin board ( http://www.ktog.org
) the sear of the Sub2k rifle is set at a positive angle, i.e.
when the sear moves forward it actually has to force the
hammer up against the hammer spring.
This is one reason for the very heavy trigger pull.
Also, the sear-to-hammer mating surface is about
.060” deep. In
this procedure I will zero the sear angle and reduce the
amount of sear-to-hammer mating surface.
Please be aware that the only way to change the angle
of the hammer and sear mating surfaces is with the proper
tools. Ok, enough
harping!
Hammer/Sear
Basics
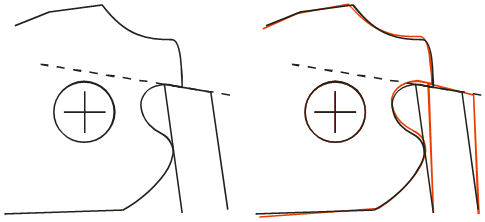
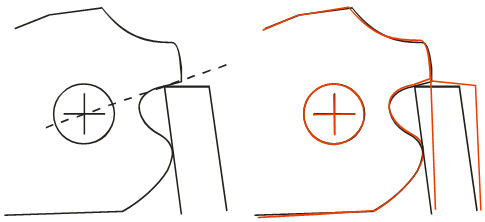
How
the hammer and sear mate is critical to firearm safety, and
directly affects trigger pull.
The above figure shows a hammer and sear with a
positive engagement angle.
(The angle in these diagrams has been exaggerated for
clarity.) The
angle is in front of the hammer pivot point.
When the sear rotates toward let off, it pushes the
hammer up against the hammer spring making the trigger pull
heavy, but very safe; the hammer cannot accidentally fall off
the trigger.
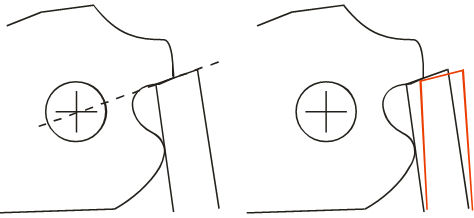
If
the sear angle is in line with the hammer pivot point, this is
a sear angle of 0o as shown in the above figure.
Notice that when the sear rotates, the hammer stays in
place. This makes
for a light, smooth trigger pull.
The depth of the sear engagement controls creep and
let-off. The
deeper the sear engagement, the more drag or “creep” in
the trigger because it takes longer for the hammer to release.
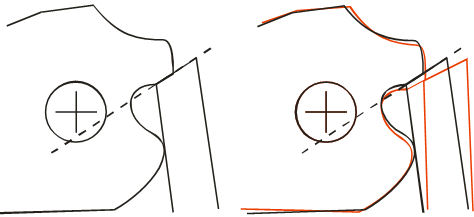
If
the sear angle is behind the pivot point, this is a negative
engagement angle, as shown in the above figure.
This results in a very light trigger, but it can be
unsafe as jarring the firearm could cause the hammer to slip
off of the sear. The
pressure of the hammer pressing against the sear could cause
the sear to move forward releasing the hammer.
It
seems that the Kel-Tec Sub 2000 hammer is at 0o but
the sear is not. This
still causes some hammer push through, causing a heavy
trigger. However,
there are enough manufacturing variations that you need to
check each individual hammer and sear.
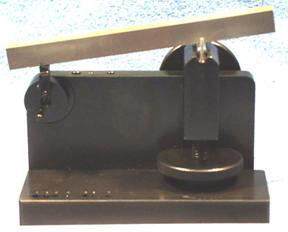
Measuring
Angle of Hammer Mating Surface
I
set the hammer on top of a straight edge so the mating surface
was parallel with the edge.
If the straight edge bisected the middle of the hammer
pivot hole, the angle was already set to 0o.
If the hammer was not already at 0o then I
would have to correct it first before working on the sear.
Setting
Sear Angle to 0o
This procedure requires the Power Custom Series I stoning
fixture with MKII adapter.
As mentioned before, the sear is cut at a positive
angle causing hammer push through.
I verified this by assembling the hammer bushing,
hammer, and sear into the left receiver half.
While looking through the safety hole and putting
pressure on the hammer with my right index finger, I rotated
the sear away from the hammer and felt for hammer movement.
I needed to adjust the sear until it did not push the
hammer against my finger.
I performed these steps only after verifying that the
hammer angle was 0o.
I
installed the MKII adapter on the Power Custom Series I
stoning fixture and align the 0o mark to the line
as described in the fixture instructions.
Then I set the stone guide elevator until the stone was
perfectly flat with the mating surface as described in the
fixture instructions. If
there was no hammer push through, I polished the sear with the
coarse then fine stones.
If
there was hammer push through I marked the sear mating surface
with marking fluid. I
then moved the elevator up 4 clicks (1 click is about 1/2o).
I used a square, coarse stone or coarse ceramic stick
and stoned the sear surface until enough smooth surface was
showing that will be engaged by the hammer mating surface.
I tested hammer/sear function again looking to remove
any hammer push-through. I
repeated the adjust and polish steps until there was no hammer
push through then final polished with a square, fine stone or
fine ceramic stick.
Hammer
This procedure required the Power Custom Series II stoning
fixture with universal adapter.
When performing this process, I frequently checked for
fit by installing the hammer, hammer bushing, and sear into
the left receiver half with no springs.
I visually checked the hammer and sear mating surfaces
by looking through the safety hole in the left receiver half.
Before working on the hammer I needed to modify the
Series II stoning fixture and universal adapter.
Modify
the Series II Stoning Fixture
In order for the Series II stoning fixture to work with the
Kel-Tec Sub 2000 hammer, it must be modified by drilling and
tapping a third mounting hole so the stoning guide can be
moved farther to the right.
I
first moved the stoning guide to the existing far outside hole
and locked it in the far right position using the ¼ x 20 hex
screw. I drilled a
13/64” hole into the upright at the far right side of the
stoning guide adjustment hole.
After I removed the stoning guide I tapped the new hole
with a ¼ x 20 tap. I
set and locked the stoning guide onto the stoning fixture
using this new hole.
I
installed the universal adapter onto the fixture and used a
high-speed rotary tool with a cutoff wheel to cut a slot in
the adapter mounting screw.
This will facilitate adjusting the adapter.
Modifying
the Universal Adapter
The universal adapter that comes with the Series II stoning
fixture needs to be modified to work with the Kel-Tec Sub 2000
hammer.
I
ground the shorter, round radius flat so there was enough
metal left for the small set screw to function.
This was necessary so the stone did not interfere with
the adapter when working the hammer mating surface.
With
the B side facing me and the ground edge at the top, I
installed a .125 pin into the top hole, then installed the
hammer onto this pin so the mating surface was on the right.
I then installed a .187 pin into the larger hole to the
right of the hammer and allowed the hammer to rest against
this pin.
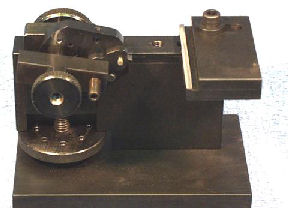
I
installed the adapter onto the stoning fixture so that the
ground edge of the adapter was to the right, then installed
the clamp block so the hammer did not rotate.
The
coarse and fine stones I purchased from Brownells especially
for this jig were different widths so I had to adjust the
stoning guide so both would fit.
I decided to drill a .094 hole in the adapter in line
with the alignment mark. This
will allowed me to duplicate the setup if I wanted to work on
another Kel-Tec Sub 2000 hammer.
Setting
Hammer Angle to 0o
I measured the hammer angle as described before.
If the straight edge bisected the middle of the hammer
pivot hole, the angle was already set to 0o.
I
set the elevator up 52 clicks from the bottom and adjusted the
jig so that the fine stone was perfectly flat against the
hammer mating surface as described in the instructions.
This was the reference point.
If
the hammer was already set to 0o I used the fine
stone to polish the mating surface.
If the hammer angle needed to be adjusted, I moved the
elevator up or down accordingly.
3 clicks is about 1o of change.
I used the
India
stone to cut the new mating surface and again used a
straight edge to check for an angle of 0o.
Once I achieved 0o I polished with the hard
Arkansas stone.
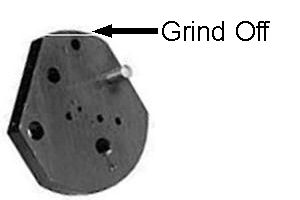
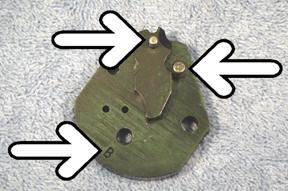
Reduce
Hammer Mating Surface
From the factory, the hammer mating surface is about 0.060”.
I wanted to reduce it to 0.020” - 0.030”.
This won’t lighten the trigger pull, but it will make
it crisp.
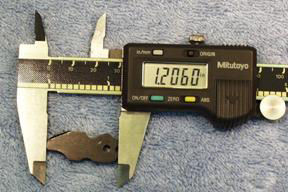
Using
a caliper I measured from the front of the mating surface to
the top of the hammer. It
should be approximately 1.247”.
I wanted to remove .030” - .040” so the result
should be between 1.207 - 1.217”.
Using
a high-speed rotary tool with a cutoff wheel I carefully
removed metal from the front of the sear mating surface.
I checked frequently for fit.
I made sure to leave enough metal so the sear would
positively and safely catch the hammer.
I stopped removing metal when the measurement was
reduced to 1.206”. I
then beveled the edges of the hammer mating surface to reduce
the width. This
will result in a crisp trigger pull.
I
installed the hammer onto the Series I 10/22 adapter and
installed the 10/22 adapter on the Power Custom Series I
stoning fixture so that the front of the sear mating surface
was on top. I
stoned the front of the sear mating surface so that it was
square. I was sure
to maintain a round radius.
I then carefully stoned the front edge of the sear
mating surface to break the burr raised by the grinding.
I lubricated the hammer and sear mating surfaces with
good quality gun oil.
I
reassemble the rifle and tested for functioning.
My rifle now has a safe, crisp, smooth trigger pull
that breaks at 6 pounds. This
is very acceptable for this type of rifle.
Addendum 2017
There is a company called
M.CARBO that is manufacturing after-market parts for the
Sub 2000 such as spring and trigger kits. If you don't
have the jigs and don't want to do the work yourself, click
on the link above and check them out.
|
