Making
a Homemade Anti-Cant Device
by Roy Seifert
Click here to purchase a
CD with this and all Kitchen Table Gunsmith Articles.
Disclaimer:
This article is for entertainment only and is not to
be used in lieu of a qualified gunsmith.
Please defer all firearms work to a qualified
gunsmith. Any loads
mentioned in this article are my loads for my guns and have
been carefully worked up using established guidelines and
special tools. The
author assumes no responsibility or liability for use of
these loads, or use or misuse of this article.
Please note that I am not a professional gunsmith,
just a shooting enthusiast and hobbyist, as well as a
tinkerer. This
article explains work that I performed to my guns without
the assistance of a qualified gunsmith.
Some procedures described in this article require
special tools and cannot/should not be performed without
them.
Warning:
Disassembling and tinkering with your firearm may
void the warranty. I
claim no responsibility for use or misuse of this article.
Again, this article is for entertainment purposes
only!
Tools
and firearms are the trademark/service mark or registered trademark
of their respective manufacturers.
I recently built a custom
varmint/target rifle in .22-250 Ackley Improved.
It has a 27-inch barrel with a 1 in 8” twist.
I plan to shoot 80-grain bullets because I want to get
some extended distances out to 1,000 yards.
To get this type of accuracy consistently, it is
important that the rifle be perfectly level.
A canted rifle dramatically affects accuracy.
Refer to the excellent article on the Recreational
Shooting, Inc. website.
So, I needed to find a way to keep my rifle level shot
to shot.
There are many types of
anti-cant devices available; most of which consist of a spirit
level on a mount. Rather
than pay the $30+ for one I decided to make my own.
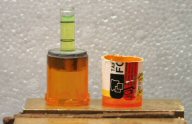
I found an empty prescription bottle that fit snuggly
onto the scope adjustment knob caps.
I cut the bottle leaving enough room for a wooden plug.
I cut a piece of one-inch dowel 1/2-inch long, then
filed some notches around the edge with a jeweler’s round
file. These
notches provide better grip for the epoxy.
I spread a thin film of epoxy
around the inside top of the bottle, then pushed the notched
dowel into the bottle. I
set the bottle onto the scope cap so the plug was bottomed
onto the top of the cap. I
also spread a thin layer of epoxy on the top of the wood to
act as a filler.

I purchased a cheap sprit level from the hardware store
and removed the vials. After
the epoxy dried, I drilled a 3/8-inch hole in the center of
the plug and epoxied a vial into the hole.
I made sure the vial was level by comparing it to a
receiver level.
 After
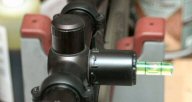
the epoxy cured, I painted the assembly flat black.
Now I have a portable anti-cant device that I can
install or remove easily. After
the epoxy cured, I painted the assembly flat black.
Now I have a portable anti-cant device that I can
install or remove easily.
|