These
instructions came from a number of cowboy shooters including
Blackhills Blackie, Eight Bits (me), Calaveras and Jess
Money; my thanks to them for their work and willingness to
share. My comments are in red.
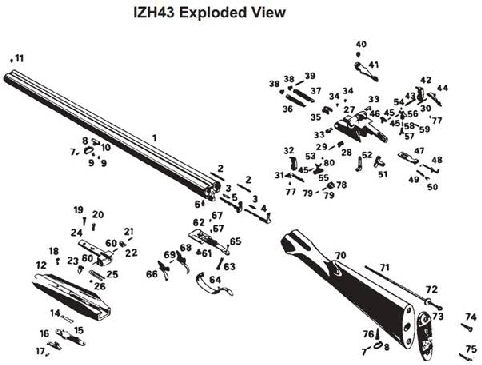
This is a rewrite of my original article; but this time I
have included photos and a schematic with parts list.
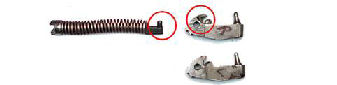
Since I took the photos after I completed the work the
springs in the photos are not the original springs. Much
of what is written here came from two sources on the
Internet:
http://marauder.homestead.com/files/TuneBaik.html
http://www.hobbygunsmith.com/Archives/Nov03/Scattergun.htm
Introduction by Jess Money
Before you even attempt to work on the internals of this
firearm, imagine this shotgun as two separate guns having
one butt stock and one fore end; because that's basically
what you're getting ready to find.
There is
a left side and there is a right side and even though in
appearance the hammers, sears, cocking rods and cocking cams
look alike, they each fit one side of the receiver only.
The exception could be the cams themselves, especially if
someone has modified them previously. Even more reason to
put them back on the side they came from.
First
off, set up your work area for a "receiver left side”
component section and the same for a "receiver right side"
component section. This is a good idea if you're taking the
receiver apart for the first time or the umpteenth time.
The parts look almost identical and you want to put parts
back in the same way they came out. Keep your work area
clean. It will become cluttered soon enough so anything
unnecessary will be in your way. Put your soft drink or
coffee in a separate area. You don't want to spill liquid
here.
(I clean the plastic containers Chinese soup and foods come in and
use them for gun parts when working on guns. Or you can
purchase some plastic containers with lids from the grocery
store.)
The
Tuning Process by Blackhills Blackie
1)
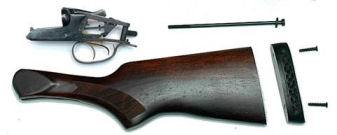
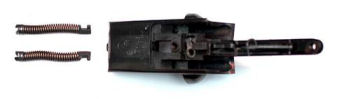
The first
thing you need to do is remove the barrels, stocks, and
trigger guard. Take off the butt pad. There is a hole in
the rear of the stock and a screw at the bottom of that
hole. This screw holds the stock in place. Remove it and
pull the stock free from the receiver.
2)
To remove
the trigger guard, remove the trigger guard screw located at
the rear of the trigger guard. Rotate the trigger guard
counter clockwise until it comes off.
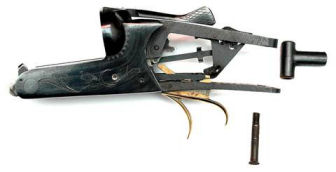
3)
Remove
the screw that holds the threaded connector (stock mount
“T”) and remove the threaded connector.
(This threaded connector only goes
on one way. I put the screw back in the hole to help me
remember the correct orientation.)
4)
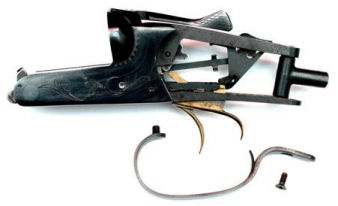
Next
remove the screw at the bottom of the receiver that holds
the bottom plate in place. This can be tight, so use a well
fitting screw driver. (I placed the
received in a padded vice and had to use an impact driver to
remove the screw the first time. The second time I removed
the screw I used a socket wrench.) Lift the bottom
plate loose from the receiver. You may have to gently pry
this part away from the receiver.
(Be careful not to lose the sear springs.)

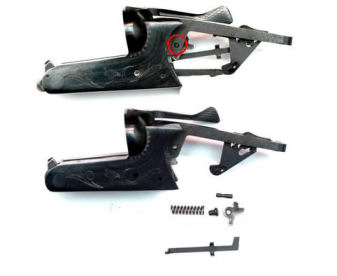
5)
There is
a pin that passes through the sears from one side of the
receiver to the other. Tap this out with a punch and
hammer. Remove the sears and the two sear springs.
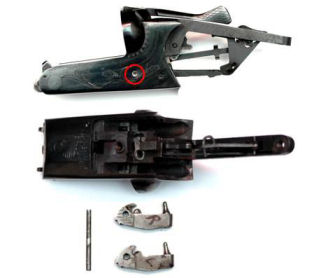
6)
There is
another pin that holds the hammers in the same fashion.
This needs to be removed so the hammers can be taken out.
(Do not touch the rebound springs
embedded in the hammers! Pay attention to which hammer is
left and which is right. I marked mine as you can see in
the above photo.)
7)
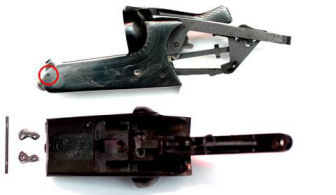
On the
front of the receiver, there are two cams that do the
cocking when you open the action. These are held in place
by another cross pin. Remove this pin and the cams.
8)
After
this is done, you can remove the hammer spring assemblies by
pulling them out through the holes in the front of the
receiver. (Pay attention to the
orientation of each assembly and note which is left and
which is right.)
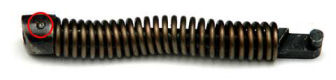
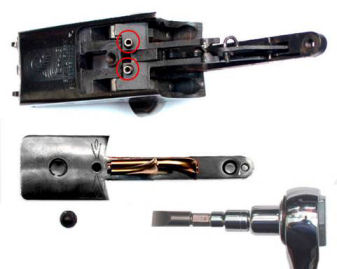
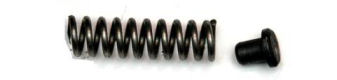
9)
To change
the springs, you will need to compress them while you tap
out the pin that holds the cap onto the end of the spring
shaft. Wrap a rag around them so they don't go flying. I
sacrificed a kitchen fork to use as a tool to compress the
springs. (don't tell my wife) (I
didn’t plan on saving the springs so I used a Dremel tool
with a cutoff wheel and cut through them. This made
removing the pin much easier.)

10)
(Use stock Ruger Vaquero hammer
springs and see if the barrels stay open. If not cut
1/2 coil at a time until they will stay open. This is
a trial and error process.) They may look a little wobbly, but stuff
them into the cleaned out/polished bores.
(To make reassembly easier, I ran a 1/16” drill bit through
the holes in the rod and end cap, just to ream out the
burrs. The pin slid back in with only finger pressure.)
11)
To change
the release lever spring, remove the lever by tapping the
pin out that holds the little block inside the receiver that
the lever actuates. (The automatic
safety connecting rod should now fall out. Leave it out if
you want to disable the automatic safety.) I used a
hammer spring (main spring) from a 1911 semi auto that was
cut to the same length as the Baikal spring. Smooth the cut
end with a file.
(If the release lever won’t function with the 1911 spring, proceed as
follows:)
a)
Remove the locking lever screw from the top of the lever.
b)
Use a punch to drive out the locking bolt lever, then remove the
locking lever.
c)
Remove the safety mechanism by removing the two pins, one in the
receiver, and one through the thumb piece. Be careful not
to lose the detent ball and spring.
d)
Remove the locking bar.
e)
Polish the top, bottom, and sides of the locking bar, and its groove
in the receiver. Be sure it slides freely in the groove.
f)
Polish the locking bolt lever and its bore in the receiver. It
should rotate freely.
g)
Remove burrs and polish the bottom, and round front of the release
lever. It should rotate freely.
h)
The cam of the locking bar lever rides in a cut in the locking bar.
All mating surfaces need to be polished and any burrs
removed. This was why mine wouldn’t work with the 1911
spring.
i)
Reassemble the locking bar, safety mechanism, locking bar lever,
locking lever and screw. The head of the release lever
screw is milled at an angle to match the angle of the
release lever. Tighten the screw until the head is flush
with the top of the release lever. Tightening the screw
will press the release lever onto the locking bolt lever.
Do NOT over-tighten this screw or the release lever will
bind against the receiver.
12)
Now would
be the time to remove the safety connecting rod if you want
to disable the automatic safety. The safety will still
function but it has to be activated manually. This part
should have fallen out when performing the prior step.
13)
While the
gun is apart, you should take the opportunity to sand and
polish all internal parts until they all move freely. If
you skip this step, you could have parts that stick because
of the lighter springs. I used 600 grit emery cloth and
oil. It does a nice job and doesn't remove much metal.
After all
this is done, you won't believe the difference in the gun.
It will open easily, stay open for faster reloads, and have
a lighter trigger pull. Take your time and try not to get
frustrated. It took me several times disassembling and
reassembling my gun to get it the way I wanted it. What I
have listed here is the result of this. Let me know if
there is anything else I can do.
Blackhills Blackie
1.
The
safety can be converted so it is a manual safety instead of
an automatic safety. It will still work, but only when you
put it on "safe" intentionally. When you take it apart, you
will see a lever that actuates the safety when you open the
action. You can remove this lever and the safety will come
on when you put it on, and stay off when you switch it off
like your rifle.
2.
The stock
springs cause the barrels to want to close part way when you
open it up. Pushing to the left on the lever keeps it
open. After you replace the springs with the lighter ones,
you won't have to do this.
3.
You're
right about the gun being dirty inside. Mine was. Besides
grease, there was saw dust and other stuff in there.
(The ones I’ve worked on were
clean. Better quality control?)
4.
Brownell's sells a mercury-filled tube that you can install
in the stock. It is supposed to reduce recoil
significantly. I haven't tried one, but I'm planning on
getting one. My wife is going to start shooting the cowboy
matches with me and I don't want her to have to deal with
the kick of this thing the way it is.
5.
As for
light recoil shells, Winchester makes a light recoil 12
gauge shell. They are called "Low Recoil, Low Noise Target
Load". The part number on the box is AA12FL8. They are
commonly called "Feather Lights", but I didn't think this is
their actual name. Cheaper Than Dirt seems to have the best
price on these.
6.
The
chambers on my gun didn't really need honing. The shells
dropped out the first time I used it. But I did polish them
a little. I took a bore mop and rubbed some automotive
polishing compound on it, chucked it up in a drill, and ran
it in and out of the chambers for a while. I just can't
leave things alone. I also use silicone spay lubricant in
the chambers before each shoot. The shells fall out.
Comments
from Calaveras
Now here are some things I ran into. First, the stock
retaining screw was seriously tight. It's slotted, so I
found a long-shank screwdriver that fit that had a hex at
the top of the shank (snap on). I put the stock in a vice
padded well and pushed hard while turning the wrench. It
broke loose. I believe the wood had swelled and had that
screw at about 100 lbs of torque. If this hadn't worked I
was prepared to rig up a hand impact driver that I could hit
with a hammer.
I had no
problem driving the pins out for the cocking cams, triggers
and sears. Observe closely, the way they came apart, mark
them if you have to. When I was reassembling, I had to
refer to the manual that came with it a couple of times. I
had the barrel upside down that the stock retaining screw
goes into and couldn't get the stock to go on all the way.
I used
600 grit emery cloth and oil and slicked up the sides of the
hammers, sears, triggers and the cam that the release lever
uses to move the locks. I cleaned and inspected as I went.
The 1911 hammer spring worked neat. What I did was take the
pin from the cam and just took the stock spring out and cut
the same length of the 1911 spring. I have enough spring
left over to do about two more levers. There is no need to
remove the lever or anything.
The
cocking springs are the reason, the foul thing wouldn't open
far enough. You can hold them in a vice and either vice
grip or use a fork to compress the springs. The pin pushes
out with a nail. I didn't even have to drive it. When you
get the vaquero springs, cut them 1/4 longer (2 1/2“ in
length) than the Baikal springs. I then took needle nose
pliers and bent the end coil to the next one and closed the
diameter a bit to keep it close to the shaft at the hammer
end and filed it flat. I found that the vaquero springs are
easy to put together and pin the caps. I used a kitchen
fork and no problem. I got a little excited when I put the
setup in the bore; it felt like it was going to be too big.
Not so, once I got it seated it was fine. Make sure you
have left and right in the proper side.
I went
ahead and polished the receiver at the cocking spring where
the barrel hinges. I don't know if I needed to, but it was
rough, so I went ahead and did it.
Now for
my barrels, I removed the screw that retains the extractor
and found that I could not even pull it out with my
fingers. I inspected it and found the guide pin bent and I
straightened it, but it was still seriously tight. I
polished the pins a lot until I could slide the extractor in
and out with ease. I also polished up the sharp edges on
the extractor, not wanting to cut myself in the heat of
battle, trying to reload quickly.
I didn't
polish the chambers, as shells didn't stick in my SxS before
and I figured I could always do it later. Once I had the
receiver all back together and figured out why the stock
wouldn't slip all the way on. I sanded the stock on the top
to give the lever plenty of room and on the sides coming
from the receiver to just smooth it up a bit. I went and
sanded the whole thing and wiped on some Watco special
walnut stain I had around and it looks great. I put the
screw back in the stock, careful to make it not too tight
and the end piece.
Then to
try it. What a dream; opened easy, fell open all the way
with plenty of clearance for reloading and locked up tight.
Smooth, feels like a Browning. Took it out back and shot a
few. SOLD, it is a great gun, Russian commies or not and
every bit as nice as I could hope for. Now if you decide to
tackle it, I will be able to help you, so long as my memory
holds out.
Regards,
Calaveras
(Because of manufacturing differences, every one you work on will be
a little different. Be prepared to find things not listed
in this write-up.)
Comments
from Jess Money
You'll be removing and reinserting cross pins when you
remove sears, hammers and cocking spring assemblies so it's
important to have a 1/16" punch to start to drive with. My
punch is a Stanley and it looks like a yellow wooden pencil
made of steel. The actual 1/16" punch section is only 1"
long. Since the shotgun receiver is wider than that, you'll
need some slave pins to help completely remove the factory
cross pins from the receiver. I sacrificed some drill bits
for this and a 1/8" bit, a 3/32" bit and a 5/32" bit worked
fine for the job as slave pins. (I
use the Replaceable Pin Punch Set
#080-507-000
from Brownells. The pins are long enough that you don’t
need slave pins.)
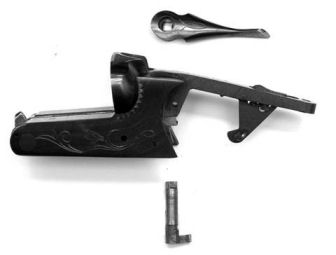
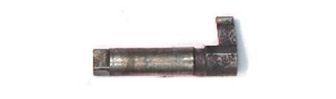
Once you
remove the barrels, look at the two protrusions on either
side at the front of the receiver. These are the cocking
cams and you'll be removing the smallest of all the cross
pins that hold them in place. A suggestion here, when the
time comes to remove the cams and hammer spring assemblies:
drive the cocking cam pin from one side into the receiver
body just far enough to completely clear the cam and then
remove the cam and spring assembly. Then tap the pin back
in from the other side just far enough to clear the other
cam and remove that cam and spring assembly. Once that
spring assembly is removed, tap the cross pin back in flush
with the receiver. That's the safest place for it.
Although
not absolutely necessary, a small table mounted metal vice
with a 3" jaw opening will be really helpful when driving
the pins, removing the trigger guard, removing screws and
then replacing them again. It helps too when you're filing
and polishing the inside of the receiver. I used some scrap
flooring linoleum and glued a piece to each side of the
metal jaw with Elmer's Glue and that has been working well
for over a year. A small vice will be sufficient because
we're not talking about putting a tremendous amount of
pressure on the receiver, just enough to hold it firmly.
Besides, everyone should have a vice around the house for
other projects.
A
jackscrew is just the ticket for lifting the floor plate
from the bottom of the receiver. I found an SAE stove bolt
in my parts drawer that worked just right. Be sure to
remove the long screw from the T shaped fixture at the very
back that holds the tang and floor plate together and serves
as a receptacle for the butt stock bolt. Once the floor
plate is off, you're looking into the boiler room of the
shotgun. Look immediately for two small coil springs
located in the top of each sear. They sit in a blind hole
and they press on the floor plate to return the sears. They
should be heavy with grease. Take these two small springs
and place them where they won't get lost.
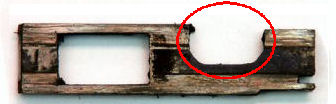
Now,
notice anything? Look closely. That's right! You are
looking at the bottom of the shotgun. So, things are a bit
different from this view. Left is right and right is
left. Repeat; left is right and right is left! When
you begin removing parts make sure you place your parts in
the correct component areas you made and be sure you
remember that left is right and right is left.
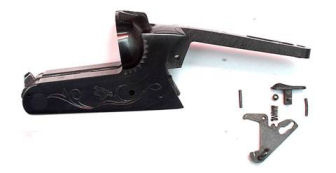
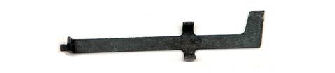
Now that
the sear return springs are safely put away, let's remove
the sears. Those long legs on the rear are what the trigger
tabs actuate. Using your 1/16" punch, tap the cross pin as
far as the punch will reach. Stop before you get to the
area of the punch that is wider than 1/16". Use your
properly fitting slave pin, or drill bit, to drive the pin
the rest of the way out. Remember left is right and right
is left and put the sears in their proper component area.
When each pin is removed, mark the end you drove from with a
colored pen, china marker or chalk and put this end in first
when you replace the cross pin. A jar lid would be a safe
place for your cross pins. They will roll around on a bench
and are easily lost!
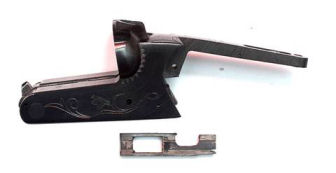
Now, for
the hammers. Look closely how the hammers sit in their
slots in the receiver. They are aligned almost vertically
on the cross pin. Remember that because it's important.
Again, using the 1/16" punch, tap the cross pin as far as
the punch will safely go, then use the properly fitting
slave pin to drive the pin the rest of the way out and put
the hammers in their proper component location.
Now go
back and pick up one hammer. Look at it closely. Turn it
over, upside down and sideways. Notice that part of the
lower section has been milled away and in that section
you'll see a hole that has been drilled there. It actually
looks as if the hole was misaligned because there is an open
section in that oddly drilled hole. Inside that hole is a
small spring that resembles a hair pin. In the paragraph
above, it was suggested you remember the vertical alignment
of the hammers. It's important to remember the odd hole in
the thin part of the hammer, too. Notice that on the end of
each cocking rod there is a small round section, similar to
a short piece of a nail, that is 90° to the rod. This piece
fits into the odd hole in the thin part of the hammer and
the small hairpin in the hole helps secure the rod into the
hammer when cocked. Neat, huh? So that's why the hammers
are vertical in their slots. You've got to make sure you
press the hammers forward to engage the rod when you're
aligning the hammers on reassembly. Not hard to do but has
to be done. Remember, the cocking rods and cams must be
reinstalled and pinned before you can replace the hammers
Now is
the time to tap the last small pin in the front of the
receiver that holds the cocking cams and rods. Notice how
the cams fit into the slots in the cap of the cocking rods.
You can completely remove this cross pin, or follow my
suggestion about partially removing it. Remove the cams and
cocking rods and place them in their proper component
location. You now have an essentially bare receiver. A
tooth brush, small steel or copper brush can be used to
remove debris left from the factory. An air compressor or
even canned air will help blow junk from the receiver after
using the brushes.
Taking
one component group at a time, examine each piece for wear
areas, places that the piece makes contact with the frame
and polish the devil out of both sides of each piece of each
component group. Polish the receiver where the parts rub,
if possible. Anything that looks like it should be polished
should get the works. We're speaking of polishing, not
grinding. There may be some areas on the insides of the
receiver that could use a few strokes with files of
diminishing coarseness but for the most part we want to use
400/ 600 grit paper or a hard Arkansas stone on our
component pieces. A light coat of Rem Oil or similar on the
component pieces won't hurt, but don't overdo it.
After
you're satisfied with your polishing efforts, reassemble the
receiver in reverse order you disassembled it. When
replacing the pins you'll need to use your slave pins
again. Be patient and the gun will go back together just
fine. You may have to jiggle a bit here and twist a bit
there and in general hold your mouth just right to align the
floor plate into place. Remember to be sure the stock bolt
section on the T should point upward. Remember, since we're
still working upside down, when the butt stock is replaced
it will be upside down, too. DO NOT over tighten the floor
plate screw. You may wish to replace the cocking springs
later or reverse your trigger positions. Snug tight will do
for the screw. DO tighten the butt stock screw securely.
Good luck
and have fun!
Jess
Money
Note: After making these changes I used my shotgun for a cowboy
match every month for about seven years and never had a
problem. When disassembling the gun to take these photos I
noticed it was pretty dry inside. I lubricated all friction
points with Brownells Action Lube Plus
#083-050-002 which is a synthetic grease that I use for
the internals of all my firearms.
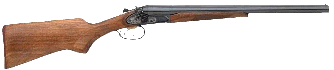
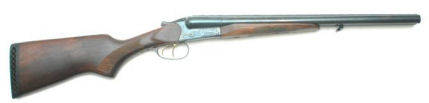
(Courtesy EAA Corporation)