Fabricating
and Installing a Taller Front Sight for a Ruger® Bisley
Blackhawk®
by Roy Seifert
Click here to purchase a
CD with this and all Kitchen Table Gunsmith Articles.
Disclaimer:
This article is for entertainment only and is not to
be used in lieu of a qualified gunsmith.
Please defer all firearms work to a qualified
gunsmith. Any loads
mentioned in this article are my loads for my guns and have
been carefully worked up using established guidelines and
special tools. The
author assumes no responsibility or liability for use of
these loads, or use or misuse of this article.
Please note that I am not a professional gunsmith,
just a shooting enthusiast and hobbyist, as well as a
tinkerer. This
article explains work that I performed to my guns without
the assistance of a qualified gunsmith.
Some procedures described in this article require
special tools and cannot/should not be performed without
them.
Warning:
Disassembling and tinkering with your firearm may
void the warranty. I
claim no responsibility for use or misuse of this article.
Again, this article is for entertainment purposes
only!
Tools
and firearms are the trademark/service mark or registered trademark
of their respective manufacturers.
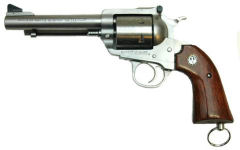
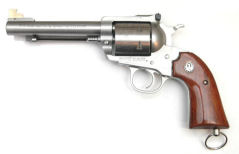
In my gun
collection I have a stainless steel Ruger® Bisley Blackhawk®
in .45 Long Colt with a 5 1/2“ barrel.
I have already accurized this gun so that all shots
touch at 50 yards, added a wide-spur Blackhawk® hammer and
checkered the spur, added a lanyard ring, polished the
cylinder chambers, and modified the pawl to a free-spin pawl.
Refer to my articles:
I carry
this gun when I go hunting and would have preferred a 4 5/8”
barrel, but
North Carolina
requires a minimum barrel length of 5 1/2”.
I load this gun with my favorite hog load of 20 grains
of Aliant 2400 under a 300 grain hard cast wide flat nose gas
check bullet. Unfortunately,
this load prints about 4-inches high at 25 yards even with the
rear sight in its lowest position.
Therefore, to lower the point of impact, since I
couldn’t lower the rear sight any farther, I needed to raise
the height of the front sight.
I read an
article on the Beartooth
Bullets web site where the author had the same problem
with a Ruger® revolver on which he was working.
He silver-soldered a piece of brass onto the top of the
front sight to give him the extra height he needed.
Since I have a hobby CNC mill at home I decided to
fabricate my own higher front sight rather than modify the
factory sight. By
designing my own sight I can create any pattern I desire.
Calculating
the amount of increase in front sight height is a simple ratio
and proportion problem. For
those who don’t remember your high school math I developed a
Front
Sight Height Calculator in Excel which you can download by
clicking on the link. The
four quantities in the ratio are:
Change
in Front Sight Height
= Bullet Impact Change
Sight Radius
Distance to Target
Because the
change is in inches, all measurements must be in inches.
So what I had was:
Change in
Front Sight Height = X (this is what we’re trying to figure out)
Sight radius
= 7.5 (front sight to rear sight)
Bullet Impact Change
= 4
Distance to target
= 900 (25 yards x 36 inches)
Cross
multiplying and solving for X gave me:
Change in
Front Sight Height = Sight Radius x Bullet Impact Change /
Distance to Target or
X = 7.5 x 4 / 900,
X = 0.0333
This change
would work for the rear sight being at its lowest position.
To place bullet impact more into the middle of the rear
sight adjustment I used a bullet impact change of 6 inches
which gave me a change in front sight height of 0.05 inches.
My factory
front sight blade measured 0.442” so I needed to fabricate a
front sight that was 0.492”.
Brownells
sells a replacement front sight blade that is 0.495” high so
I decided to make my new blade to match that height.
I used a
punch to remove the roll pin from the front sight base and
removed the blade, then carefully measured it with calipers.
I used
CorelDRAW® to design the pattern for my new front sight
blade. The height
was 0.495” but I designed it with an undercut front to
reduce glare, rather than a post or ramp.
I purchased
a piece of brass 1/8” x 3/4“ x 12” from Online
Metals, my favorite place to purchase metal.
I decided to fabricate the new blade out of brass
because it’s easier to work with.
I realize that since brass is softer than steel the new
blade could get deformed easier, but I’ve had steel blades
get deformed by being knocked around, plus I can always make a
new one. I’m
really not that hard on my guns so the brass blade should be
just as durable as a steel one.
Plus, I don’t have to worry about finishing the
brass. However, I
also purchased a piece of steel 1/8” x 3/4“ x 12” in
case I wanted to produce a blade made of steel instead of
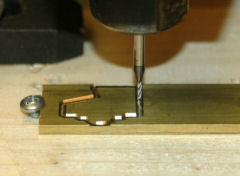
brass. I took the
piece of brass, mounted it to a piece of wood on my milling
table, and milled out the new blade.
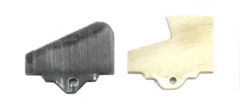
After I
milled the new blade I touched up the sharp edges with a
jeweler’s file and installed it in the front sight base.
I took a 1/16” drill bit and using the hole in the
sight base as a guide, drilled the roll pin hole in the new
blade. After I
drilled the hole I installed the roll pin.
I didn’t
quite make the front radius large enough so the front edge was
pretty sharp. I
took my flat jeweler’s file and rounded the edge.
If I want it cleaner I can always change the design and
make another blade.
A
new, higher ramp-style front sight blade would have cost
$10.00 plus shipping. The
two metal bars, brass and steel, cost me $15.00 including
shipping so the hit to my pocket was about the same.
However, I can probably fabricate 18 to 20 front sight
blades for the same price of one, plus I can experiment with
different designs until I find one I like.
|