Laser
Bore Sight Calculator
by Roy Seifert
Click here to purchase a
CD with this and all Kitchen Table Gunsmith Articles.
Disclaimer:
This article is for entertainment only and is not to
be used in lieu of a qualified gunsmith.
Please defer all firearms work to a qualified
gunsmith. Any loads
mentioned in this article are my loads for my guns and have
been carefully worked up using established guidelines and
special tools. The
author assumes no responsibility or liability for use of
these loads, or use or misuse of this article.
Please note that I am not a professional gunsmith,
just a shooting enthusiast and hobbyist, as well as a
tinkerer. This
article explains work that I performed to my guns without
the assistance of a qualified gunsmith.
Some procedures described in this article require
special tools and cannot/should not be performed without
them.
Warning:
Disassembling and tinkering with your firearm may
void the warranty. I
claim no responsibility for use or misuse of this article.
Again, this article is for entertainment purposes
only!
Tools
and firearms are the trademark/service mark or registered trademark
of their respective manufacturers.
Addendum – June, 2021
Forget everything I’ve written below.
The theory and math are correct, but I really
didn’t need it.
All I needed was the path of the bullet, which any
ballistic program will give you.
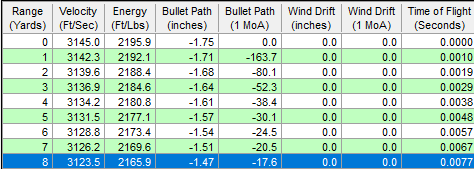
Let’s take the 6mm Remington example.
I’m using
Sierra Infinity Suite V6; the current version is V7.
I entered my data as follows:
-
Bullet – Remington .243
100 gr PSP
-
Velocity – 1380 FPS
-
Sight Height – 1.75
inches
The software shows that the bullet is 1.47-inches below
the line of sight at 8-yards (24-feet).
I use 25-feet (8.3-yards) inside my house but stand
12-inches closer.
According to the above chart, the laser dot must be
about 1.5-inches BELOW the front sight.
This is the same as the math below.
I have a new Marlin 1894 .44 Remington Magnum I want to
bore sight.
Using the Sierra Infinity Suite I entered the following
data:
-
Bullet – Remington .4295
240Gr. SMJHP
-
Velocity – 1300 FPS
-
Sight Height – 0.75
inches
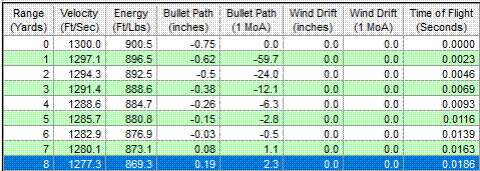
For this caliber and load I would need to adjust my sight
so the laser dot was 0.19-inches ABOVE the front sight.
This is so much easier than doing all that math!
The only thing I have to remember is the laser dot
represents bullet.
Introduction
I have a laser bore sight that I use to bore sight a rifle
after attaching a scope.
The theory is that by bore sighting the rifle you can
at least get the shots on paper at 100 yards.
From that point, you can then go to the range and
perform the final sight adjustments with your particular
loads.
The instructions that came
with my laser bore sight stated that at twenty-five (25)
feet you should adjust the scope for two inches above the
laser dot. This
seemed too general to me and I couldn’t see how that would
fit for all loads. Therefore,
I developed a laser bore sight calculator that should get me
much closer to zero at 100 yards.
The objective here is to determine how far above the
red laser dot I should adjust a scope for a 100 yard zero
when bore sighting a rifle at 25 feet.
There
were two pieces of information I needed to know before
performing these calculations.
First, I needed to measure the height of my scope
above the center line of the bore.
This was easy to obtain just by measuring with a
ruler. Secondly,
I must know the departure angle of the bullet.
I can get this
from my ballistic software.
However, I must know the performance of my load and
enter that data into the software.
At a minimum, I need to know the muzzle velocity (MV)
of the bullet, and it’s ballistic coefficient (BC).
Most bullet manufacturers publish the BC for each of
their bullets, and a reloading manual can give me an
estimated velocity. This
is going to be close enough to get the bullet on paper at
100 yards.
Theory
and Geometry
If you find this technical explanation too complicated, you
can skip it. You
can download my Laser
Bore Sight Calculator, an Excel spreadsheet, that will
do all the calculations for you.
Just enter the measurement of the distance between
the center of the bore and center of the scope, and the
departure angle, and the spreadsheet will calculate the
distance above the red dot for which you need to adjust your
scope at 25 feet.
I
had to think about this for a bit and visualize it in my mind.
What I couldn’t get through my head was that the
bullet path had nothing to do with bore sighting.
The flight of a bullet is a parabolic curve, but bore
sighting involves straight lines.
So I drew a diagram with straight lines so I could
visualize what was happening during the bore sighting process.

When
you shoot a rifle, if the rifle was perfectly level with the
ground, gravity starts to pull the bullet down immediately, so
the bullet would hit low at 100 yards.
Therefore, to hit the center of the target at 100
yards, or any distance for that matter, the rifle has to have
a small upward angle. This
angle, called departure angle, and the height of the scope
above the bore are the numbers I needed to know.
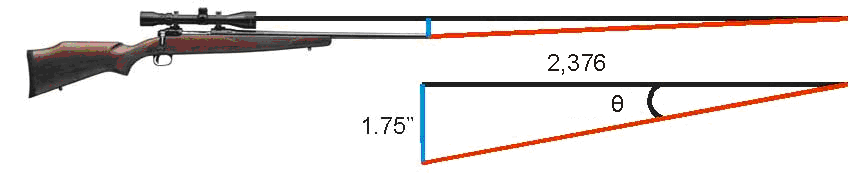
Going
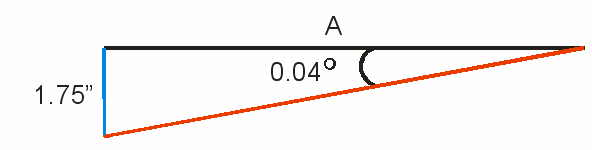
back to high school algebra and geometry, by knowing the
values of any two parts of a right triangle, I can find the
value of any other part.
If you look at the above diagram, the line extending
from the scope (line of sight) becomes the base of the
triangle. Because
the rifle is at an angle, the line extending from the bore
becomes the hypotenuse, and the distance from the center of
the bore to the middle of the scope becomes the vertical
leg. The angle
where the two lines come together is the departure angle.

Because the scope was level,
but the barrel was angled, somewhere out in the distance those
two lines would come together.
I needed to find out how far from the bore those two
lines intersected. Once
I found that distance, I could subtract 25 feet (300 inches)
and find the new value of the leg.
Because the barrel is at an angle, as we move farther
from the bore the closer together the two lines become.
So, to properly set up my scope, I need to know how far
above the red dot the scope must be adjusted for at 25 feet so
the rifle can be zeroed at 100 yards (or at least close).
The black lines in the above
diagram represent the line of sight from the scope.
The red lines represent the laser projecting from the
bore, and the blue lines represent the height of the sight
above the bore. You
can also think of the blue lines as the height of the scope
cross hairs above the laser dot.
Please note that the triangles in the diagram are not
drawn to scale, but the values are accurate.
Finding
the Angle
Finding the angle of the rifle was easy with my ballistic
software. I use
Ballistic v4.13 Copyright 1988-1995 by William R. Frenchu.
You can download a free trial copy from Steve’s
Reloading Pages. Other
ballistic software packages may also provide the angle of
departure, but I only have experience with this software.
I
used my Remington 700 BDL in 6mm Remington caliber for the
calculations. This
rifle is already sighted-in at 100 yards so I can verify my
calculations. Ballistic
v4.13 stated that for my load the angle of departure was 0.040
degrees, so that is what I used for my calculations.
I used an estimated muzzle velocity, not actual
chronograph values.
Ok, so you
don’t have Mr. Frenchu’s excellent program.
You can calculate the angle of departure using the
following formula (also available on my Laser
Bore Sight Calculator):
Angle of
departure = ARCTAN(sight height above bore/distance to cross
the line of sight)
Sight
height above the bore is measured from the center of the bore
to the top of the front sight, or center of the scope if
installed. The
distance to cross the line of sight has to be determined with
a ballistic program. I
used Sierra Infinity V6 and using the same 6mm Remington data
the bullet crossed the line of sight at 66 yards, which is
2,376 inches. My
scope sits 1.75 inches above the bore so the formula looked
like this:
ARCTAN(1.75/2,376)
= 0.042 degrees
ARCTAN is
the inverse tangent function.
Looking at the above figure and knowing that the
tangent of an angle is the opposite side divided by the
adjacent side gave the above formula.
Finding
the Length of the Base Leg
Remember I said that by knowing the values of any two parts of
a right triangle, I can find any other value.
I knew the rifle was angled at 0.04 degrees, and the
middle of the scope was 1.75” above the center of the bore.
If you look at the second triangle you can see those
measurements. Do
you remember SOH-CAH-TOA (rhymes with Crakatoa) from your
geometry days? SOH-CAH-TOA
is a memory mnemonic for calculating parts of a right
triangle. It
stands for:
- SOH:
SIN(θ) = opposite over hypotenuse
- CAH:
COSINE(θ) = adjacent over hypotenuse
- TOA:
TANGENT(θ) = opposite over adjacent
These
formulae show the relationships of the lines of the triangle
with respect to any one of the angles (θ).
The hypotenuse is always the angled line; the red line
in our triangles.
In
the second triangle, I knew the angle was 0.04 degrees, and I
knew the blue line opposite that angle was 1.75 inches.
I needed to find the length of the black line that was
adjacent to the angle. The
black line is not
the hypotenuse because it is not angled.
I knew opposite and wanted to find adjacent, so I
needed the TANGENT function.
The tangent of an angle is the length of the opposite
leg divided by the length of the adjacent leg.
Substituting values in the TANGENT formula I got:
TANGENT(.04)
= 1.75 / A
Using
some basic algebra to tell me how to find the value of A,
first I multiplied both sides by A, which gave me A *
TANGENT(.04) = 1.75, then I divided both sides by TANGENT(.04)
which gave me A = 1.75 / TANGENT(.04)
So,
to find the length of line A, the formula was:
1.75 / TANGENT(.04) which was 2506 inches or almost 70
yards. (Remember,
this has nothing to do with bullet flight, this 70 yards is
the distance where the line of sight from the scope would
touch the line from the laser.)
Finding
the Height Above the Laser Dot
Ok, so now I knew the distance from the bore to where the two
lines intersected. However,
because my rifle was 25 feet away from my measuring point (in
my case it was a wall inside my home), not 70 yards away, I
needed to find out how far above the red dot I should adjust
my scope.
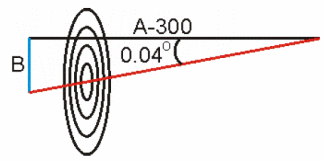
I
started by subtracting 300 inches (25 feet) from the value of
the base leg in the second triangle.
That gave me 2206 inches.
Since I now knew the angle (0.04 degrees), and I knew
the base leg (2206) I again used the TANGENT formula to find
the height of the blue leg (B).
TANGENT(.04)
= B / 2206
Again,
using algebra to solve for B, first I multiplied both sides by
2206 giving me 2206 * TANGENT(.04) = B, so the final formula
was:
B
= 2206 * TANGENT(.04) which gave me an answer of 1.54 inches.
So, at 25 feet, the cross hairs of the scope should be
1 1/2 inches above the red dot.
I
used the scientific view of the calculator that came with my
PC software to perform these calculations.
Again, you can download an Excel
spreadsheet that will automatically do the same thing.
I
tried this formula with my .308 M1A which is also already
sighted in for 100 yards.
The scope was 2.5 inches above the bore, and my
ballistic software showed the departure angle as 0.037
degrees. Using my
calculator, I got 2.3 inches, which should be where I need to
adjust my scope above the red dot at 25 feet.
As you can see the sight height, bullet and caliber
make a difference. And,
the bore sight manufacturer’s general measurement of 2
inches high at 25 feet would probably be alright for .30
caliber ammunition.
Testing
the Theory
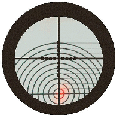
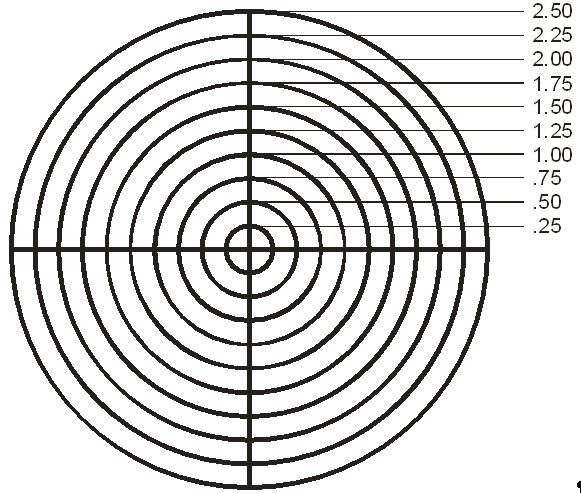
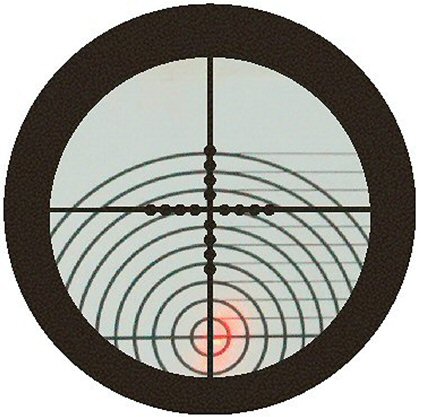
I created a target with 1/4” rings.
I set up my Remington 700 rifle with the bore sight
installed and positioned the target at 25 feet with the laser
dot on the center of the target.
The scope reticle was centered at 1 3/4”; my estimate
was 1 1/2”. This
variation could be caused by many factors, but most likely was
caused by me entering an estimated MV instead of actual MV
into my ballistic software.
However, the variation of 1/4” at 25 feet represents
3 inches at 100 yards; good enough to be on the paper.
After all, the point of bore-sighting is to get on the
paper, then use live fire to finish sighting in.
So, with some basic geometry and estimated bullet
performance I can bore sight my rifle and get it to shoot on
the paper.
|