Threading
a Shotgun Barrel for Choke Tubes
by Roy Seifert
Click here to purchase a
CD with this and all Kitchen Table Gunsmith Articles.
Disclaimer:
This article is for entertainment only and is not to
be used in lieu of a qualified gunsmith.
Please defer all firearms work to a qualified
gunsmith. Any loads
mentioned in this article are my loads for my guns and have
been carefully worked up using established guidelines and
special tools. The
author assumes no responsibility or liability for use of
these loads, or use or misuse of this article.
Please note that I am not a professional gunsmith,
just a shooting enthusiast and hobbyist, as well as a
tinkerer. This
article explains work that I performed to my guns without
the assistance of a qualified gunsmith.
Some procedures described in this article require
special tools and cannot/should not be performed without
them.
Warning:
Disassembling and tinkering with your firearm may
void the warranty. I
claim no responsibility for use or misuse of this article.
Again, this article is for entertainment purposes
only!
Tools
and firearms are the trademark/service mark or registered trademark
of their respective manufacturers.

I
regularly participate in local 3-gun matches where one of the
guns is a pump or semi-auto shotgun.
I wanted a shotgun that would reliably feed the Aguila
short 12ga. shells so I could fit more in the magazine tube.
I purchased a
Winchester
1300 Defender, which came with a cylinder bore barrel.
Apparently, it was for use with 00 buck loads.
Shooting target loads with this barrel made such a wide
pattern that I couldn’t knock down steel targets at 15 feet!
I thought the best solution to this problem was to
thread the barrel for choke tubes.
Since I had a
Winchester
shotgun, I decided to thread the barrel for Winchoke tubes.
There are
four steps in the process for threading a shotgun barrel for
choke tubes:
- Measure
the barrel to see if there is enough metal for threading.
- Fit
the bushing to the inside of the barrel.
- Ream
the inside of the barrel to ensure it is uniform.
This also removes any existing choke.
- Tap
the barrel for the appropriate choke tube.
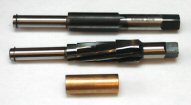
 The
left photo shows the necessary tooling, which I purchased
from Brownells.
From top to bottom are the tap, reamer, and pilot
bushing. The
left photo shows the necessary tooling, which I purchased
from Brownells.
From top to bottom are the tap, reamer, and pilot
bushing.
Step
1: Measure Barrel
The instructions that came with the tooling stated that the
barrel had to have a minimum outside diameter of 0.845”.
My barrel measured 0.900” which gave me plenty of
metal.
Step
2: Fit Bushing
The bushing helps keep the reamer and tap centered in the
barrel. I
purchased a universal bushing that was a bit too large.
I took the barrel and bushing over to a friend who has
a lathe and he reduced the diameter of the bushing just enough
so that it would fit in my barrel.
He offered to ream and tap the barrel for me, but I
didn’t bring the tooling with me!
Step
3: Ream Barrel
I mounted the barrel in a padded vise and used a tap wrench to
ream the inside of the barrel.
I was surprised at how much metal was removed.
I used plenty of cutting oil to lubricate the reamer,
and removed the reamer to clean off chips regularly.
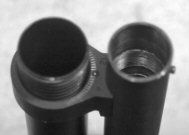
I stopped when the last step of the reamer was touching
the front of the barrel. The
reamer had removed enough metal that a step was left in the
barrel. This step
was where the end of the choke tube would set leaving a flush
seam between the barrel and the choke tube.
Step
4: Tap Barrel
Again, I used a tap wrench and plenty of oil to tap the
threads for the choke tube.
I turned the tap maybe 1/2 turn, then backed it off one
full turn to break the chips.

After
the barrel was tapped I thoroughly cleaned it with brake parts
cleaner, then oiled the barrel.
I applied some choke tube lubricant to a modified choke
and installed it in the barrel.
Now, with the modified choke, those metal targets fall
every time.
Tooling
|
Part Number
|
Source
|
Description
|
|
513-042-000
|
Brownells
|
12
ga. reamer
|
|
513-044-012
|
Brownells
|
12
ga. Winchoke tap
|
|
513-040-750
|
Brownells
|
12
ga. universal pilot
|
|