Making a Free Spin Pawl for a Ruger®
Single-Action Revolver
by Roy Seifert
Click here to purchase a
CD with this and all Kitchen Table Gunsmith Articles.
Disclaimer:
This article is for entertainment only and is not to
be used in lieu of a qualified gunsmith.
Please defer all firearms work to a qualified
gunsmith. Any loads
mentioned in this article are my loads for my guns and have
been carefully worked up using established guidelines and
special tools. The
author assumes no responsibility or liability for use of
these loads, or use or misuse of this article.
Please note that I am not a professional gunsmith,
just a shooting enthusiast and hobbyist, as well as a
tinkerer. This
article explains work that I performed to my guns without
the assistance of a qualified gunsmith.
Some procedures described in this article require
special tools and cannot/should not be performed without
them.
Warning:
Disassembling and tinkering with your firearm may
void the warranty. I
claim no responsibility for use or misuse of this article.
Again, this article is for entertainment purposes
only!
Tools
and firearms are the trademark/service mark or registered trademark
of their respective manufacturers.
Converting
Existing Pawl to a Free-Spin Pawl
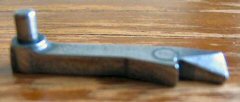
The pawl is the arm that extends from inside the frame of the
revolver to engage the ratchet teeth on the rear of the
cylinder as you cock the hammer to index the cylinder to the
next chamber. With
the loading gate open the top of the pawl is in constant
contact with those teeth allowing the cylinder to rotate in
only one direction. A
free-spin pawl does not engage the cylinder with the loading
gate open thereby allowing the cylinder to rotate freely in
any direction during loading.
When the loading gate is closed the free-spin pawl
works as normal to engage the cylinder when the hammer is
pulled back. Over
the years I have tried using the after-market free-spin pawls
but they seem to alter the trigger pull.
This was caused by the press-fit pin backing out
causing the pawl to drag against the frame.
I found an article on the Internet on how to convert the
existing factory pawl into a free-spin pawl.
First I completely disassembled the gun and clamped the
pawl in my padded vise.
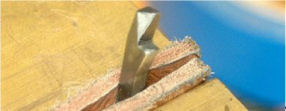
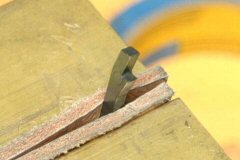
Then
I took a #6 safe-edge Swiss pillar file and carefully filed
the inside of the top at an angle as shown in the photos
above. I filed
until the ratchet on the rear of the cylinder no longer made
contact with the top tooth leaving
about 1/16” on the top. I
filed the angle so that I did not remove any metal from the
bottom, only from the top.
I used the safe-edge file because I didn’t want to
touch the lower tooth. This
tooth is fit at the factory and ensures the cylinder rotates
far enough to lock up properly.
After filing I final polished with a 400 grit stone,
again being careful not to touch the lower tooth.
I cleaned the pawl with a shot of brake parts cleaner,
then oiled and re-assembled the gun.
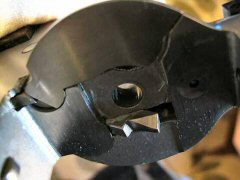
The
photo above shows the modified pawl installed in the
frame with the hammer in the full-cock position.
With the hammer down and the loading gate open the top
of the pawl no longer contacts the cylinder ratchet so the
cylinder now spins freely.
I had a little
trouble understanding what was happening until I took out my
calipers and did some measuring. Here is what the modification
does:
With
the hammer down the cylinder is locked in place with the bolt.
The pawl is down about 0.16-inches below the center
line of the cylinder. Notice
in the above figure that if the loading gate was open allowing
the cylinder to spin the top tooth of the factory unmodified
pawl is contacting the ratchet causing the clicking sound.
The pawl being down so far is the reason that rotating
the cylinder backwards until it stops causes the chambers to
be out of alignment with the loading gate.

The
modification removes just enough metal so the ratchet is not
contacting the pawl allowing the cylinder to free spin.
As
the hammer is pulled back the bolt drops out of place to
unlock the cylinder and the pawl rises up to engage the tooth
on the ratchet. As
the hammer continues to move back into the fully cocked
position the rising pawl causes the cylinder to rotate which
moves the next chamber into the firing position and the bolt
snaps back into position against the cylinder in preparation
to lock it in place.
Addendum
A reader of the Kitchen Table Gunsmith reported that after
modifying the pawl in the above manner the cylinder in his
Bisley wouldn’t lock up.
It turned out that he had removed just a few
thousandths too much so the pawl wouldn’t engage the
cylinder ratchet when cocking the gun.
In fact, after the first two or three rounds were fired
the remaining rounds that still had bullets in them would
cause the cylinder to rotate backwards because of the
imbalance. He
wound up having to replace the pawl.
By the way, the pawl is individually fitted to each gun
at the factory so he would have had to fit the new pawl to his
particular gun.
Whenever I
modify a part by removing metal, I always go slowly and
frequently try the modified part for fit and function.
Sure it is time-consuming to constantly reassemble and
disassemble the gun, but this prevents me from going too far
and having to replace the part.
I can always remove a little more metal, but adding
metal is very difficult.
|
