Please
note that this article is fairly long but is written in
three parts. In Part 1 I replaced a damaged barrel with a used barrel.
Part 2 is much longer where I installed a new production barrel
on a 1942 receiver and had to ream the chamber and polish
the chamber throat. In
Part
3 I replaced the multiple cracked and repaired stock
with a new one.
Introduction
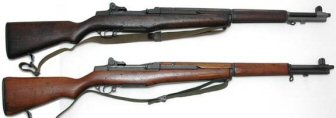
I have always been fascinated with military rifles.
I have two M1 Garands in my collection; an arsenal
rebuild with a
Springfield
receiver dated from 1942; the other is a new receiver by
Century Arms International (CAI) built with military surplus
parts. The CAI
was a gift to my son who really likes to shoot this rifle. He
especially enjoys hearing the well-known “ping” sound
when the empty clip is ejected.
The
M1 Garand was developed by Canadian-born firearms designer
John C. Garand. It
was the first semi-automatic rifle to be generally used by
soldiers of any nation.
During WWII the M1's gas-operated, semiautomatic
action gave
United States
forces a significant advantage in firepower and shot-to-shot
recovery time over standard bolt-action rifles in use by
enemy soldiers. The
Garand also provided increased shot capacity of 8 rounds
compared to most bolt-action rifles of the time that
typically held only 5 rounds.
One of the disadvantages of the Garand was that enemy
soldiers learned to listen for the “ping” and knew that
the rifle was empty. Even
so, General George S. Patten called it "The greatest
battle implement ever devised."
The Garand officially replaced the bolt-action M1903
Springfield as the standard service rifle in 1936 and was
heavily used by
U.S.
forces in WWII and the Korean War.
It continued in service to a limited extent until
1966 during the Vietnam War.
Many thousands were also lent or provided as foreign
aid to
America's allies.
There
were approximately 5.4 million M1 Garands produced for
military use, and some recent manufacturers have produced
new receivers with military surplus parts.
It’s no wonder that Garands are available to
civilian shooters and collectors and can be found at gun
stores and gun shows across the country.
The Civilian
Marksmanship Program continues to sell Garands to
U.S.
citizens through the mail.
At
the same gun show where I purchased the CAI rifle I also
purchased some remanufactured ammunition for it.
The vendor selling the ammo ridiculed me for
purchasing the CAI “wall hanger”, but told me I
couldn’t go wrong with his ammo.
There are a number of articles, both pro and con
about shooting reloads in the Garand, but it is possible for
the reloader to manufacture hand loads to military
specification, i.e. 2700 feet per second using powder in the
IMR 4895 burn rate range.
I wanted my son to have something to shoot for his
birthday, and I didn’t have enough components at the time
to reload my own, and so, against my better judgment, I
purchased some of this reloaded ammo.
I’ve had problems with other people’s reloads
before so I have a policy to never shoot reloads… unless I’ve done the reloading myself!
Sure enough, with these gun show reloads, we had a
squib! Although
the CAI rifles have had some negative press, we never had a
problem with this rifle, until we had the squib load and
fired another round behind it; now the CAI had a bulged
barrel!
The
M1 Garand is a rugged, reliable battle rifle that has stood
the test of decades of time.
It was designed to take the punishment of the
battlefield. Unfortunately,
many of these Garands come with less than suitable barrels.
This is understandable since they may have had
thousands, sometimes hundreds of thousands of rounds fired
through their 70 year old barrels causing those barrels to
be “shot out”. Even
one that has been through an arsenal rebuild may come with a
worn barrel.
Another
factor that caused accelerated barrel wear was improper
cleaning. Due to
the design of the Garand, the barrel is normally cleaned
from the muzzle end; and you can bet that field troops
didn’t use a bore guide for their steel cleaning rods!
I have seen many Garand barrels that looked like they
had a good bore, but the last inch or so at the muzzle was
worn smooth because of poor cleaning technique.
So
how can I tell if it’s time to replace a Garand barrel?
I could purchase a throat erosion gauge to measure
chamber throat wear, and a muzzle gauge to measure muzzle
wear, but these are expensive tools.
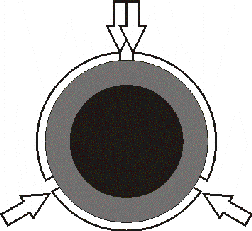
Throat erosion creates an additional free bore area
through which the bullet must travel before encountering any
rifling. A
minimum free bore is important to bench rest and target
rifle accuracy, but not overly critical to accuracy in a
battle rifle. On
the other hand, the condition of the muzzle and crown has a
very critical effect on accuracy.
Damage to the muzzle and/or muzzle crown can allow
gas to escape around the bullet unevenly and literally push
the bullet off target causing a significant drop in
accuracy. The
bullet must maintain even, continuous contact with the lands
and grooves until it leaves the barrel, at which time gas
must escape evenly around the bullet so accuracy is not
affected.
Any
nicks or burrs in the crown must be removed.
Dressing a muzzle crown can be accomplished with a
brass muzzle lap. I
have had very good results from lapping a muzzle; which I
always perform whenever I purchase a new gun.
Lapping the muzzle makes the ends of the lands and
grooves sharp and even which enhances accuracy.
Refer to my article Restoring a Ted Williams
Model 100 .30-30 for details on lapping a muzzle.

An
easy way to test muzzle wear is to insert a bullet into the
muzzle. If the
bullet can be inserted up to the case neck, or crimping
groove on the bullet, the barrel flunks the “bullet
test”, meaning the barrel is excessively worn and needs to
be replaced. Because
my Springfield Garand had a fairly good barrel which passed
the bullet test I was confident this barrel would be fine
for casual shooting. So
my plan was to replace the bulged CAI barrel with the barrel
from the
Springfield
, and purchase a new barrel for the
Springfield.
Tools
My father taught me that to do any job right you need the
right tools. My
philosophy about tools is that usually a tool costs much
less than the cost of labor to have someone else do the job,
and I have the tool if I need to do the job again!
And, if someone else does the job and needs to
purchase the tool, they usually add the cost of the tool to
the labor! The
tools I used are listed in the table below:
Purchasing
tools can get expensive, and although I never balk at
purchasing a new tool, I was able to save some money and
still have the right tools for the job.
The pull through chamber reamer is a tool that I will
probably only use once for this project.
So rather than purchase the tool, I found Elk
Ridge Reamer Rentals online where I could rent the
reamer for a little over 30% of the cost of purchasing one.
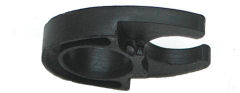
Another
required tool was the barrel and receiver timing gauge which
attaches to the rear sight base of the receiver and the gas
cylinder on the barrel and allows me to properly index the
barrel with the receiver.
However, I didn’t really want to spend the $70 for
this tool. So
instead, I made my own.
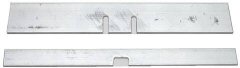
I
went to my local home improvement store and purchased 3/4“
x 12” and 1 1/2“ x 12” aluminum bars.
I cut two 1/4“ notches 1 1/4“ apart in the 1
1/2“ bar and I cut a 5/8” notch out of the 3/4“ bar.
The wide bar will set between the rear sight ears on
the receiver, and the narrow bar will set over the dovetail
on the sight flat on the gas cylinder.
When these bars are parallel I know the barrel is
indexed properly to the receiver.
Part
1: Replacing the
CAI Barrel
Disassembly
I replaced the barrel of the CAI first since this didn’t
require any parts, only tools.
First I removed the barrel from the CAI Garand.
To do this I completely disassembled the receiver,
but I left the clip latch and rear sight assembly in place. There
are many fine books available for sale, and sources on the
Internet that explain how to completely disassemble the M1
Garand. I left
the rear sight assembly on the receiver until I installed
the
Springfield
barrel, then I removed it to accommodate my barrel/receiver
timing gauge.
Barrel
Removal
I
wrapped tape around the front of the receiver and attached
the receiver wrench. Then
I applied rosin to the barrel bushing, slipped it over the
barrel and attached the barrel vise.
The barrel vise and action wrench in the photo above
are different than the ones that MidwayUSA sells because I
had purchased these many years ago from Brownells.
The process, however, is the same.
I set the barrel vise in my bench vise and pushed
down on the receiver wrench.
The CAI receiver came loose with a minimum of
pressure on the wrench.
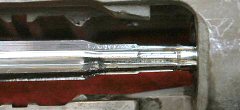
Once
the barrel was removed I took a closer look at it.
I could clearly see a line inside the barrel where
the bulge was located just behind the gas port.
This was now a throwaway barrel.
I
removed the barrel from the
Springfield
receiver in the same manner.
Before attaching the vise and wrench I wrapped 5 or 6
layers of masking tape on the gas cylinder lock threads to
protect them. This
barrel was not as easy to remove from the
Springfield
receiver. It
took quite a bit of effort to loosen the barrel; in fact I
finally had to purchase an 18” piece of steel pipe to
provide some extra leverage to get the barrel to loosen.
Obviously the barrel to receiver fit was much tighter
on the surplus rifle than on the newly manufactured one.
Based on everything I’ve read, a barrel does not
have to be that tight and can even cause the receiver and/or
barrel to warp causing loss of accuracy.
Installing
the Springfield
Barrel on the CAI Receiver
I decided I didn’t want the Springfield
barrel to be so tight on the CAI receiver.
Since I don’t have a lathe to cut back the barrel
shoulder, I used 400-grit lapping compound and lapped the
barrel shoulder to the receiver.
This technique comes from Accurizing
the Factory Rifle by M. L. McPherson.
Refer to my article Building
the V-10 Hog Hammer for details.
This procedure not only squares the receiver with the
barrel shoulder, but also reduces the “interference fit”
of the barrel to the receiver so the barrel requires less
torque to tighten it. This
combination of squared shoulder and less tight barrel should
provide an increase in accuracy.
The lapping process removes metal from both the
barrel shoulder and receiver face so I needed to be sure
that I didn’t lap too much; otherwise I wouldn’t be able
to tighten the barrel. This
technique also reduces the headspace a fraction, but I
wasn’t worried about that with this barrel.
I
lapped just until I could see a gray ring around the front
of the receiver as shown in the above photo.
This indicated that I had a square, even mating
surface between the barrel and receiver.
After lapping I cleaned off the lapping compound with
brake parts cleaner, then cleaned the barrel threads, barrel
shoulder, receiver threads and receiver face with acetone.
I applied purple Loctite® 222 to the barrel threads,
and green Loctite® 609 to the barrel shoulder and installed
the barrel onto the receiver.
Since I have reduced the interference fit of the
barrel to the receiver it required much less torque to
tighten it, so the Loctite® helps to keep it tight.
Apparently CAI used this process on some of its
Garands which received some negative comments from another
commercial Garand builder.
Personally, I would rather use the Loctite® for
improved accuracy, than risk a warped receiver or barrel.

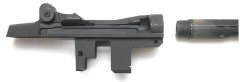
I
removed the rear sight assembly from the receiver, and installed the gas
cylinder, gas cylinder lock and gas cylinder screw onto the
barrel. Then I removed the front sight so I could use my
barrel/receiver timing gauge.
I tightened the barrel until the two bars of the
gauge were parallel indicating the barrel was properly
indexed, then I removed the receiver wrench and barrel vise.
I removed the tape from the receiver and gas cylinder
lock threads, then reassembled the rifle.
I did not install the bolt, operating rod spring, and
operating rod because I wanted to check the headspace first.
Checking
Headspace
A very important procedure when replacing a barrel is to
check the headspace. There
are a number of methods to check headspace, but the most
accurate is to use headspace gauges.
There are three lengths of headspace gauges:
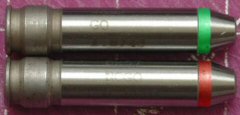
- Go – This is the shortest of the three gauges and is
used to set the headspace for a new barrel.
It ensures that the rifle chamber will accept
cartridges made to maximum SAAMI specifications.
- No-Go – This is the middle length of the three gauges.
A bolt should not close on this gauge in a new
barrel. If
the bolt closes on this gauge on an existing or surplus
barrel, the barrel may still be within acceptable SAAMI
tolerances.
- Field – This is the longest of the three gauges.
Technically, a bolt should never close on a field
gauge; however, if it does the headspace could still be
within SAAMI specifications.
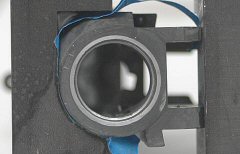
To
check the headspace on any rifle I completely disassemble
the bolt. There
should be no extractor or ejector contact on the gauge; just
the bolt face. Although
special tools are available, the Garand bolt can be
disassembled without them thereby saving a little more
money.
I
slipped a small flat-blade screwdriver between the extractor
and extractor plunger so the plunger was depressed.
While holding my thumb over the bolt face I used a
punch to drive out the extractor from the bolt body.
My thumb prevented the ejector from flying out.
After the extractor was removed I carefully relieved
ejector spring tension by allowing the ejector to move out
of the bolt face. I
removed the ejector and ejector spring, then removed the
firing pin from the rear of the bolt.
Finally I used a pair of needle-nose pliers to remove
the extractor spring and plunger.
While the bolt was disassembled I cleaned and
lubricated all parts, then set them aside in a small plastic
container so I wouldn’t lose them.
I am always amazed how dirty a semiautomatic can get,
especially all the little nooks and crannies where powder
residue can accumulate.

With
the rifle and bolt disassembled, I inserted the .30-06 Field
headspace gauge into the chamber and gently tried to close
the bolt using just light finger pressure.
I never try to force a bolt closed on a gauge; light
finger pressure is all that is needed.
I used the Field gauge because this was an existing
barrel with a precut chamber.
The above photo shows that the bolt would not close
all the way. There
was a gap between the bottom of the right locking lug and
the receiver. This
is the point where I just started to feel some friction.
Because the bolt would not close on the Field gauge
meant that the chamber was not too long.
I then used the Go headspace gauge and the bolt
closed completely. Using
these two gauges told me the chamber was within proper
specifications.
I
reassembled the bolt by first inserting the firing pin
through the rear of the bolt.
I inserted the extractor spring and plunger into the
recess in the bolt body, then inserted the ejector and
spring so the notch in the ejector was facing the hole for
the extractor pin. I
pressed down on the ejector with a punch until I could press
the extractor past the notch in the ejector, then finished
seating the extractor with my thumb.
Tightening
the Gas Cylinder
The
gas cylinder was very loose on this barrel, which would
cause the front sight to be unstable and affect accuracy.
I set the end of the barrel onto a piece of wood and
took a 1/8” punch and peened the edges of the gas cylinder
splines as shown above.
I started peening about 1/8” back from the front
edge of the splines so the gas cylinder would start onto the
splines correctly. After
peening I had to use a block of wood and a mallet to install
the gas cylinder. Now
the gas cylinder is nice and tight so the front sight will
not wander.
I
finished reassembling the rifle and tested it with dummy
rounds. The
rounds chambered and everything seemed to function as it
should. All
that’s required now is to take it to the range, test fire
it and get it sighted in.
Part
2: Installing a
New Production Barrel
Obtaining
a New Barrel
The Civilian
Marksmanship Program (CMP) sells a new Garand barrel for
about $70 less than other sources.
However, I couldn’t just send in the money and have
them send me a barrel. I
had to meet specific requirements before I could order:
- Show
proof of
U.S.
citizenship – I sent a copy of my passport.
- Show
proof of current membership in a CMP affiliated
organization – for $25 I joined the Garand
Collectors Association; an organization devoted to
the study of the M1 Garand rifle.
I printed out the application form, filled it
out, and sent it in with a check for $25.
After about two weeks I received a nice package
in the mail with my membership card, of which I sent a
copy to the CMP.
- Show
proof of participation in a marksmanship or other
firearm related activity – I sent a copy of my state
concealed carry permit.
- Fill
out the three forms and have the Certification
notarized. This
is good for 3 years.
- Fill
out the order form and send it in along with all of the
above paperwork.
This
is the same process for ordering a rifle from the CMP.
At the time I ordered the barrel in March of 2010 the
CMP had a very large back-log of orders.
Three weeks after I sent in my order I received an
email that my order would be processed and shipped in 60 to
90 days. This
was not a problem for me since I was in no hurry to complete
this project. I
could have paid $70 more and gotten the new barrel much
quicker, but hey, I’m on a budget here!
After
another three weeks I received a call from a nice lady at
the CMP regarding my order.
Apparently my 8’s look like 6’s so they
couldn’t run my credit card.
I gave her the correct number over the phone and she
said the barrel would be shipped in about two weeks.
Finally my new barrel arrived about 7 weeks after I
sent in the order.
Installing
the New Barrel
The first thing I did was to slug the new barrel.
I thoroughly oiled the bore and drove a .30 caliber
soft lead bullet through the barrel.
The slug measured .308” at the grooves, and .300”
at the lands. This
not only gave me the proper internal measurements of the
barrel, but it also let me check for tight or rough spots in
the bore. It was
actually very easy to push the bullet through the bore
indicating there were no rough or tight spots.
I
installed the new barrel onto my
Springfield
receiver in the same manner that I installed the barrel on
the CAI receiver. I
removed the rear sight assembly from the receiver, and
installed the gas cylinder, gas cylinder lock, and gas
cylinder lock screw on to the barrel.
Wow, I had to drive the gas cylinder onto the new
barrel with a piece of wood and a mallet because the splines
were very tight! This
is great for accuracy because it keeps the front sight from
moving around. I
removed the front sight and tightened the barrel until the
bars of my homemade barrel/receiver timing gauge were
parallel. I
reinstalled the front sight, then removed the gas cylinder
lock screw and gas cylinder lock, then used a block of wood
and a mallet to remove the gas cylinder.
I then removed the action wrench from the receiver
and the barrel vise from the barrel.
I wrapped the gas cylinder splines and gas cylinder
lock threads with tape to protect them before proceeding.
Finish
Reaming
The chamber of the new barrel came about 0.010” short
which I verified with the Go headspace gauge; the bolt would
not close. This
meant I would have to finish cutting the chamber to the
proper headspace.
As
mentioned before, I rented a pull-through .30-06 finish
reamer from Elk
Ridge Reamer Rentals.
I called them before ordering the reamer and we had a
nice discussion on whether or not a chrome-molybdenum barrel
needed a carbide chamber reamer, or if a high-speed steel
reamer would work. The
gentleman I spoke with really didn’t know, so I called Krieger
Barrels Inc. which is the actual manufacturer of the
Criterion barrel. Neal,
at Krieger, informed me that a high-speed steel reamer would
work fine with a chrome-moly barrel.
So, I called Elk Ridge Reamer Rentals back again and
ordered the high-speed steel pull- through reamer.
I ordered it for 2 weeks which cost me an extra
$7.00, and I also purchased the $5.00 insurance just in case
something went wrong.
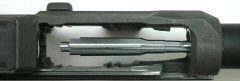
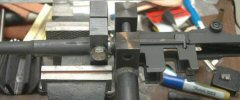
I
placed a bore guide on the front of the barrel and ran the
pull-through rod through the bore until it was visible in
the receiver. I
attached the reamer to the rod and liberally lubricated it
with cutting oil. I
pulled the rod until I felt the reamer contact the chamber,
then gave it about 10 turns.
I could feel the reamer cutting into the new barrel
as it cut a longer chamber and new throat.
I
pushed the reamer back into the action.
As shown in the above photo the flutes had steel dust
from the reaming process.
I unscrewed the reamer from the rod and removed the
rod and bore guide from the barrel.
I thoroughly flushed the reamer and chamber with
brake parts cleaner to remove all chips and cutting oil,
then ran a clean dry patch through the bore from the chamber
to the muzzle. I
used the Go headspace gauge to measure headspace as
described before. The
bolt would not close on the Go gauge indicating I had to do
more cutting.
I
repeated the cut 10 turns, clean and measure process until
the bolt would completely drop into battery with the Go
gauge in place. The
chamber and throat were now cut to the proper length.
Just to make sure I measured headspace with the Field
gauge and the bolt would not close.
Barrel
Break In
As mentioned before, the barrel I purchased was a chrome-moly
barrel manufactured by Criterion which is actually a
subsidiary of Krieger
Barrels Inc. Their
web site contains plenty of information regarding how to
break in a new barrel. When
Criterion manufactures a new barrel they state that they
hone (not lap) the barrel twice; once after reaming, and
again after rifling. However,
because I cut the final chamber dimensions by turning the
reamer 90-degrees to the direction of bullet travel, this
left reamer marks in the throat across (at right angles to)
the lands. The
following comes from the Krieger web site:
“In
a new barrel they [reamer
marks] are very distinct; much like the teeth on a very fine file.
When the bullet is forced into the throat, copper
dust is released into the gas which at this temperature and
pressure is actually a plasma.
The copper dust is vaporized in this gas and is
carried down the barrel.
As the gas expands and cools, the copper comes out of
suspension and is deposited in the bore.
This makes it appear as if the source of the fouling
is the bore when it is actually for the most part the new
throat. If this
copper is allowed to stay in the bore, and subsequent
bullets and deposits are fired over it; copper which adheres
well to itself, will build up quickly and may be difficult
to remove later. So
when we break in a barrel, our goal is to get the throat
polished without allowing copper to build up in the bore.”
For
chrome-moly barrels Krieger recommends 25 cycles of shooting
one round, then thoroughly cleaning the barrel, followed by
2 cycles of shooting 3 rounds, then thoroughly cleaning the
barrel, then firing 5 rounds and thoroughly cleaning the
barrel. Throughout
this process I would need to closely monitor the amount of
copper fouling that is being removed to gauge how smooth the
barrel throat is becoming.
Shoot
and clean takes a minimum of 20 minutes between each shot to
allow time for the solvent to remove the copper fouling.
Since the purpose of breaking-in a new barrel is to
polish the throat, I thought I could accelerate the
polishing process by lapping the barrel, either by hand or
by fire-lapping.
Hand
lapping is the process of driving a lead lap, or tight patch
impregnated with lapping compound back and forth through the
bore. However,
hand-lapping doesn’t always ensure good results, and if
not done properly, can alter the shape of the barrel causing
it to become egg-shaped, or producing enlarged areas where
the lap reversed direction.
I have hand lapped barrels before using a soft lead
lap. The problem
with using a lead lap is that it works only with the bore,
not the throat. This
is because the lands in the throat are larger in diameter
than in the barrel, and since a lead lap does not expand, it
would not polish the lands in the throat.
I found an interesting article online at the Twin
City Rod and Gun web site that provided a process for
hand-lapping a barrel using three different grits of
cleaning compound and tight patches.
Fire-lapping
involves shooting a bullet impregnated with lapping compound
down the bore at a much reduced velocity and pressure.
This has the effect of both polishing and tapering
the bore for maximum accuracy, but it can also open and
lengthen the throat. I
found an article on the Los
Angeles Silhouette Club web site written by Ken Mollohan
that has a little different method for fire-lapping.
Ken first ran a bore mop impregnated with J-B® Bore
Cleaning Compound through the bore being careful not to get
any compound in the chamber, then fired a low velocity, low
pressure jacketed round through the bore.
He repeated this process 5 or 6 times, then
thoroughly cleaned the barrel.
This process not only provided all the benefits of
fire-lapping, but it prevented damage to the throat, and
since the bullet itself was not impregnated with the lapping
compound, the cartridge cases did not have to be thrown
away.
I
decided to try a combination of both methods.
First I loaded 10 rounds of .30-06 with 5.0 grains of
Red Dot behind a 150 grain FMJ boat tail .308 bullet and a
large rifle magnum primer.
I put an empty case in the chamber and closed the
bolt to prevent compound from getting into the chamber,
impregnated a bore mop with USP Bore Paste, then ran the mop
back and forth through the entire length of the bore 20
times. This left
a small amount of compound in the bore.
I fired one low velocity round through the barrel,
inserted the same empty case into the chamber that I had
used before, then again ran the impregnated bore mop back
and forth through the bore several times.
This cleaned any powder residue and fouling from the
bore and prepared it for a second shot.
After performing this for 5 shots, I thoroughly
cleaned the barrel using solvent and dry patches.
I
threw away the first empty case I used and put a new empty
case in the chamber and closed the bolt.
I impregnated a clean bore mop with J-B® Bore Bright
which has a finer grit and ran the mop back and forth
through the entire length of the bore 20 times.
I fired one low velocity round through the barrel,
inserted the same empty case into the chamber, then again
ran the impregnated bore mop back and forth through the bore
several times. This
again cleaned any powder residue and fouling from the bore
and prepared it for a second shot.
After performing this for 5 shots, I thoroughly
cleaned the barrel using solvent and dry patches.
The bore was mirror bright and smooth and was now
ready for full pressure loads, and in theory the new throat
was polished which should help to prevent excessive fouling.
The
last thing I did just to make sure I hadn’t picked up any
nicks or burrs on the muzzle crown was to lap the muzzle
using a brass muzzle lap and 400-grit lapping compound.
This removes those nicks and burrs and, as mentioned
before, makes the ends of the lands and grooves sharp and
even.
Summary
My son lived with me from 1999 through 2000.
I purchased the CAI Garand for his birthday in 2000.
After firing maybe 50 rounds through it we had the
squib and bulged the barrel.
At the end of 2000 he moved to
California
but did not take his rifle with him.
So I’ve had his damaged rifle in my gun safe for
almost 10 years. During
that time I’ve slowly acquired the necessary tools, parts,
and knowledge to repair his rifle.
His
rifle is now repaired, albeit with a used barrel, and is now
restored to shooting condition.
I installed a brand new barrel on my rifle, and
needless to say, it shoots very well.
The key to successful completion of this project was
having the correct tools.
Addendum
May
14, 2010
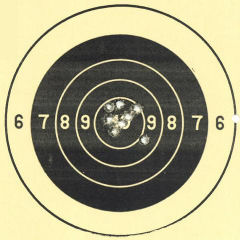
Ok, so how does my rifle shoot?
The above target shows the results of eight shots
from a sandbag rest at 50 yards.
Darn, I had one flyer!
Also, I had no fouling, and the bore was very easy to
clean. I fired
maybe 60 rounds through it, and it cleaned up with 3
patches!
Part
3: Replacing
the Stock
MidwayUSA had Boyds’
replacement M1 Garand stock and hand guard sets on sale so I
purchased one to finish the improvements to my Garand.
Although this wasn’t really part of my original
plan, the timing and price were right since I had a couple
of MidwayUSA gift certificates burning a hole in my pocket!
The original stock that came with my rifle was
cracked and repaired in many places.
The Boyds’ stock came stained and finished with an
oil finish. I
found an article on surplusrifle.com
on how to replace the stock and stock hardware.
Following their instructions I was able to install my
new stock. I was
pleased to see that all the hardware fit perfectly and
tightly, but I was disappointed to find the butt was larger
than the butt plate.

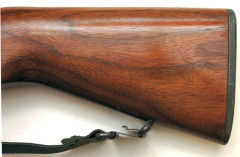
As
you can see from the above photo, the stock was about
1/16” larger than the butt plate.
If this edge ever caught on anything small chips of
wood could flake off leaving unsightly nicks and gouges in
the wood. This
happened to a Ted Williams model 100 .30-30 that I restored
because someone had replaced the butt stock and the butt
plate was too small leaving an edge.
Refer to my article Restoring a Ted Williams
Model 100 .30-30.
You can also see in the photo rough tooling marks
left from the manufacturing process.
Looking
at other Garands with original military stocks it seems that
the rear of the butt was rounded so the edge of the wood
would mate with the butt plate.
So even though the Boyd’s stock was manufactured to
proper specifications, I wanted the butt to be straight
instead of rounded.
I
decided to sand the butt down so the butt plate would fit
flush. I tried
using sandpaper but this took too long and the paper would
fill up with finish too quickly.
I didn’t want to use any power tools because I did
not want to create any ripples or uneven areas.
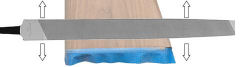
I discovered that using large files and draw-filing
performed the work.
To
draw-file I place each end of the file in each hand then lay
the file on the work surface.
I push and pull the file in a back and forth motion.
This removed wood fairly quickly but left the surface
of the stock smooth. When
the teeth of the file became full I used a brass brush to
clean them.
I
installed the butt plate onto the stock and put a piece of
blue painters tape around the edge. I
first used an 8” half-round bastard file to remove wood
almost down to the tape, then used a 10” mill bastard file
to draw-file the wood. I
finished with 150-grit sand paper to get the edge of the
butt even with the tape.
Ok,
so now I had a stock that was 3/4 finished and 1/4 in the
white. I removed
all the original stain using a stripper called Bix
Stripper that I purchased from my local home improvement
store. It comes
as a semi-paste that I applied with a brush.
I let it set for about 30 minutes, then wiped it off
with a paper towel. I
applied a second coat of stripper, again let it set for 30
minutes, then again wiped it off with a paper towel.
I then washed the stock with water and brushed with
steel wool. This
last step was important to remove all of the stripper and
get finish out of the grain.
Wetting the wood also raised the grain in preparation
for final sanding. Most
of the stain came off and left just the bare wood.
The wood appeared to be a dark walnut with beautiful
grain.
To
make sure all of the wood pieces matched I also removed the
finish from the hand guards.
I first removed all of the hardware, then removed the
surface finish by lightly draw filing with the 10” bastard
file. I used the
Bix Stripper as I did on the stock, then used water and
steel wool to remove the stripper.
I was very careful when working with the hand guards
because they could crack or split.
I
wanted to duplicate the same finish that came on the stock
so I fired off a quick e-mail to Boyds’ and they
recommended that I use Minwax®
Gunstock stain #231 to match their color and finish.
I sanded all of the wood with 150-grit, then 400-grit
and finally with 600-grit sandpaper.
I was careful not to sand the stock where the
receiver and trigger group mated with the stock; this would
have altered the fit. I
applied the Minwax® Gunstock stain which goes on a
brick-red color. I
let the stain set then wiped it off with a paper towel.
The result was a deep reddish-brown color.
After
the stock and hand guards dried I applied five coats of Birchwood
Casey® Tru-Oil®. I
have always liked the smooth, semi-glossy finish Tru-Oil
imparts to the wood. I
realize this is not a military finish, but my Garand is no
longer going to be used for warfare so I don’t care if the
stock shines. To
ensure no water would get into the stock and damage any of
the rifle’s metal, I coated the inside of the stock and
hand guards with polyurethane.
I have a 1924 Yugoslavian Mauser where a part of the
stock absorbed water and the wet stock sat against the metal
of the barrel and caused corrosion and deep pitting.
Refer to my article Restoring
a Yugo 24 Mauser.
Refinishing
the Lower Band
The original lower band that had come with my rifle was
damaged. One end
of the hole for the lower band pin had cracked and separated
from the lower band itself.
I ordered a new lower band from Numrich
Gun Parts Corp. but it was pitted on the outside.
I took the 10” mill bastard file and draw filed the
outside ring of the band until most of the pits were
removed. One pit
was so deep I couldn’t remove all of it; otherwise the
metal would be too thin.
I polished the band with 400-grit wet/dry paper, then
removed the rest of the old Parkerizing with my bead
blaster. Finally
I re-Parkerized the band using a kit I purchased from Shooter
Solutions™. I
purchased the heavy-duty manganese kit which gives a black
finish and have used this kit to finish a number of
1911’s.
The
above photo shows the result of my work, but the photo
really doesn’t due it justice.
My M1 Garand now looks and shoots great and will last
for generations to come.
I am proud to own this wonderful piece of American
war history, and I enjoy shooting it regularly.