Disclaimer:
This article is for entertainment only and is not to
be used in lieu of a qualified gunsmith.
Please defer all firearms work to a qualified
gunsmith. Any loads
mentioned in this article are my loads for my guns and have
been carefully worked up using established guidelines and
special tools. The
author assumes no responsibility or liability for use of
these loads, or use or misuse of this article.
Please note that I am not a professional gunsmith,
just a shooting enthusiast and hobbyist, as well as a
tinkerer. This
article explains work that I performed to my guns without
the assistance of a qualified gunsmith.
Some procedures described in this article require
special tools and cannot/should not be performed without
them.
Warning:
Disassembling and tinkering with your firearm may
void the warranty. I
claim no responsibility for use or misuse of this article.
Again, this article is for entertainment purposes
only!
Tools
and firearms are the trademark/service mark or registered trademark
of their respective manufacturers.
| No
Photo |
-
MAKE
SURE YOUR RIFLE IS UNLOADED!
-
Unfold and latch the barrel.
- Remove
the recoil spring, bolt, and bolt head as described
in the owner’s manual.
|
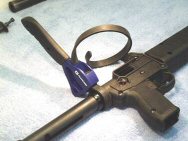 |
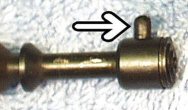
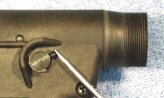
- Using
a strap wrench, unscrew the stock collar.
Holding the rifle normally, the collar has a
standard right-hand thread, i.e. turn to the left to
loosen, turn to the right to tighten.
|
| No
Photo |
- Unlock
the barrel and fold in half, but do not latch it.
|
 |
- Place
a wooden dowel of the proper diameter into the
receiver and pull the trigger.
Remove the dowel and allow the hammer to
fall.
|
 |
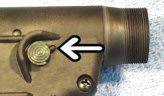
- Remove
the two ‘C’ clips from each side of the safety
button.
Note:
The ‘C’ clip in this photo has been
colored red to enhance visibility.
The actual clip is black.
|
 |
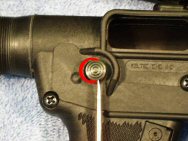
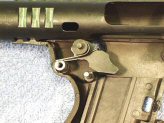
- Remove
the barrel hinge screw and washer from the left (non
ejection port) side.
|
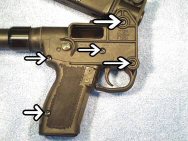 |
- Remove
the five screws from the right (ejection port) side
of the receiver.
The barrel hinge and trigger guard hinge
screws have washers; don’t lose them.
|
 |
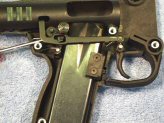
- Gently
pry apart the right receiver half.
You may have to use a flat blade screwdriver
to separate the receiver half from the barrel and
trigger guard hinges. Be
sure the trigger guard stays in the left receiver
half to keep the spring in place.
The
magazine release spring may stay in the right
receiver half; don’t lose it.
This is a very well designed weapon, no springs or
little pieces will fly out.
|
 |
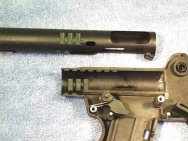
- Remove
the barrel assembly from the left receiver half and
set aside.
|
 |
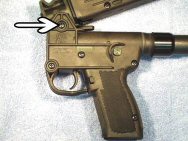
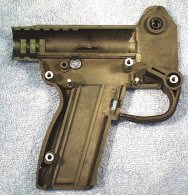
Before
proceeding, carefully examine the interior parts to see
their orientation and how they fit together. |
 |
- Remove
the magazine catch.
|
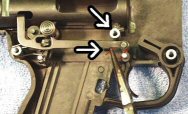 |
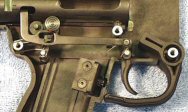
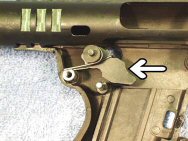
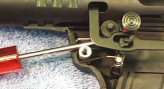
- Release
the trigger return/ disconnector spring.
With a small pair of needle-nose pliers,
carefully remove the leg of the spring that sets
against the trigger bar.
Bring it behind the trigger bar and over the
top of the adjacent receiver nut.
Note:
The spring in this photo has been colored red
to enhance visibility.
The actual spring is black/silver.
|
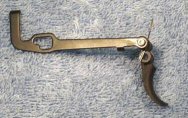 |
- Remove
the trigger/trigger bar as one unit.
|
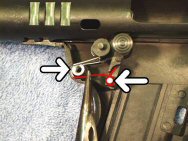 |
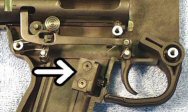
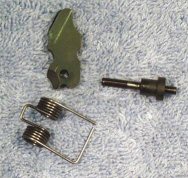
- Release
the sear spring and remove it.
With a small pair of needle-nose pliers,
carefully remove the leg of the spring that sets
against the receiver nut.
Bring it up and over the receiver nut, then
remove it from the sear axis pin.
Note:
The spring in this photo has been colored red
to enhance visibility.
The actual spring is black/silver.
|
|
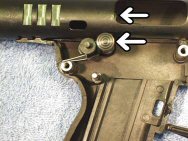
- Hold
the hammer back and remove the safety. There
is a small plunger and spring in the left side of
the safety button, do not lose them.
|
 |
- Allow
the hammer to rotate until there is no tension on
the hammer spring.
|
 |
- Remove
the bolt tube.
|
 |
- Remove
the hammer, hammer bushing, and hammer spring.
|
 |
- Remove
the hammer bushing.
Remember the position of the hammer spring
for reassembly.
|
| |
Reassembly |
|
-
Insert
the hammer into the hammer spring.
-
Insert
the hammer bushing into the hammer.
- Insert
the hammer, hammer spring, and hammer bushing
assembly into the left receiver half.
The legs of the hammer spring should rest
against the top of the adjacent receiver nut.
|
 |
- Press
the bolt tube into the left receiver half.
|
 |
-
Insert the safety
a. Attach the ‘C’ clip to the left
side of the safety.
b. Insert the safety spring and
safety pin into the left side of
the safety.
c. Hold the hammer back and
insert the safety from the
outside of the left receiver
half. Insert
the red side first
until the safety pin rests
against the side of the
receiver.
Note:
The safety pin should be oriented to the 2
o’clock position as you view the outside of the left
receiver half.
|
|
|
d. Release the hammer and allow
it to rest against the safety.
|
 |
e. Use a small, flat blade
screwdriver to depress the
safety pin, then press the
safety all the way into the
receiver until stopped by the
‘C’ clip.
|
|
-
Install
the sear onto the sear axis pin.
-
Install
the sear spring.
a.
Set
the spring on the sear axis pin.
Be sure the small leg fits into the sear.
b.
With a small pair of needle-nose pliers engage
the long leg of the spring to the bottom of the adjacent
receiver nut.
|
|
-
Install
the trigger bar and trigger as one unit.
Be sure the small leg of the trigger spring
sits behind the trigger axis pin.
- Engage
the long leg of the trigger spring to the bottom of
the small tab on the trigger bar.
|
|
|
- Insert
the barrel assembly into the left receiver half.
|
 |
- Insert
a toothpick or small screwdriver between the hammer
spring and the top of the receiver nut.
This will keep the spring from interfering
with the right receiver half.
|
|
- Insert
the magazine release.
|
 |
- Insert
a magazine into the magazine well so that it catches
the magazine catch.
|
|
- Insert
the magazine release spring into the right receiver
half.
|
|
-
Press
the right receiver half to the left receiver half.
Use a toothpick or small screwdriver to align
the safety in the safety hole.
Everything else should line up.
-
When
the right receiver half meets the
toothpick/screwdriver from step 11 above, remove the
toothpick/screwdriver.
-
Attach
all screws.
-
Start
the stock collar by hand for the first few turns.
Then use a strap wrench to tighten it.
- Insert
a wooden dowel into the receiver from the barrel end
to cock the hammer.
|
 |
-
Insert
the bolt end, bolt, and recoil spring and latch in
place as described in the owner’s manual.
- Test
the rifle for proper functioning, including the
disconnector function.
|
