Fixing the Dreaded Marlin Jam
by
Rusty
Marlin
Thanks to Rusty Marlin for
this article.
Click here to purchase a CD with this and all Kitchen Table
Gunsmith Articles.
Disclaimer:
This article is for entertainment only and is not to
be used in lieu of a qualified gunsmith.
Please defer all firearms work to a qualified
gunsmith. Any loads
mentioned in this article are my loads for my guns and have
been carefully worked up using established guidelines and
special tools. The
author assumes no responsibility or liability for use of
these loads, or use or misuse of this article.
Please note that I am not a professional gunsmith,
just a shooting enthusiast and hobbyist, as well as a
tinkerer. This
article explains work that I performed to my guns without
the assistance of a qualified gunsmith.
Some procedures described in this article require
special tools and cannot/should not be performed without
them.
Warning:
Disassembling and tinkering with your firearm may
void the warranty. I
claim no responsibility for use or misuse of this article.
Again, this article is for entertainment purposes
only!
Tools
and firearms are the trademark/service mark or registered trademark
of their respective manufacturers.
 The
Problem The
Problem
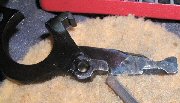
The "Marlin Jam" as it is affectionately known is
caused by an inherent design/manufacturing flaw of the Marlin
lever. The lever has a snail shaped cam surface that goes
around the pivot screw. This snail shaped cam rides on a
sloped surface on the bottom of the carrier and raises the
carrier enough to allow the first incoming shell into the
carrier and to block the next incoming round from jamming up
the works. Every time the lever is cycled the carrier bounces
on the forward edge of the cam. The forward most edge of this
cam is left sharp at the factory (the flaw).
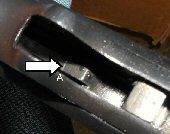 The
bouncing forges a notch into the bottom of the carriers' slide
surface and over time (high number of cycles) lowers the
carriers' initial pick-up height allowing the rim of the next
incoming shell to slip over the front and jam it up tight.
Note the notch labeled 'A' and marked with an arrow in the
photo. The
bouncing forges a notch into the bottom of the carriers' slide
surface and over time (high number of cycles) lowers the
carriers' initial pick-up height allowing the rim of the next
incoming shell to slip over the front and jam it up tight.
Note the notch labeled 'A' and marked with an arrow in the
photo.
Simply changing the carrier out as many repair places do is
only a temporary fix at best. The new carrier will get a notch
forged into it from the sharp edge of the lever cam and over
time will settle downward in the action and again give you the
“Marlin Jam”. Following the steps below will cure this
problem FOREVER.
The Cure for New Guns
With new guns (less than 50 cycles) you can generally get away
with just putting a radius on the forward edge of the lever
cam. While this will lower the initial pick-up height
slightly, it typically will still be high enough to prevent
the dreaded "Marlin Jam" from ever occurring. If
your rifle jams you will need to follow the steps outlined
above.
Many of you will
have guns that jam once in awhile but haven't figured out why.
You probably have an odd piece of brass or two in your
collection. For example the gun might run fine on Starline or
Winchester but lock up tight on R-P. R-Ps are slightly smaller
than others and this will cause the problem to be sporadic.
Eventually the gun will jam on anything you feed it and you
will need this fix.
The Fix for
Used Guns
Three things are required to fix the problem. The first two
prevent it from ever occurring again and the third retimes the
carrier to proper height. Don’t even bother to do them if
you aren’t going to do item 2A or item 3.
1) Put a
generous radius on the front edge of the snail cam on the
lever. I use between a .025 and .035" R. This radius
spreads the load out from the force of the carrier bounce and
prevents the forged notch from reoccurring. You will notice a
shiny line will form but it won’t be a notch like before.
The large radius also self limits how deep it can forge into
the softer carrier.
2A) Order a new
carrier from Marlin. If you do this, you will be done,
otherwise, read on...
2) Grind the
slip cam surface on the carrier to just remove the forged
notch.
These two items will make the problem worse until item three
is done.
3) Bend the
carriers' nose up about .05".
Use the heat and
bend method described below.
Clamp the
carrier in a large bench vice so the pivot hole axis runs
vertically. The two parallel faces at the pivot hole end need
to be clamped in aluminum blocks for a heat sink. If the heat
gets to the plunger spring you will need a new carrier, so the
heat sinks are very important.
Heat the neck
just behind the front of the carrier till dull red. Position a
block of steel (or brass) just behind the shell stop (tang
that hangs down in front) and tap the head "up".
This is actually going to be parallel to the floor.
Measuring this
movement can be difficult. I gave up trying after the first
few and now it’s by eye. After cooling try it in the gun. If
you went too far the very first incoming shell will jam as the
lever is opened; the carrier will wedge it up against the top
of the magazine opening. You will need to heat the carrier
again and tap it back a touch. This retimes the carriers'
initial pick up height to let one round in and keep the rest
in the magazine.
Rusty Marlin,
SASS #33284
|