Ruger® Mini-14® Cycling Problems
by Roy Seifert and Bob Shrank
Click here to purchase a
CD with this and all Kitchen Table Gunsmith Articles.
Disclaimer:
This article is for entertainment only and is not to
be used in lieu of a qualified gunsmith.
Please defer all firearms work to a qualified
gunsmith. Any loads
mentioned in this article are my loads for my guns and have
been carefully worked up using established guidelines and
special tools. The
author assumes no responsibility or liability for use of
these loads, or use or misuse of this article.
Please note that I am not a professional gunsmith,
just a shooting enthusiast and hobbyist, as well as a
tinkerer. This
article explains work that I performed to my guns without
the assistance of a qualified gunsmith.
Some procedures described in this article require
special tools and cannot/should not be performed without
them.
Warning:
Disassembling and tinkering with your firearm may
void the warranty. I
claim no responsibility for use or misuse of this article.
Again, this article is for entertainment purposes
only!
Tools
and firearms are the trademark/service mark or registered trademark
of their respective manufacturers.
Introduction
A reader of the Kitchen Table Gunsmith, Bob Shrank, recently
sent me an email describing a problem he was having with his
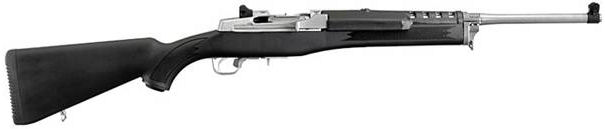
stainless steel Ruger® Mini-14®:
“Dear
Kitchen Table Gunsmith,
I
enjoyed your article on using foreign ammo in your .223 Ruger
Mini 14. [Refer
to my article Fixing
the Ruger® Mini 14/30 Bolt to Shoot Imported Ammunition.]
I have two of
them and enjoy shooting them.
After purchasing a new [stainless steel] model last year, and shooting it a bunch of times running several 100
round full [magazines]
through it, I decided to give it a thorough cleaning.
Without any written instructions, I ended up taking off
the gas port block to remove the forearm.
Even though I marked the barrel with a marker, and
carefully repositioned the block.
My almost new [stainless steel] Mini
14 is now a single shot, or worse, it jams all the time.
Is there a simple fix for this?
I
have considered taking my other Mini 14 apart to see if I can
match the amount of gas hole exposed, but I’d like to
prevent another problem. Can
you please help me out?”
It had been
awhile since I worked on a Mini-14 or Mini-30 but I remembered
there was some type of alignment pin involved with the gas
block so I got out my NRA firearms assembly book and looked up
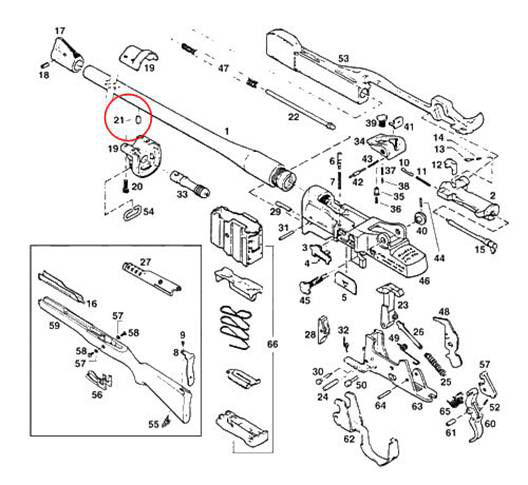
the Mini-14. Part
#21 circled in red in the above figure was listed as the gas
port bushing.
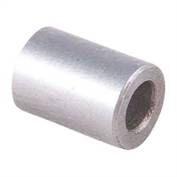
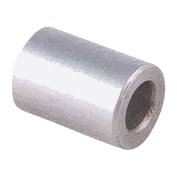
Gas
Port
Bushing
(not actual size)
The gas
port bushing has two functions; it properly aligns the gas
block with the barrel and piston, and it directs the hot gas
to the piston. Without
that bushing there would not be enough gas funneled to the gas
piston causing the symptoms Bob described.
I replied to Bob’s email with my suspicion that he
probably lost the gas port bushing when disassembling his
rifle. His reply
to me was that he did remember hearing something hit his
basement floor as he removed the gas block.
No
reflection on Bob here because I give him kudos for working on
his own rifle, but before disassembling a firearm beyond what
the manufacturer recommends for normal cleaning and
maintenance (removing the gas block is not recommended by
Ruger for normal cleaning and maintenance) it’s always good
to have an exploded diagram on hand.
This has saved my bacon a number of times with my own
guns. I recommend
the NRA
Firearms Assembly books which I have in my library
available direct from the NRA.
You can also find them on ebay of all places.
I also have The Gun Digest Book of Exploded Firearms
Drawings, 2nd Edition which has many diagrams of
older firearms no longer in production.
This book is out of print, but you can sometimes find
copies on ebay. Numrich,
also known as Gun Parts
Corp, has many schematics of older, obsolete firearms.
Another
gunsmithing trick is to disassemble a firearm over or inside a
box to catch small parts or flying springs.
Even placing separate cloths over and under the
assembly you are working on will prevent the loss of flying
springs or small parts. There
is almost no worse feeling in the world than having a spring
fly off into a crowded basement or work room, or having a
small part drop out of sight.
I believe these parts go to the same place as odd
socks.
I told Bob
that he could order the gas block bushing direct from Ruger,
from Numrich, or other parts suppliers on the internet such as
MidwayUSA or Brownells
and his rifle would be back in working order in no time.
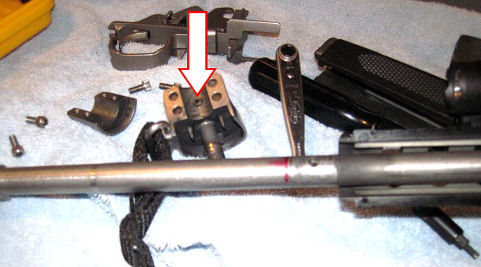
(Photo
courtesy Bob Shrank)
You can see
from Bob’s photo above just how dirty the gas block got.
The arrow points to the gas block bushing which he did
not lose after all. After
he cleaned the gas block and associated parts he reassembled
the rifle but did not get the gas block screws tight enough so
gas was leaking causing the malfunctions.
Perhaps this occurred because the bushing was not
properly aligned with the barrel and piston.
Regardless of the reason, gas was leaking preventing
the rifle from cycling. When
he disassembled the gas block once again he could see where
the gas was leaking which required him to do another thorough
cleaning.
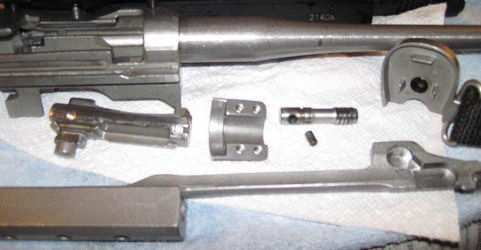
(Photo
courtesy Bob Shrank)
After all
the parts were cleaned he reassembled the rifle making sure
the gas block bushing was aligned and in the hole in the gas
piston (#33 in the exploded diagram) and all the gas block
screws were tight. A
quick trip to the range confirmed that he had his rifle back
in working condition.
Sometimes
the most difficult part of maintaining a firearm is getting it
back together after having taken it apart.
However, Bob should get some satisfaction out of being
able to diagnose and fix a problem himself.
That’s what gunsmiths do, both hobby and
professional, diagnose and fix problems.
Great job Bob!
|