Installing
a M1 Carbine Rear Sight on a Ruger Mini Thirty
by Roy Seifert
Click here to purchase a
CD with this and all Kitchen Table Gunsmith Articles.
Disclaimer:
This article is for entertainment only and is not to
be used in lieu of a qualified gunsmith.
Please defer all firearms work to a qualified
gunsmith. Any loads
mentioned in this article are my loads for my guns and have
been carefully worked up using established guidelines and
special tools. The
author assumes no responsibility or liability for use of
these loads, or use or misuse of this article.
Please note that I am not a professional gunsmith,
just a shooting enthusiast and hobbyist, as well as a
tinkerer. This
article explains work that I performed to my guns without
the assistance of a qualified gunsmith.
Some procedures described in this article require
special tools and cannot/should not be performed without
them.
Warning:
Disassembling and tinkering with your firearm may
void the warranty. I
claim no responsibility for use or misuse of this article.
Again, this article is for entertainment purposes
only!
Tools
and firearms are the trademark/service mark or registered trademark
of their respective manufacturers.
I
recently installed a combination front sight and flash
suppressor onto my Ruger Mini Thirty (refer to my article Adding
a Flash Suppressor to a Ruger Mini Thirty). The rear sight of the
Mini Thirty is adjustable for windage and elevation, but it
is not click adjustable. In
addition, this sight folds down if a scope is mounted to the
receiver. Although
this sight is fully functional, I have never really liked
the looks of it. I
have always liked the looks of a military-style rear sight,
so I decided to replace the folding rear sight with a
military-style rear sight.
Adjustable M1/M1A-style rear sights for the Ruger
Mini’s are available on the Internet anywhere from $40 -
$80 and up. This
seemed a bit pricey to me.
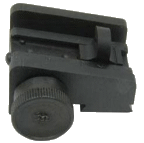
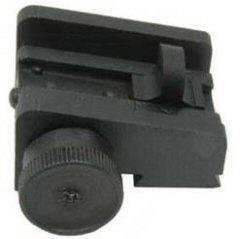 I
found that I could purchase a complete rear sight assembly for
a .30 M1 Carbine for $25.00 from Gun
Parts Corporation. This
rear sight assembly is adjustable for both windage and
elevation, and attaches to the receiver via a dovetail.
The dovetail for the M1 Carbine is larger than the
dovetail on the Mini Thirty, but that should be easy to
correct. Anyone
can add aftermarket parts to a firearm, but to modify, adapt
or improve something to make it work is true gunsmithing. I
found that I could purchase a complete rear sight assembly for
a .30 M1 Carbine for $25.00 from Gun
Parts Corporation. This
rear sight assembly is adjustable for both windage and
elevation, and attaches to the receiver via a dovetail.
The dovetail for the M1 Carbine is larger than the
dovetail on the Mini Thirty, but that should be easy to
correct. Anyone
can add aftermarket parts to a firearm, but to modify, adapt
or improve something to make it work is true gunsmithing.
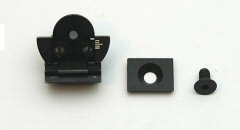
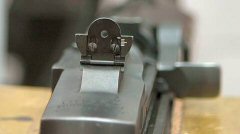
The
original Ruger rear sight and mount consists of three parts;
the rear sight assembly itself, windage lock, and windage lock
screw. The base of
the sight assembly is a dovetail that fits into a
half-dovetail slot cut into the top rear of the receiver.
The windage lock provides the front half of the
dovetail slot into which the sight base sets.
The windage lock screw provides tension on the windage
lock, which holds the sight in place.
The width of the original sight base dovetail is
0.376”. The
width of the M1 Carbine sight base dovetail is 0.470”.
Both are a 60-degree dovetail.
There are a couple of ways I can approach mounting the
carbine sight:
- Mill
0.094” off the rear of the carbine dovetail so it fits
with the original Mini Thirty parts.
This may be the best solution since I won’t have
to modify the receiver.
- Drill
and countersink a hole in the carbine sight base, and
drill and tap a corresponding hole in the receiver so the
original windage lock screw holds the new sight in place.
This will definitely prevent the sight from moving,
but would require disassembling the sight if I ever have
to remove it.
Ultimately,
I decided to mill 0.094” off the rear of the sight base
dovetail because the base was not wide enough to accommodate
the width of the windage lock screw head and the small pad on
the front of the elevation adjustment base.
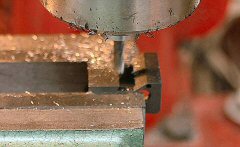
I
disassembled the sight and placed the base upside down in the
machinist vise on my mill.
Then I took a 3/16” square end bit and milled off
0.094” from the rear of the sight base dovetail.
This pilot cut prevents the dovetail bit from loading
up.

Then I took
a 60-degree sight dovetail cutter and cut the final dovetail.
After performing the dovetail cut I cold-blued the
exposed metal. I
cleaned and oiled the sight base and tried it for fit. It
fit into the dovetail perfectly, and the windage lock held it
tightly in place.
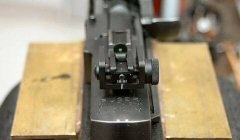
I
reassembled the sight and used acetone to clean the top of the
receiver where the new sight sets, and cleaned the base of the
new sight. I put a
few drops of Loctite 609 onto the base of the sight, centered
the sight in the dovetail, and tightened the windage lock
screw. Loctite 609
is designed to be used where two metal parts fit together. I
frequently use it on sight bases to prevent the sight from
moving. It takes
about 24 hours to fully cure.
Unlike glue or epoxy, the sight can be removed later.
Now that my
Mini Thirty has a flash suppressor and a new rear sight, it
looks more military than ever. Now
it is off to the range to get it sighted in.
Ok, so you
think having a mill puts this project outside of the ability
of a kitchen-table gunsmith? Yes,
the mill allowed me to reduce the dovetail width quicker, but
I could have accomplished this task with a vise and files. I
could have used a safe-edge file to reduce the width to
0.376”, and then used a 60-degree dovetail file to cut the
dovetail. So this
project is well within the abilities of the kitchen table
gunsmith.
|