Polishing
Revolver Cylinder Chambers
by Roy Seifert
Click here to purchase a
CD with this and all Kitchen Table Gunsmith Articles.
Disclaimer:
This article is for entertainment only and is not to
be used in lieu of a qualified gunsmith.
Please defer all firearms work to a qualified
gunsmith. Any loads
mentioned in this article are my loads for my guns and have
been carefully worked up using established guidelines and
special tools. The
author assumes no responsibility or liability for use of
these loads, or use or misuse of this article.
Please note that I am not a professional gunsmith,
just a shooting enthusiast and hobbyist, as well as a
tinkerer. This
article explains work that I performed to my guns without
the assistance of a qualified gunsmith.
Some procedures described in this article require
special tools and cannot/should not be performed without
them.
Warning:
Disassembling and tinkering with your firearm may
void the warranty. I
claim no responsibility for use or misuse of this article.
Again, this article is for entertainment purposes
only!
Tools
and firearms are the trademark/service mark or registered trademark
of their respective manufacturers.
When a
revolver comes from the factory, the chambers in the
cylinder are often just rough-cut and can contain burrs and
cutting marks. These
burrs and cutting marks can make it difficult to extract
empty cases, and difficult to remove powder fouling.
Polishing the chambers makes the cases easy to
extract, and makes the chambers easy to clean.
The
processing for polishing chambers is relatively easy and
only requires simple power tools:
- Use
a special medium-grit hone to hone/polish each chamber
to remove tooling marks
- Final
polish using a fine-grit hone
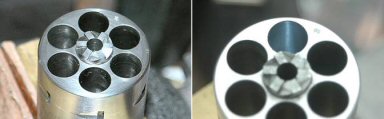
It is
difficult to tell from my photos, but each chamber had
tooling marks around the circumference down the entire
length of the chamber. These
were left when the chambers were reamed at the factory. The
goal is to polish out those tooling marks.
I have four
Ruger® single-action revolvers in .45 LC; two that I use for
Cowboy Action Shooting™ and two that I use for
hunting. When unloading
my cowboy guns I want the brass to fall out. For my
hunting guns I have
some fairly high-pressure loads that I use and are sometimes hard to
eject. These are
the cylinders that I want to polish.
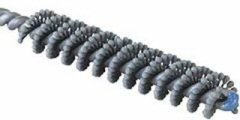
Brownells
sells a cylinder hone specifically designed to polish chambers
in revolver cylinders called a Flex-Hone.
This is the correct tool for polishing chambers and
consists of small balls of polishing grit on the ends of a
spiral wire brush. The
Flex-Hone comes in two different grits, medium and fine.
The medium-grit hone is used to polish-out the tooling
marks, and the fine-grit hone is used to final-polish the
chamber. Brownells
states that you should only use their Flex-Hone
Oil as the cutting/lubricating agent, and that you should
not spin the hone any faster than 750 RPM.
This is well within the slow speed of my cordless
drill.
A word of
caution here; I do not want to polish the chambers mirror or
bearing smooth. When
the cartridge case expands, it needs something to grip
against, otherwise I could get excessive pressure.
First, I
used the medium Flex-Hone to polish out the tooling marks.
I put a few drops of Flex-Hone oil in the chamber,
chucked the hone into my cordless drill and ran the Flex-Hone
in and out of the chamber at slow speed.
It took about 10 minutes to polish out the tooling
marks. I added a
few drops of oil after every minute.
After every two to three minutes or so, I cleaned the
chamber and checked progress.
When I couldn’t see any tooling marks, I switched to
the fine Flex-Hone to final polish the chamber.
It took five minutes to final polish each chamber.
Each time, I put a few drops of the oil into the
chamber and ran the hone for about 1 minute, then added a few
more drops of oil.
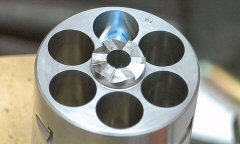
Again, it
is somewhat difficult to tell from my photo, but the chambers
are now smooth after honing. I
placed a small white LED light in one of the chambers and you
can see the reflection of the head in that chamber.
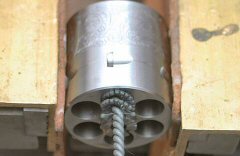
Although
I have performed this procedure using a hand drill, I found
that using a drill press works much easier.
I wrapped a paper towel around the cylinder to pad it,
then put it in my machinist vise with the ratchet facing up.
I used a level to make sure the cylinder was straight.
I set my drill press to 720 RPM, locked the hone in the
drill press chuck and centered it over a chamber.
I lowered the hone into the chamber and added honing
oil, then turned on the drill press.
As the hone rotated in the chamber, I moved the quill
up and down. I
added a few drops of oil after every minute.
After ten minutes with the medium-grit hone, I moved to
the next chamber. After
all chambers were finished, I removed the cylinder and
thoroughly cleaned it, then put it back in the vise.
With the fine-grit hone I spent five minutes on each
chamber.
The empty
cases from the high-pressure loads I use in these revolvers
now eject easily. Prior
to polishing the chambers, the tooling marks would hold soot
and powder residue and I would have to spend a lot of time
scrubbing them out with a brush. Now,
just two or three patches soaked in powder solvent completely
clean the entire cylinder. Hey,
anything that makes a gun easier to clean is great by me.
|
