Performing an Action Job on a Ruger Redhawk
by Roy Seifert
Click here to purchase a
CD with this and all Kitchen Table Gunsmith Articles.
Disclaimer:
This article is for entertainment only and is not to
be used in lieu of a qualified gunsmith.
Please defer all firearms work to a qualified
gunsmith. Any loads
mentioned in this article are my loads for my guns and have
been carefully worked up using established guidelines and
special tools. The
author assumes no responsibility or liability for use of
these loads, or use or misuse of this article.
Please note that I am not a professional gunsmith,
just a shooting enthusiast and hobbyist, as well as a
tinkerer. This
article explains work that I performed to my guns without
the assistance of a qualified gunsmith.
Some procedures described in this article require
special tools and cannot/should not be performed without
them.
Warning:
Disassembling and tinkering with your firearm may
void the warranty. I
claim no responsibility for use or misuse of this article.
Again, this article is for entertainment purposes
only!
Tools
and firearms are the trademark/service mark or registered trademark
of their respective manufacturers. All tools were
purchased from Brownells
unless otherwise indicated.
Introduction
I recently modified a Ruger Redhawk chambered in .45 Colt to
also fire .45 ACP by milling the ejector star (refer to my
article
Converting a KRH .45 LC Redhawk to shoot .45LC and .45ACP).
Now I wanted to perform an action job on this revolver.
An action
job consists of polishing all of the action parts where they
make contact to reduce friction and make the action
smoother. Certain angles and surfaces can also be modified
to make the trigger pull heavier or lighter. I had already
polished out some burrs in the frame where the hammer and
trigger were rubbing, so now I was ready to work on the
action parts themselves.
Just a
brief note about polishing – I constantly read that when
polishing you don’t want to remove any metal, just polish
the surfaces. Polishing, by its very nature, removes a very
small amount of metal to make the surfaces smooth. This
usually involves removing burrs or high spots, but not deep
pits or tooling marks unless absolutely necessary. The goal
is not to remove so much metal as to change the
angles or dimensions of the parts.
I viewed
a number of videos on You Tube to get some ideas on how to
perform an action job on the Ruger Redhawk, Super Redhawk,
GP100, and SP101 which all have essentially the same action,
but most were incomplete, and a couple are just downright
wrong.
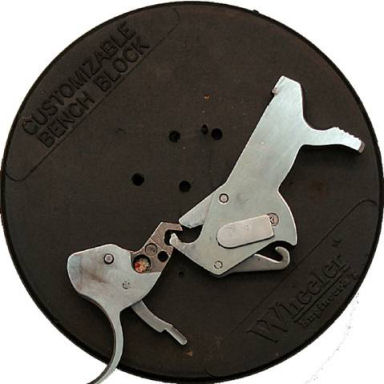
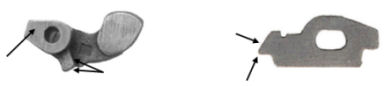
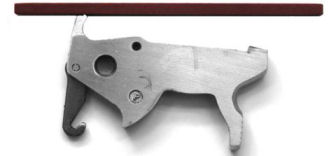
Action
Cycles
Before polishing any surfaces, I wanted to get an idea of
how the hammer and trigger interacted in both single-action
and double-action modes so I could determine the surfaces
that would need polishing. I used a bench block and drilled
two holes to hold the trigger and hammer pivot pins. I also
drilled a 1/16” hole for a roll pin to keep the hammer from
moving too far forward, which simulated the frame. I
removed the pawl and transfer bar for clarity. The
placement of the holes may not be perfect, but they were
close enough so I could see what parts were touching during
both the single-action and double-action cycles.
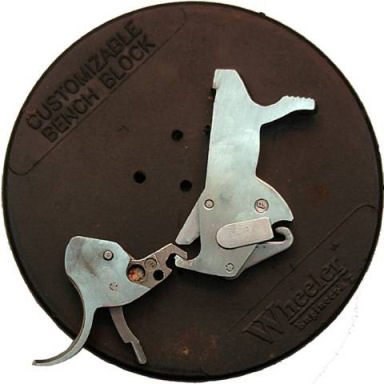
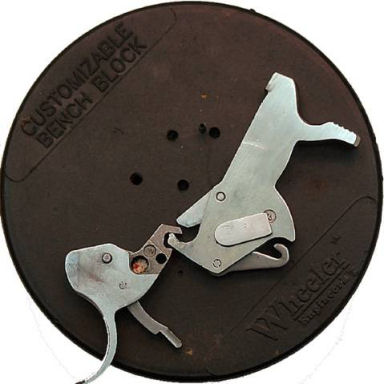
With the
hammer and trigger at rest, the mainspring holds the hammer
against the frame and also holds the trigger forward. Note
how the trigger hook is between the hammer dog and hammer
hook. The Redhawk uses one spring as both the hammer
mainspring and trigger return spring. This is one reason
why the single-action trigger pull on a Redhawk is so heavy.
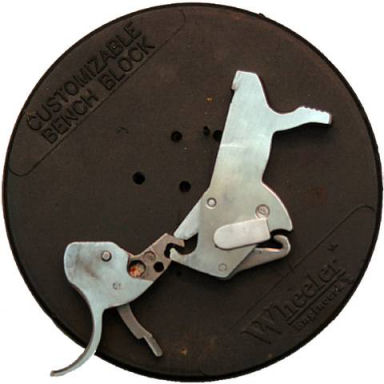
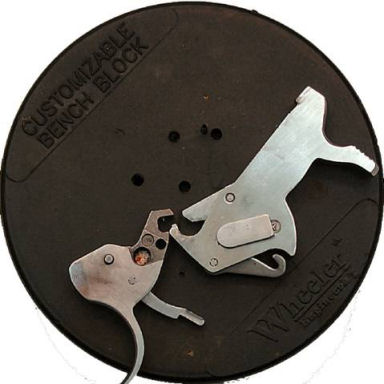
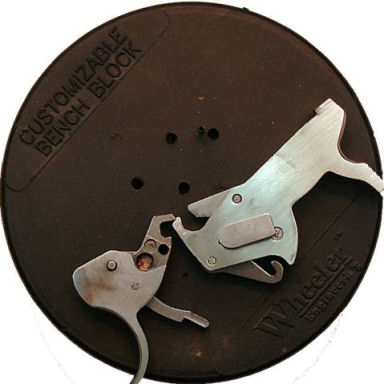
Pressing
the trigger to the rear begins the double-action cycle. The
top of the trigger hook presses on the bottom of the hammer
dog causing the hammer to begin to rotate. These two
surfaces need to be polished and lubricated.
At the
same time as the trigger begins to move, the cylinder bolt
drops down to unlock the cylinder, the pawl rises up to
engage the cylinder ratchet to rotate the cylinder, and the
transfer bar begins to rise up to cover the rear of the
firing pin. These parts are not shown but also need to be
polished to eliminate any friction.
As the
trigger is continued to be pressed to the rear, the hammer
movement is transferred from the top of the trigger hook and
the hammer dog to the bottom of the hammer and the
double-action sear on the trigger. These two surfaces will
also need to be polished and lubricated. The point of the
double-action sear needs to be gently rounded so it won’t
gouge the bottom of the hammer.
The
cylinder bolt is released and a spring and plunger causes it
to pop up and rub against the cylinder creating a drag
ring. The pawl continues to rise causing the cylinder to
continue to rotate, and the transfer bar also continues to
rise.
In the
final stage of the double-action cycle, the trigger has been
pressed to the point where the double-action sear is just
ready to release the hammer. As the trigger continues to
move to the rear the sear releases the hammer and the hammer
falls. These surfaces need to be polished and lubricated,
but the angles should not be changed.
Just
before the hammer falls, the cylinder has been rotated
enough that the bolt falls into a bolt notch in the cylinder
which locks the cylinder in place, and the transfer bar is
high enough to engage the rear of the firing pin.
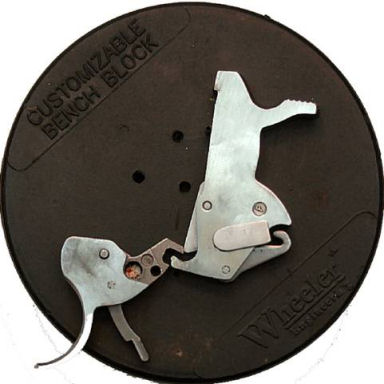
Releasing
the trigger after the hammer falls causes the single-action
sear on the trigger to depress the hammer dog. As the
trigger moves forward the single-action sear presses on the
hammer dog causing the dog to rotate.
When the
single-action sear on the trigger clears the end of the
hammer dog, a spring and plunger behind the hammer dog
causes the hammer dog to pivot to the front thereby
resetting the action. Again, where surfaces meet and rub
together, they need to be polished and lubricated. As the
trigger moves forward, the pawl and transfer bar are lowered
to their reset positions.
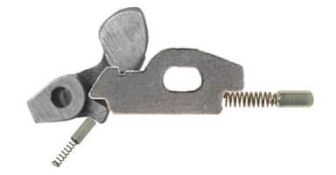
Nestled
inside the trigger assembly are the cylinder bolt and the
trigger plunger. The trigger plunger causes the bolt to
rotate down which unlocks and releases the cylinder. When
the trigger is released and moves forward, the angled front
of the trigger plunger rides against a cam on the rear of
the bolt causing it to move backwards. The end of the
spring for the pawl plunger also rides against the rear of
the trigger plunger and causes it to move forward and slide
over the bolt cam in preparation to rotate the bolt at the
beginning of the next cycle.
The
engagement surfaces on these two parts need to be lightly
polished where shown. Over-polishing these two parts will
affect the timing of the bolt. The sides of the bolt and
trigger plunger can also be lightly polished; just enough to
remove roughness and high spots, but not mirror smooth or
the dimensions will be changed. All surfaces that touch
need to be cleaned and lubricated after polishing.
To begin
the single-action cycle the hammer is pulled to the rear.
The top of the single-action hammer hook presses against the
underside of the trigger which causes the trigger to begin
moving to the rear. The underside of the single-action sear
on the trigger, and top surface of the single-action notch
on the hammer need to be polished and lubricated.
As
before, when the trigger begins to move, the bolt falls
unlocking the cylinder, the pawl and transfer bar begin to
rise and the cylinder begins to rotate.
As the
hammer continues to be pulled to the rear, the single-action
sear on the trigger falls into the single-action notch on
the hammer. Mainspring pressure holds the hammer notch
against the trigger sear. When the trigger is pulled, the
sear moves out of the notch allowing the hammer to fall.
The ledge of the single-action notch on the hammer can be
reduced to remove single-action drag, and the sear and notch
need to be polished glass-smooth.
When the
trigger is pressed, the single-action sear moves out of the
single-action notch and the hammer falls. When the
trigger is released the action resets.
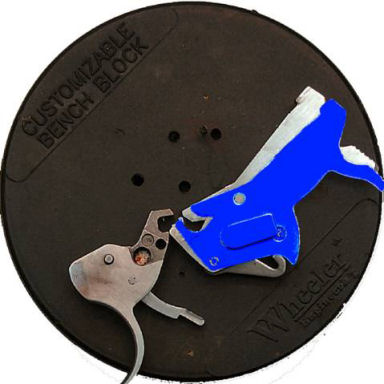
It is
important to note that the hammer comes back farther in
single-action mode (shown in blue in the above photo) than
in double-action mode. That means the hammer has less
striking force against the firing pin in double-action
mode. When I replace a mainspring I always test with CCI
primers to see if they will fire in double-action mode. CCI
primers are the hardest in the industry, and the hammer has
less energy in double-action mode.
Polishing
Tools
I used the following tools to polish the trigger and hammer:
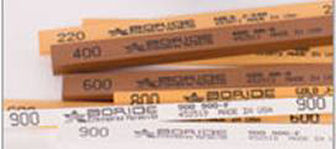
·
400 and
600-grit narrow polishing sticks – available from
Boride Engineered Abrasives. They make a gunsmithing
kit with coarse and fine, wide and narrow polishing sticks
that I have used on many guns. Oil is used to clean these
polishing sticks.
·
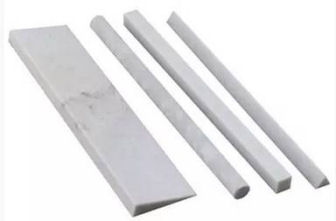
Fine
Arkansas stone – available from Brownells. They make a
4-stone set
#975-104-000 that comes in different shapes perfect for
gunsmithing use. Oil is used to clean these stones.
·
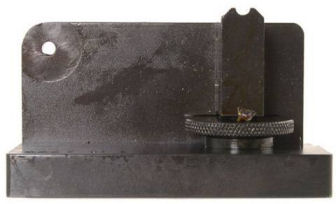
Power
Custom Series I Stoning Fixture – The proper tool for
polishing the trigger sear. Available from MidwayUSA.com,
#743549, this jig ensures that surfaces are kept flat
and square.
·
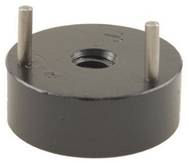
Ruger
Redhawk Adapter for Power Custom Series I Stoning Fixture –
This adapter fits the Series I stoning fixture and sets the
Ruger Redhawk trigger in the proper position so the
single-action sear can be polished. This is also available
from MidwayUSA.com,
#335275.

·
Ceramic
Polishing Sticks, White, Extra Fine – Available from
Brownells
#080-721-601 used to polish the single-action sear.
Water is used to clean a ceramic stick.
Polishing
the Single-Action Sear

I
installed the Redhawk adapter onto the Power Custom Series I
stoning fixture. I removed the pawl and plunger and the
trigger plunger from the trigger and mounted it onto the
adapter. I marked the sear with a blue marker to ensure I
was polishing the surface flat. I used the white extra-fine
ceramic stick to polish the surface. When the stick became
dirty I used water to clean it.
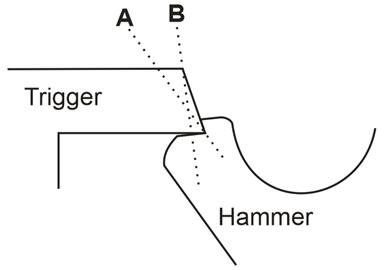
It is
possible to change the angle of the single-action sear to
increase or decrease the single-action trigger pull. A
small change in angle goes a long way so must be done very
carefully in very small increments. The Power Custom Series
I stoning fixture is designed so that moving the adjustment
wheel changes the angle of the stone against the sear.
Changing
in the direction of angle A will make the trigger pull
heavier. In this situation the trigger is actually causing
the hammer to rotate which is called “hammer push” which
results in a heavy trigger pull. Notice the gap between the
sear and the hammer notch.

Changing
in the direction of angle B will make the trigger pull
lighter. If this angle is too large the hammer could slip
off of the sear causing a very unsafe condition.
I decided
not to change the angle in any way on my revolver. I
certainly didn’t want to make the single-action trigger pull
any heavier than it already was, and I didn’t want to risk
making the revolver unsafe; especially since I reduced the
height of the single-action notch on the hammer.
Reducing
the Single-Action Notch
The
single-action trigger pull had a bit of creep which I wanted
to remove. I used a 400-grit polishing stone and reduced
the notch on the hammer to 0.010”. I marked the lip with a
blue marker and carefully stoned the lip until the notch was
reduced. This was a trial and error process; I reduced the
lip by about 10-20 strokes with the stone, then reassembled
the gun to test for creep. Reducing the notch and replacing
the mainspring with a 14# mainspring reduced to
single-action pull to 4-pounds, 4-ounces.
Polishing
Hammer Bottom
Next I
used a 600-grit polishing stick to polish the bottom of the
hammer. This is where the double-action sear rides and
needed to be smooth.
Polishing
the Hammer Dog
I used a
rubberized polishing tip and my high-speed rotary tool to
polish the top and bottom edges of the hammer dog. There
are no critical angles here so the power-tool worked great.
I made sure the polishing tip was flat against the bearing
surfaces.
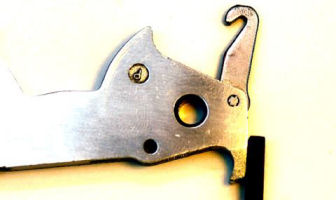
Polishing
the Trigger Hooks
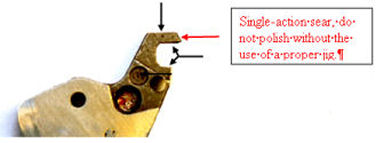
The
trigger hooks needed to be polished in the areas shown in
the above figure. These surfaces make contact with the
hammer in both single-action and double-action modes. I
didn’t touch the single-action sear because I had already
polished this using a proper jig.
Replacing
the Mainspring
I purchased a Wolff Redhawk spring kit from MidwayUSA.com
#139298 which contained a 12#, 13#, and 14# mainspring.
The factory is 19#. Originally I had installed the 12#
spring, but that wouldn’t ignite .45 ACP cartridges in
double-action mode. I installed the 14# spring which now
reliably ignites the .45 ACP cartridges.
Reassembly
I lubricated all moving parts with CLP and put Brownells
Action Lube Plus
#083-050-002 on the single-action sear, hammer notch,
and double-action sear and hammer surface. I dry-fired the
gun over 100 times to wear-in the parts I just polished;
especially the single-action sear. The double-action is
smooth and the Ruger design prevents stacking. Stacking is
where the trigger pull gets heavier at the end of the
double-action cycle.
Results
The single-action trigger pull is now crisp with no
perceptible creep or drag. It’s still heavy and takes a bit
of getting used to, but it is very acceptable and the gun is
a pleasure to shoot.
Please
note that Ruger takes a dim view of performing any
modifications to their firearms; especially to the action.
If I was to ever have to send the Redhawk in for service,
chances are all my polished and/or modified parts would be
replaced with factory parts and I would have to start all
over.
|