Refinishing a .45 ACP Conversion Cylinder with Brownells
Dicropan IM®
by Roy Seifert
Click here to purchase a
CD with this and all Kitchen Table Gunsmith Articles.
Disclaimer:
This article is for entertainment only and is not to
be used in lieu of a qualified gunsmith.
Please defer all firearms work to a qualified
gunsmith. Any loads
mentioned in this article are my loads for my guns and have
been carefully worked up using established guidelines and
special tools. The
author assumes no responsibility or liability for use of
these loads, or use or misuse of this article.
Please note that I am not a professional gunsmith,
just a shooting enthusiast and hobbyist, as well as a
tinkerer. This
article explains work that I performed to my guns without
the assistance of a qualified gunsmith.
Some procedures described in this article require
special tools and cannot/should not be performed without
them.
Warning:
Disassembling and tinkering with your firearm may
void the warranty. I
claim no responsibility for use or misuse of this article.
Again, this article is for entertainment purposes
only!
Tools
and firearms are the trademark/service mark or registered trademark
of their respective manufacturers.
Introduction
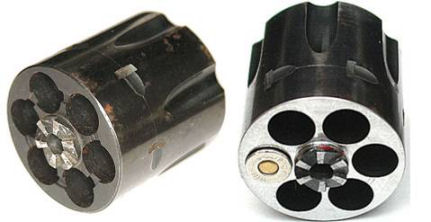
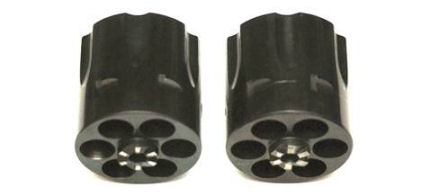
Cylinder As Received (left), Milled and Fitted (right)
I
recently purchased two Ruger ,45 ACP conversion
cylinders that I found on ebay that came from old-model
Ruger Blackhawks. I fitted these cylinders to my old
model Ruger Vaqueros, refer to my article
Fitting a .45 ACP Conversion Cylinder. One of
the cylinders was pristine and well cared for; the other
was dirty and had rusted.
Many
years ago Ruger would provide their extra cylinders in a
red felt bag; the spare cylinder for my Single-Six
liberty gun had one. The problem with these bags was
that they absorbed moisture. Most people never removed
the spare cylinder from the bag so eventually the
cylinder developed rust as you can see from the above
photo. I also milled the rear face of this cylinder to
match the second cylinder so a lot of bare metal was
exposed.
If you
read my articles you know I am a big fan of cold-bluing. I
have done complete receivers with cold blue solutions and
they have come out looking very nice. This time I wanted to
try a different process using Brownell’s Dicropan IM®.
Rather than using hot bluing salts and a single dip process,
Dicropan IM is a slower rust-bluing process that requires
multiple repeat dipping and carding. I remembered reading
about this process in the October, 2011 issue of American
GunSmith and wanted to try it out.[1]
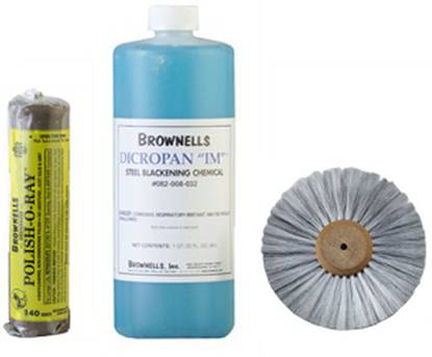
Materials
Brownells sells a complete Dicropan IM bluing kit
#082-905-105 but I already had most of the components,
so I purchased just what I needed; one quart of Dicropan IM
#082-008-032, 400-grit polishing compound
#080-505-400, and a soft stainless-steel wire wheel
#360-164-631. The wire wheel is used to brush off the
surface rust caused by the rust-bluing process. This
brushing is called “carding”. The Dicropan IM instructions
say to use degreased steel wool for the carding process, but
the wire wheel will help me card the rear face of the
cylinder. I degreased two pads of 000 steel wool by
unrolling a small piece and soaking it in TCE. I then dried
the pad with a paper towel.
I also
needed a means of cleaning and degreasing the cylinder, a
pot of boiling water, and a method for suspending the
cylinder in the boiling water. I already had Brownells TCE
#083-060-032 for cleaning and degreasing, and my wife
purchased a cast-iron pot at Goodwill that was deep enough
to submerge the cylinder so I was pretty much ready to go.
Polishing
and Removing Rust
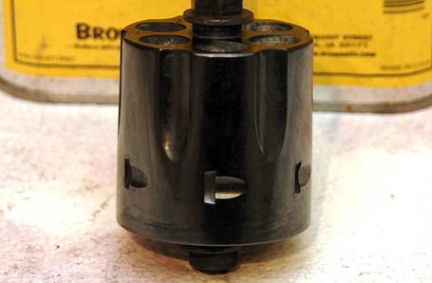
As with all forms of finish, preparation is everything! As
you can see from the first photo the cylinder had some bad
rust spots. Where ever there was rust a pit existed because
rust is a corrosive process which eats away metal. Why does
rust occur on a blued metal surface? Bluing is a process in
which steel is only partially protected against rust with a
passive outer-coating of corrosion, and is named after the
blue-black appearance of the finish. Gun bluing is an
electrochemical conversion passive coating resulting from an
oxidizing chemical reaction with iron on the surface. This
process forms magnetite (Fe3O4), the
black oxide of iron. Black oxide provides only minimal
protection against rust, which is why blued firearms must
also be treated with a water-displacing oil to reduce
wetting and the galvanic action that causes rust; the orange
iron-oxide (Fe2O3). As mentioned
before, rust is corrosive; it eats away the base metal and
leaves pits. I wanted the cylinder to be polished and
smooth like it came from the factory so first I had to
polish out the rust and pits.
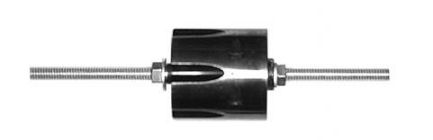
I
installed a 1/4-20 threaded rod through the pivot hole and
held it in place with a nut and washer on either end. This
rod allowed me to secure the cylinder for polishing.
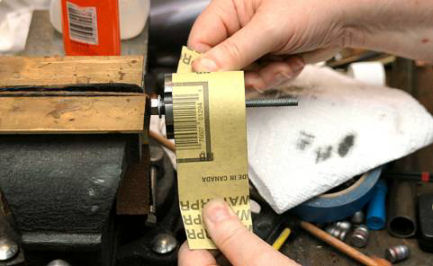
I
installed one end of the threaded rod into my padded vise,
and used strips of 220-grit, then 400-grit wet/dry sand
paper and “shoe-shined” the cylinder. When one area of the
cylinder became smooth and any pits were removed, I rotated
the cylinder to work on another area. I polished completely
around the cylinder until it was completely smooth and most
of the pits were removed. I couldn’t remove all of the pits
because some of them were very deep and I didn’t want to
remove too much metal.
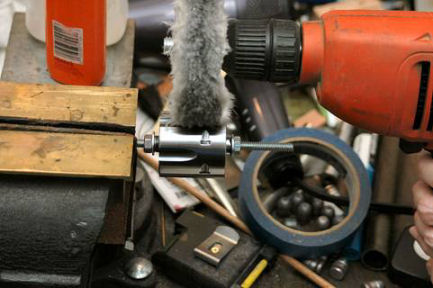
I
installed a felt buffing wheel onto a drill and coated the
wheel with the 400-grit Polish-O-Ray® compound and finished
polishing the cylinder. The instructions that came with the
Dicropan IM recommended use of this product.
Bluing
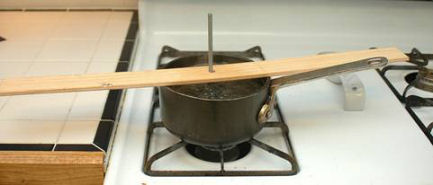
After the
cylinder was polished I followed the Dicropan IM
instructions. First I completely degreased the cylinder
with Brownells TCE
#083-060-032, then I suspended the cleaned and degreased
cylinder in a pot of boiling water for 5 minutes. I
drilled a hole in a flat piece of wood to prevent the
cylinder from tipping over in the pot. At the end of the 5
minutes I removed the cylinder from the water and shook off
any excess water. The cylinder was so hot that most of the
water evaporated. I used a pad of degreased 000 steel wool
to remove any surface rust that appeared, then used a large
swab to coat the cylinder with the Dicropan IM. The exposed
metal immediately turned dark black.
I
liberally applied the Dicropan IM for 60 seconds, then
immersed the cylinder into the boiling water for another 15
minutes. I again removed the cylinder and shook off the
excess water and allowed it to air dry. The cylinder had a
thick, orange-colored coating that I carded off with the
degreased steel wool. I threw away this steel wool and the
first swab. After carding the cylinder was a shiny light
blue/black in color. With Dicropan IM, the more
applications, the darker the bluing will become.
I applied
12 more coats of Dicropan IM. After applying each coat I
boiled the cylinder for 5 minutes, removed it from the
water, shook off the excess water, and allowed it to air
dry. After the cylinder dried it had a white coating which
I carded off with a second degreased pad of 000 steel wool.
It took 9 coats before the cylinder started to take on a
darker color, so I did four more applications to get the
nice dark color I was looking for. It looks just a little
splotchy in the above photo, but the instructions state this
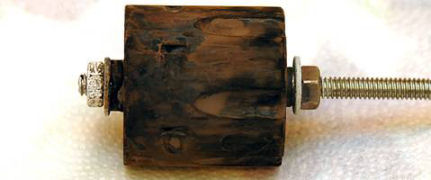
will even out once the bluing cures overnight.
I soaked
the cylinder in a water-displacing oil overnight to allow
the bluing to cure. The above photo shows the result. The
only way I could tell the Dicropan IM blued cylinder from
the factory blued cylinder was the newly finished cylinder
did not have a drag ring caused by the cylinder latch.
Summary
Although the Dicropan IM bluing process takes awhile I am
very pleased with the results. It seemed to be very
durable; carding with steel wool did not make it come off,
and the deep blue-black finish matched the factory finish.
Hmm, now
what else can I finish with Dicropan IM? The receiver for
my 1947 Marlin 39A had a lot of surface rust and I tried to
cold-blue it but it didn’t come out very well, so I think
I’ll refinish it with Dicropan IM. Literally, all you need
to perform a professional bluing job at home are a few
simple supplies and a pot of boiling water. Who’d of
guessed it?
A special
thanks to Paul Mazan for his article in American GunSmith
which pointed me in the right direction. If you would like
a subscription to American GunSmith you can contact them at
www.american-gunsmith.com/ or call them at
1-800-829-5119.
|