Converting a Rossi 62SAC to Shoot .22 Short,
Long, and Long Rifle Cartridges
by Roy Seifert
Click here to purchase a
CD with this and all Kitchen Table Gunsmith Articles.
Disclaimer:
This article is for entertainment only and is not to
be used in lieu of a qualified gunsmith.
Please defer all firearms work to a qualified
gunsmith. Any loads
mentioned in this article are my loads for my guns and have
been carefully worked up using established guidelines and
special tools. The
author assumes no responsibility or liability for use of
these loads, or use or misuse of this article.
Please note that I am not a professional gunsmith,
just a shooting enthusiast and hobbyist, as well as a
tinkerer. This
article explains work that I performed to my guns without
the assistance of a qualified gunsmith.
Some procedures described in this article require
special tools and cannot/should not be performed without
them.
Warning:
Disassembling and tinkering with your firearm may
void the warranty. I
claim no responsibility for use or misuse of this article.
Again, this article is for entertainment purposes
only!
Tools
and firearms are the trademark/service mark or registered trademark
of their respective manufacturers.
Introduction
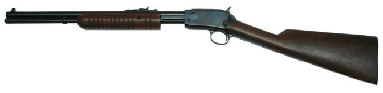
A few years ago I purchased a Rossi 62 SAC gallery gun.
This is a pump-action rifle that shoots .22 long rifle
(LR) cartridges only. This
rifle is patterned after the
Winchester
62A that was designed to fire .22 short, long, and long rifle
cartridges. As a
teenager I spent many an hour, and many a dollar at the county
fair shooting gallery shooting .22 shorts out of these rifles,
which is why I think I bought it in the first place; out of
nostalgia.
I
wanted to know what the difference was between the Rossi that
only fed .22 LR cartridges, and the original
Winchester
that fired .22 short, long and long rifle cartridges.
In my gunsmith library I have the excellent National
Rifle Association (NRA) firearms assembly books.
By the way, if you are reading this article and are a
firearms collector and/or shooter, you should be a member of
the NRA. No other
organization will protect your shooting and gun-ownership
rights like the NRA…enough said.
Since the Rossi is a copy of the
Winchester
, I looked up the
Winchester
62A.
I also found an article in
Gunsmithing the Rifle:
Fixes
& Upgrades for the Precision Shooter (American Gunsmith
Library) titled
The Rossi Gallery Rifle
by Butch Thomson that explained how
this little rifle worked, and how to correct problems.
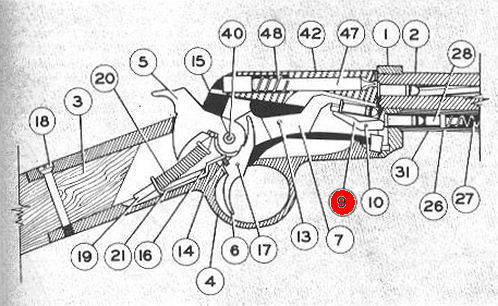
In
the above sectional diagram,
item #9 the “cartridge stop” was the piece missing from
the Rossi. In the
Winchester
, when a cartridge is fed from the magazine tube under spring
tension, the rim hits the rear of the cartridge stop causing
the front to pivot up to block the next cartridge from feeding
onto the carrier. This
piece was designed to pivot regardless of the length of the
cartridge hitting it.
The
Rossi carrier had the hole for the pivot pin, and the center
of the carrier was milled to accept the cartridge stop, but
the front of the carrier was solid.
It would have been slotted to accept the bottom of the
stop. The carrier
itself was long enough to allow .22 LR cartridges to feed.
If a shorter cartridge entered the carrier, the
following round was partially fed onto the carrier from the
magazine tube. This
was because there was nothing to stop that following cartridge
from feeding. When
the carrier was attempted to be raised, the partially fed
cartridge would get jammed between the front of the carrier
and the receiver, thereby stopping the action.
So, can I get the Rossi to feed .22 short, long, and
long rifle cartridges by installing the cartridge stop into
the carrier?
Numrich
Gun Parts Corporation was the first place I checked for
parts. I thought
if I could replace the Rossi carrier with a
Winchester
carrier assembly that might be the best solution.
Unfortunately, they were sold out of the carrier
assembly, but I was able to purchase just the cartridge stop
and pin. So, I had
to mill the Rossi carrier and fit the cartridge stop.
Apparently
the earlier Rossi model was designed to shoot .22 short, long,
and long rifle and had this part, but it was so problematic
that the later models did not.
According to Butch Thomson’s article most of the
problems related to the cartridge stop were caused by poor
fitting, which could be remedied by proper fit and polishing.
Disassembly
To get to the carrier I completely disassembled the rifle.
I removed the butt stock by first removing the tang
screw and pulling the butt stock off of the receiver.
Next I loosened the takedown screw and split the
receiver. I cocked
the hammer and put a small pin through the hammer strut
retaining hole, then pulled the trigger.
The pin prevented the hammer from falling which
relieved any spring tension from the hammer.
I carefully removed the retaining pin from the takedown
screw. This pin
actually slid out fairly easily, then I removed the takedown
screw. Finally I
removed the disassembly bushing and the hammer and carrier
came out of the receiver.
Carrier
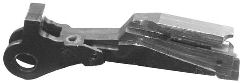
I
removed the carrier lever spring screw and spring.
I would have removed the carrier lever as well but I
couldn’t remove the pin.
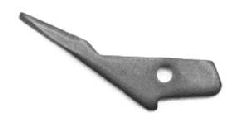
As you can see from the above photo, the center of the
carrier is slotted for the cartridge stop and the hole for the
pivot pin has been drilled.
However, the front of the carrier is solid.
I had to extend the slot in order to install the
cartridge stop. Notice
the narrow, flat piece extending from the front and below the
carrier. This
piece is an integral part of the casting, not a separate
piece. Its purpose
is to prevent cartridges from feeding from the magazine tube
when the carrier is in the raised position.
When I milled the slot extension, I had to make sure I
left enough of this piece so other cartridges would not feed.
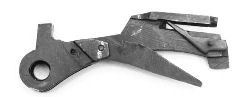
I
set the cartridge stop on the outside of the carrier and used
a drill bit to align the holes.
This showed me just how deep I needed to mill the slot.

The
slot measured 3/32” so I used that size square end mill bit
to extend the slot. I
found I also had to remove a small amount of metal from the
rear of the protruding edge, and use a 1/4” bit to deepen
the carrier so the cartridge stop would rotate.

After
milling I removed burrs and flashing with jeweler’s files
and installed the cartridge stop in the carrier.
To ensure the pin didn’t fall out I used a prick
punch and punched the center of the pin while it was in place.
This expands the end and makes it tight in the hole.
I lubricated all parts and reassembled the rifle.
To my surprise, it fed .22 short and long rifle
cartridges without a hitch.
However, it doesn’t seem to feed mixed cartridge
lengths reliably. That’s
alright since I probably won’t be mixing different length
cartridges anyway.
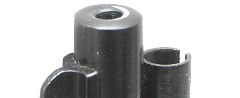
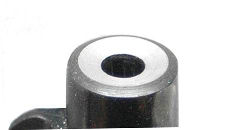
Muzzle
No,
the above photo is not an optical illusion.
That’s exactly how the muzzle looked.
I couldn’t tell if the bore was drilled off center,
or if it was just a poor muzzle crown.
Because the end of the muzzle was not square accuracy
could be adversely affected.
I never fired this rifle for accuracy, but it seemed to
do alright against soda cans at 15 yards, so accuracy was at
least as good as “minute of pop can”.
To enhance accuracy I re-crowned the muzzle.

A
professional gunsmith uses a lathe to cut a new crown, but I
don’t have a lathe. I
used a 79-degree crown cutter I purchased from Brownells
to cut the crown by hand.
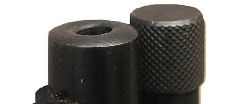
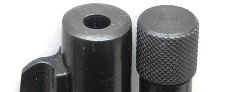
This cutter makes an 11-degree recessed target crown,
but I used a 1/2-inch diameter cutter – smaller than the
diameter of the barrel – so I wouldn’t cut out to the edge
of the barrel. I
installed the .22 pilot, handle, and a 1/2-inch stop collar
onto the cutter. The
stop collar made the final cut smooth, rather than uneven with
chatter marks. In
the photo above the stop collar is set back to show the
cutting teeth. I
adjusted the collar so it was almost flush with the front of
the cutter.
I
lubricated the pilot and cutting teeth with cutting oil and
turned the cutter clockwise.
I turned the cutter only in one direction; otherwise I
could break the teeth. I
cleaned chips off of the cutter and muzzle and lubricated the
cutter frequently. The
above photo shows just how unevenly the muzzle crown was
originally cut. Notice
the high spot that was cut first.
I
cut until the stop collar touched the front of the barrel.
You can see the nice, clean muzzle in the above photo.
It turned out that the bore was not off-center; instead
the crown was just poorly cut.
Finally,
I blued the exposed crown with cold blue to prevent the metal
from corroding. I
degreased the crown with acetone, plugged the bore, then
immersed the muzzle in Van’s
Instant Gun Blue for about 5 minutes.
I wiped off the excess bluing solution, then treated
the metal with gun oil to stop the bluing process.
The above photo shows the result.
Summary
So why would I even want this rifle to feed .22 short, long,
and long rifle cartridges in the first place?
First of all was the gunsmithing challenge to see if I
could do the conversion, and second was to increase the
flexibility of this rifle.
This project was more than just replacing parts; it
involved true gunsmithing.
I may never shoot shorts or longs out of this rifle,
but again, it was the challenge of the project.
|
