Rust Removal via Electrolysis
by Roy Seifert
Click here to purchase a
CD with this and all Kitchen Table Gunsmith Articles.
Disclaimer:
This article is for entertainment only and is not to
be used in lieu of a qualified gunsmith.
Please defer all firearms work to a qualified
gunsmith. Any loads
mentioned in this article are my loads for my guns and have
been carefully worked up using established guidelines and
special tools. The
author assumes no responsibility or liability for use of
these loads, or use or misuse of this article.
Please note that I am not a professional gunsmith,
just a shooting enthusiast and hobbyist, as well as a
tinkerer. This
article explains work that I performed to my guns without
the assistance of a qualified gunsmith.
Some procedures described in this article require
special tools and cannot/should not be performed without
them.
Warning:
Disassembling and tinkering with your firearm may
void the warranty. I
claim no responsibility for use or misuse of this article.
Again, this article is for entertainment purposes
only!
Tools
and firearms are the trademark/service mark or registered trademark
of their respective manufacturers.

If you read
my articles regularly you know that I am a big fan of the
Internet. There is
so much useful information that people are willing to share.
While “surfing the ‘Net” one day I found a way to
remove rust from firearms using electrolysis that will not
harm the bluing. The
main advantage of this method is it gets all the rust in hard
to reach places. The
materials I used were:
- A
plastic container that will hold the part and electrolysis
solution.
- Steel
rod. DO NOT
USE STAINLESS STEEL AS THIS WILL PRODUCE HARMFUL
BY-PRODUCTS.
- Water
- Arm
& Hammer Washing Soda (not baking soda).
Washing soda can be found in your local grocery
store with the laundry detergents.
If I cannot find washing soda, I can pour some
baking soda (sodium bicarbonate) into a pan and heat it
over low-medium heat.
Water and carbon-dioxide will cook-off leaving
washing soda (sodium carbonate).
-
Battery
charger or other high amperage power supply.
Cautions:
- I
always wear eye protection and rubber gloves when working
with this solution as it is very alkaline and can cause
irritation.
- I
NEVER use stainless steel for the electrode as this will
produce harmful by-product.
- The
electrolysis process breaks down water into its component
parts, Hydrogen and Oxygen, which can be explosive.
I work outside or in a very well ventilated area.
- I
make sure the battery charger/power supply is unplugged before
attaching or touching the leads.
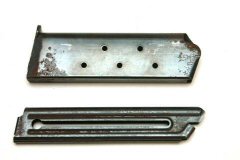
My
shooting buddy, James, gave me a couple of magazines that had
been somewhat neglected and had surface rust both inside and
out. He wanted me
to bead-blast or physically remove the rust using some other
method. That
little .22 magazine is so small I probably wouldn’t be able
to remove any rust from the inside, so I decided to remove the
rust using this electrolysis method.
In
the container I mixed 1 tablespoon of washing soda for each
gallon of water to make up the electrolysis solution.
I make sure the washing soda is thoroughly dissolved.
I placed a steel rod (NOT
STAINLESS STEEL) inside the
container. This
steel rod will become the anode to which I connected the
positive lead.
Note:
For larger parts I place the steel rod through the part
to be cleaned and use o-rings to prevent the part from
touching the rod.
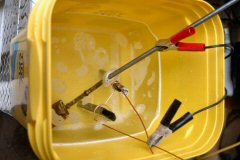
I
suspended the parts in the solution with cable or wire so that
it made a good electrical contact with the part; this will
become the cathode to which I connected the negative lead.
I connect the negative lead (black) to the parts being
cleaned (either to the part itself, or to the suspending cable
or wire), and connected the positive (red) lead to the rod(s),
then plugged in the charger.
I immediately began to see bubbles; this was Hydrogen
and Oxygen as the water broke down.
I allow the part to "cook" for 3-4 hours.
The time was dependent on the size of the part, amount
of rust, and the current of the power supply.
I left these magazines in for three hours and
repositioned them after the first 90 minutes.
This was to ensure that I was getting the electrolysis
process on both sides.
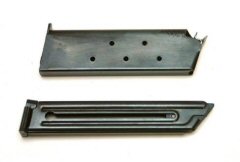
After
I removed the parts, I immediately cleaned and dried them off,
then coated them with a good quality gun oil or rust
preventative oil. As
you can see from the photos, there was no rust left on the
magazine bodies; inside or out.
However, because rusting is a corrosive process that
eats away at the metal, there will always be marks or pits
left by the rust as you can see at the top of the 1911
magazine.
Caution:
Removing rust with this method
can cause a phenomenon called hydrogen embrittlement where
parts over about 40RC in hardness will absorb hydrogen, and in
the process become very brittle, sometimes catastrophically
so. To remedy
this, after removing the rust I bake the parts in my kitchen oven at 375-degrees F for
about 4 hours. This
does not harm the heat-treating.
I
also used this process on a 1911 frame that had a lot of surface
rust all throughout the inside.
I set the frame upside down on wooden blocks in the
electrolysis solution and placed a rod with o-rings through
the magazine well. I
connected a 1.5 amp trickle charger and left it for about 4
hours. When
finished, the frame was completely free of rust, and the
bluing was intact.
|
