Constructing a Portable Target Stand
by Roy Seifert
Click here to purchase a
CD with this and all Kitchen Table Gunsmith Articles.
Disclaimer:
This article is for entertainment only and is not to
be used in lieu of a qualified gunsmith.
Please defer all firearms work to a qualified
gunsmith. Any loads
mentioned in this article are my loads for my guns and have
been carefully worked up using established guidelines and
special tools. The
author assumes no responsibility or liability for use of
these loads, or use or misuse of this article.
Please note that I am not a professional gunsmith,
just a shooting enthusiast and hobbyist, as well as a
tinkerer. This
article explains work that I performed to my guns without
the assistance of a qualified gunsmith.
Some procedures described in this article require
special tools and cannot/should not be performed without
them.
Warning:
Disassembling and tinkering with your firearm may
void the warranty. I
claim no responsibility for use or misuse of this article.
Again, this article is for entertainment purposes
only!
Tools
and firearms are the trademark/service mark or registered trademark
of their respective manufacturers.
I
enjoy going shooting as often as I can, which never seems to
be often enough! There
are a couple of national forests close to me that have an area
set aside for plinking and target shooting.
However, they don’t have any permanent target stands
for posting targets. I
understand the reason for this; target stands have a tendency
to get shot up and have to be replaced, thereby incurring
additional cost. Therefore,
I needed to bring my own target stand whenever I went
shooting.
In
the past I have used a number of different methods to hold
targets:
- A
cardboard box weighted down with rocks to keep it in place
- this is simple and effective, and you can throw away the
box when it is sufficiently ventilated.
However, you need a supply of boxes unless you keep
them between range sessions, and the boxes have a tendency
to move around if not weighted properly.
- Real
estate sign – nice if you can find one.
Push the legs into the ground to hold it upright
and tape or staple the target to the board.
However, most real estate signs can only hold one
target which means you have to call a cold range and
replace your target frequently.
- 2x4
frame covered with cardboard and mounted to a saw horse
– This worked very well and could hold multiple
targets…until the wind blew it over!
I used a saw horse that came with brackets to hold
a 2x4, but the wind would blow the 2x4 frame out of the
brackets. I
added a 1/2” wooden dowel that protruded from each side
of the frame to hold soda cans and plastic bottles.
The cans and bottles were hung from the dowels with
rubber bands. This
provided more plinking fun than just punching holes in
paper.
At
a recent range session the guy next to me had a home-built
target frame made out of 2x2’s that I thought was pretty
clever. I decided
to copy his design with a few improvements of my own.
Rather than use 2x2’s I decided to use 2x4’s and
rip them. I did
this because I wanted to put an angle on the top of the frame
so when it was leaned back against the supporting legs, the
targets would be perpendicular to the ground and square to the
shooter. (I also
had some 2x4’s left over from a previous project so I
didn’t have to purchase any new wood!)
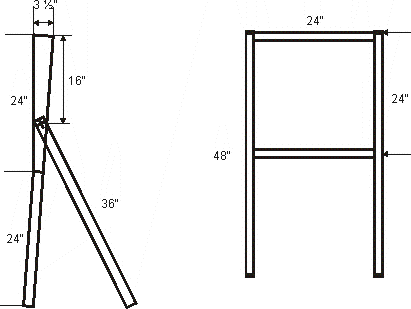
I
started by cutting two 2x4’s into 4-foot sections, which
gave me four 2x4x48” sections.
Two of those pieces I ripped lengthwise to give me four
2x2 sections. Two
of these sections I cut to 36” which became the support
legs. The other
two 2x2’s I trimmed to 24” which became the horizontal
sections.

The
other two 2x4x48’s I cut according to the pattern shown in
the above figure. I
cut the first half along the marked diagonal, and then ripped
the bottom part. I
didn’t have a guide for the diagonal cut, I just cut it by
eye on my table saw. Without
a guide the cut was pretty rough, but it is covered by
cardboard so no one sees it anyway.
I
assembled the horizontal and upright sections with 3”
wallboard screws, two screws per joint.
I drilled a pilot hole first before installing the
screw so the wood wouldn’t split.
At
the top of each 36” support leg I drilled a 3/8” hole so
it was the same distance from the top edge and each side.
I drilled a corresponding 3/8” hole exactly 16”
down from the top of the upright.
This distance is important since it gives the support
legs a wider stance. I
installed a 3/8” carriage bolt through the holes in the
support leg and upright and installed a lock nut.
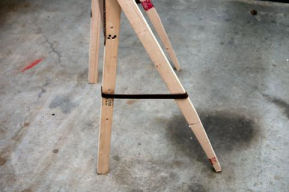
Once
the legs were installed I set up the stand and extended the
legs until the bevel at the top was level.
I attached a leather strap with staples between each
upright and support leg. The
leather strap prevents the leg from opening too wide.
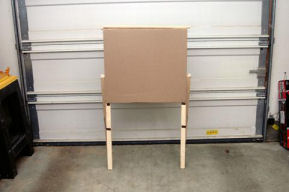
I
cut a piece of cardboard to size and stapled it to the front
of the frame. Now
I can staple or tape targets to the cardboard, and when it
becomes too blessed (holey; excuse the pun) I simply replace
the cardboard.
To
complete my target stand I purchased one 48” wooden dowel
3/4” in diameter. I
cut it in 24” sections, drilled a hole at one end through
the dowel, and attached them to each end of the frame at the
top. When I get to
the range I can unfold these “wings” and hang soda cans
and plastic water bottles from them with rubber bands to make
shooting more interesting.
The legs and wings fold up for easy transport, and
there is enough area to hang multiple targets.
Below
is a list of materials I used:
|
Qty
|
Description
|
|
2
|
2x4x96
– nothing fancy, they will probably get some holes in
them
|
|
8
|
3”
wallboard screws
|
|
2
|
3/8”
carriage bolts
|
|
2
|
3/8”
lock nuts
|
|
2
|
Leather
straps or other means to hold the support legs in place
|
|
1
|
Sheet
of cardboard
|
|
1
|
Staple
gun and staples
|
|
