Restoring
a Ted Williams Model 100 .30-30
by Roy Seifert
Click here to purchase a
CD with this and all Kitchen Table Gunsmith Articles.
Disclaimer:
This article is for entertainment only and is not to
be used in lieu of a qualified gunsmith.
Please defer all firearms work to a qualified
gunsmith. Any loads
mentioned in this article are my loads for my guns and have
been carefully worked up using established guidelines and
special tools. The
author assumes no responsibility or liability for use of
these loads, or use or misuse of this article.
Please note that I am not a professional gunsmith,
just a shooting enthusiast and hobbyist, as well as a
tinkerer. This
article explains work that I performed to my guns without
the assistance of a qualified gunsmith.
Some procedures described in this article require
special tools and cannot/should not be performed without
them.
Warning:
Disassembling and tinkering with your firearm may
void the warranty. I
claim no responsibility for use or misuse of this article.
Again, this article is for entertainment purposes
only!
Tools
and firearms are the trademark/service mark or registered trademark
of their respective manufacturers.
I really
enjoy working on a project gun.
There’s a tremendous sense of pride in turning a
junker into a fine looking and shooting firearm.
I recently purchased a saddle and built a saddle stand
for it primarily to show off my leatherwork.
I wanted a lever-action rifle to display in the
scabbard, but found the pewter replicas to be far too
expensive at $180-$225. Searching
through the used gun rack at my local gun store I found a
well-abused Ted Williams model 100 .30-30, which I purchased
for the very reasonable price of $225.
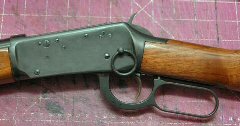
This model is really a
Winchester
94 sold by Sears under the Ted Williams name.
With a magazine plug in place and the firing pin
disabled, this would make a fine display piece in the leather
scabbard mounted on my saddle.
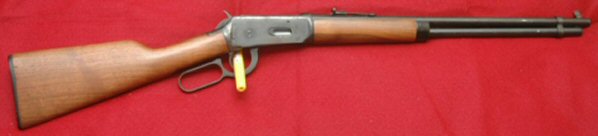
Initial Assessment
This is an example of a no frills, classic,
Winchester
.30-30. It does
not have an external safety other than the half-cock notch on
the hammer, nor does it have fancy sights.
It has a leaf main spring instead of the coil spring
and rebounding hammer.
As
mentioned before, this rifle looked like someone had very much
abused it. From
the amount of surface rust it was probably left in a soft gun
case/bag for an extended period.
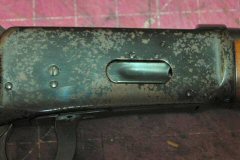
It may also have been left in a closet, as there was
white paint on the barrel and magazine tube.
The previous owner had engraved his driver’s license
number on the bottom tang, which I will have to remove.
It
looked like the wood had been replaced and had some nicks and
scratches, but was in otherwise excellent condition.
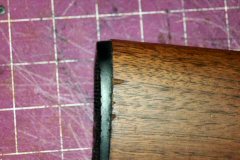
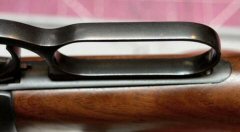
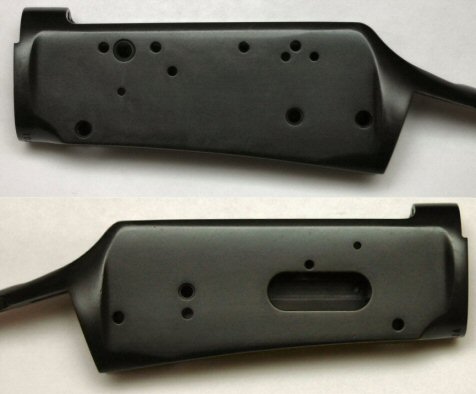
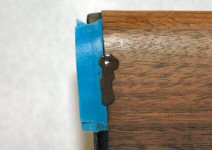
The original Sears butt plate did not fit properly as
you can see in the above photo.
Because the end of the butt stock was wider than the
butt plate the stock was prone to chipping.
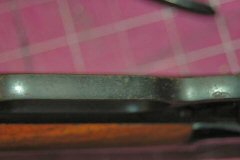
The
fore end had about 1/16 inch play forward and backward as you
can see in the above photo.
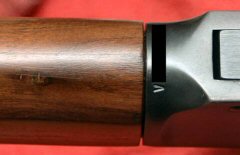
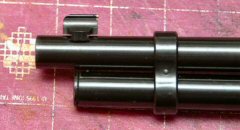
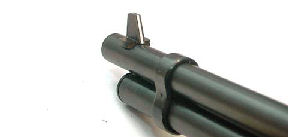
I
think the worst case of abuse I found on this rifle was the
front sight. It
looked like someone had tried to replace the front sight with
a higher one, which did not fit into the dovetail, or they may
have removed the front sight to mount a scope, then tried to
re-install it when they sold the rifle.
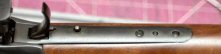
Most of the scope mounting hole plug screw slots were
buggered. In the
photo above you can clearly see the gap below the bottom of the
sight.
I scrubbed the bore with Remington Bore Cleaner and
fortunately, the bore looked fairly clean and sharp.
The lands were nice and sharp at the muzzle, indicating
to me that the rifle was not used much, nor cleaned very
often. There was,
however, some surface rust in the bore.
Restoration
Plan
This rifle is not really going to be a shooter, although it
could be. It’s
mostly for display purposes so I plan to reassemble it so it
cannot be fired. However,
since I have it apart I’ll do some basic work to it if I
ever want it to be a shooter.
-
Remove
the front and rear sights.
-
Completely
disassemble the rifle and check for internal rust/damage.
-
Unscrew
the barrel from the receiver.
-
Remove
the surface rust from the barrel and lever.
-
Remove
DL number, polish and refinish lower tang.
-
Refinish
receiver.
-
Lap
the bore.
-
Clean
up the muzzle crown.
-
Lap
the barrel shoulder to the receiver.
-
Modify
bolt for smoother action.
-
Perform
a trigger job.
-
Reassemble
the rifle with dry-firing firing pin.
-
Glass
bed the fore end to remove looseness and refinish.
-
Replace
and install the sights.
-
Fill
chips in butt stock.
-
Replace
and fit new butt plate.
-
Refinish
butt stock.
-
Add
a saddle ring.
-
Inlet
a Morgan silver dollar into the butt stock.
Remove
Sights
Removing the sights was easy; they tapped right out from left
to right with a brass punch.
The front dovetail on the front sight was peened up
because the sight was installed incorrectly, so I took a punch
and flattened as much of the raised lip as I could.
Completely
Disassemble the Rifle
I completely disassembled the rifle and found no rust inside.
This was good news!
Some screw-heads were buggered from someone using
hardware store tapered screwdrivers, or incorrect sizes of
screwdrivers, but I cleaned those up with a file and
cold-blued.
Unscrew
the Barrel from the Receiver
I used my Action Wrench with a universal head, and my barrel
vise to unscrew the barrel from the receiver.
I put tape around the front of the receiver before
installing the action wrench.
Separating the barrel and receiver will make them
easier to work on.
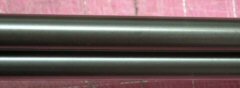
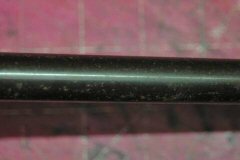
Remove
the Surface Rust from the Barrel and Lever
This rifle did not really have any deep rust pits, so it was
easy to remove the surface rust with 000 steel wool and gun
oil. I put a few
drops of Hoppes gun oil on a piece of 000 steel wool and
worked it over the metal.
The surface rust came right off but left a slight
blemish. With a coat
of good gun oil you can hardly see these blemishes.
After rubbing with the oiled steel wool I wiped off the
part with a clean rag, sprayed with brake parts cleaner to
remove any old oil and grease, then coated with Breakfree CLP.
The photos above show the results.
Remove
DL Number, Polish and Refinish Lower Tang
That driver’s license number was unsightly on the lower
tang. First I
removed all parts from the tang, then, using a bastard file, I draw-filed just enough to remove
the DL number. Using
a shoeshine motion, I then polished the surface with 320-grit
wet/dry paper until there were no file marks.
I taped the edges of
the tang to protect the bluing then bead-blasted the newly
polished surface. I
cleaned the blasted surface with acetone, then cold blued.
The result is shown in the above photo.
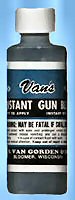
A note
about cold bluing: I
use Van’s Instant Gun Blue because I like the results.
The part I’m bluing must be perfectly clean; I use
acetone for cleaning. For
small parts, I like to immerse them in the gun blue solution.
I use small aluminum tins I purchased at the grocery
store. For
large parts, I use a toothbrush to brush the liquid on the
part, constantly keeping the part wet so the bluing can work.
This is not a “wipe and go” product.
I let the part soak/stay wet for 3 to 5 minutes, wipe
it dry, then coat with a good gun oil.
Refinish
Receiver
This receiver could not be rescued with just steel wool and
oil. I
bead-blasted the entire receiver until all rust and old bluing
was removed. I
thoroughly cleaned it with brake parts cleaner and acetone,
then immersed it in the cold bluing solution for about 5
minutes. I removed
it from the solution and wiped it clean, then sprayed it with
Breakfree CLP and let it set for a while.
I removed the excess CLP and the photo above
shows the result, with which I was quite pleased.
Cold blue is not as durable as hot bluing, but I think
this will be good enough for my purposes, as long as I keep it
oiled.
Lap
the Bore
Since I had the barrel off I decided to lap the bore.
The bore did have some rough spots and maybe some
pitting, so I decided to see if I could smooth it out a bit.
I may eventually fire-lap it, but for now I’m going
to hand lap. I put
a .22 bronze cleaning brush on a rifle cleaning rod and put
masking tape on the end of the rod.
I put just enough tape to make a snug fit in the bore.
The tape prevents molten lead from running down the
bore. I inserted
the brush into the barrel from the chamber end until it came
about one inch from the muzzle.
I poured molten pure lead (NOT lead alloy) down the
bore from the muzzle end until the lead came almost to the end
of the barrel.
I pulled
the lead lap back through the bore until I could unscrew the
cleaning rod. I
attached another cleaning rod, this one without tape, and
pushed the lap through the bore until it protruded about two
and one half inches beyond the muzzle.
I coated the lap with 400-grit lapping compound and
worked it back and forth through the full length of the
barrel. I reloaded
the lapping compound twice before having to make another lap.
I loaded that lap 3 times with lapping compound before
calling it quits.
I sprayed
brake parts cleaner down the bore and around the muzzle, then
swabbed out the bore to thoroughly remove all traces of grit
and lapping compound. I
then ran an oily patch down the bore to protect it.
After I was done the bore was shinier, but I could
still see some rough spots.
I will definitely have to fire-lap it to get it really
smooth.
Clean
Up the Muzzle Crown
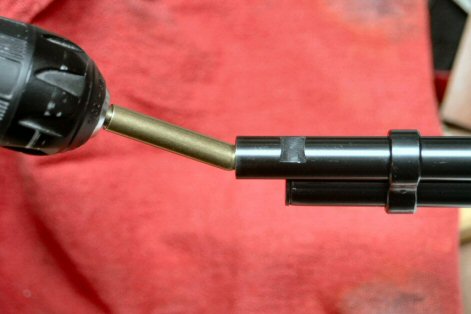
I always perform this procedure when I acquire a new gun.
I purchased brass muzzle laps from Brownells
and selected the appropriate size
for .30 caliber. I
put the lap in my hand drill and dipped the end in 400-grit
lapping compound. With
the drill on slow speed I put the end of the lap against the
muzzle and used a rotary motion with my wrist to prevent the
lap from wearing unevenly.
Notice the angle of the lap in the photo.
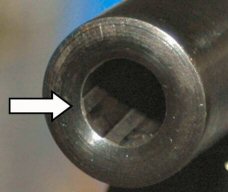
After about 30 seconds I cleaned the muzzle with brake parts
cleaner and oiled. This
made the ends of the lands and grooves nice and sharp as you
can see in the above photo.
Lap
the Barrel Shoulder to the Receiver
For most modern firearms the barrel is usually screwed much
too tightly to the receiver.
This can cause undue stress in both the barrel and
receiver, which can have an adverse affect on accuracy.
Before unscrewing the barrel, I took a prick punch and
made a witness mark between the bottom of the barrel and
receiver. This is
so I would properly align the barrel when I put it back
together. With the
barrel just touching the receiver, the two witness marks were
about one quarter inch apart.
I put 400-grit lapping compound between the shoulder of
the barrel and the receiver and alternately tightened and
loosened the barrel until the witness marks were about one
eighth inch apart. I
was careful not to get any compound on the barrel threads or
the barrel would be too loose.
I cleaned all the compound from the barrel and receiver
with brake parts cleaner and acetone.
When it came time to reassemble the barrel and
receiver, I put Loctite 222 on the barrel threads and Loctite
609 on the barrel shoulder.
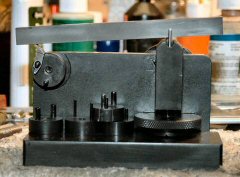
Using my barrel vice and action wrench I tightened the
barrel until the witness marks were aligned.
Modify
Bolt for Smoother Action
The action on this rifle was very stiff.
Actually, it’s no different than any other
Winchester
94 I’ve handled. I
sometimes could not even open the action with the rifle
mounted on my shoulder. After
examining all of the moving parts, I determined that the
mainspring and the hammer rubbing along the bottom of the bolt
caused most of the stiffness.
I completely backed out the hammer tension screw
thereby setting the mainspring (a leaf spring) to its lowest
setting.
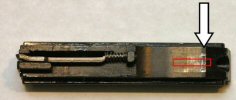
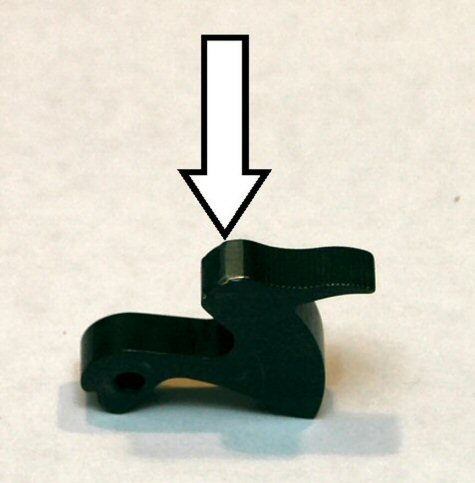
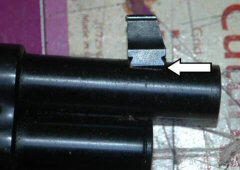
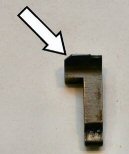
In
the photos above you can see where the hammer rides
along the bottom surface of the bolt.
The arrow points to the camming surface that cocks the
hammer. The arrow
in the right photo shows the corresponding surface on the
hammer that rides along the bottom of the bolt.
I wanted to reduce the amount
of surface area rubbing against the hammer by milling the
edges of the camming surface leaving only about one eighth of
an inch in the middle as shown by the red box in the left photo.
This would reduce friction making the action lighter.
First I took my Dremel tool with a Cratex wheel and
polished the bearing surface of the hammer, then refinished it
with cold blue.
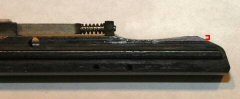
I put the bolt in the machinist vise on my mill and used a
one-quarter inch square end bit to mill each side of the bolt
bottom even with the rear of the cam as shown in the two
photos above. The bottom photo
shows the depth to which I milled the bolt.
I then polished the entire cam surface and cold blued.
This reduced the amount of bearing surface, which
significantly lightened the action.
I can now easily work the action from my shoulder.
Perform
a Trigger Job
The trigger on this rifle was long and creepy and broke at 8
pounds. I decided
I wanted a lighter, crisper trigger so I performed a trigger
job. Please note
that these procedures should not be performed without
the appropriate tools! Trigger
weight was determined by a number of factors:
I
decided not to change the mainspring or sear spring tensions,
primarily because they are both leaf springs that are more
difficult to adjust. The
hammer engagement surface was already 0.014” deep so I
decided to leave that alone also.
The
sear looked like it was only engaging about 1/3 of the
hammer-mating surface. First
I put the sear in my Power Custom Series 1 stoning fixture
with the Ruger MKII adapter and rotated the adapter until the
sear surface was parallel to the ground as seen in the above photo. I then
adjusted the fixture so a coarse ceramic stick was perfectly
flat against the sear surface.
I did this by marking the engagement surface with blue
marker and taking a couple of strokes with the ceramic stick.
I adjusted the jig until the blue was removed evenly
across the surface. I
then polished the entire engagement surface first with a
coarse ceramic stick, then with a fine ceramic stick.
I then rotated the adapter so the rear edge of the sear was
up, and stroked that edge about 15-20 times with the coarse
ceramic stick. This
put a breakaway angle on the sear.
This method reduces the amount of sear that engages the
hammer without having to remove any metal from the hammer.
Finally, I cut an angle on the left edge of the sear so
only about 2/3 of the sear was engaging the hammer as
illustrated in the above photo.
I
reassembled and lubricated the action, and found that the
trigger now broke cleanly at exactly 4 pounds with no creep.
This is great for a shooter.
Reassemble
the Rifle With Dry-Firing Firing Pin
I completely reassembled the rifle to check for function.
I noticed that the cartridge guides were originally
installed with some type of lacquer to prevent them from
coming loose. I
used Loctite 609 when I installed them by first cleaning the
guides and their corresponding channels in the receiver with
acetone, then applying the 609 to the back of the guide.
Loctite 609 is specifically designed to be used where
metal touches metal as in this application.
The locking
bolt has a chamfer around the firing pin striker.
When the rifle is dry-fired and the hammer strikes this
chamfer it peens the corners of the hammer, which raises burrs
and leaves unsightly marks on the hammer.
I wanted to be able to lever and dry-fire the rifle,
but did not want to use Snap Caps because they would be
ejected. I also
did not want the rifle to fire a cartridge.

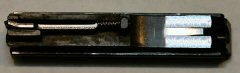
I
took four coils from a 0.197” diameter spring made of
0.033” wire from my Brownells spring kit #71 and placed it
on the front of the firing pin as shown in the photo above.
When I reassembled the rifle I had to press in on the
firing pin to get the locking bolt in place.
The lever pivot pin held the firing pin in place, and
the spring allowed me to dry-fire the rifle without actually
firing a primer. I
inserted a 16-inch long, 1/4-inch dowel in the magazine tube.
This way the rifle can’t be loaded from the magazine
tube, nor fired.
Glass
Bed the Fore End to Remove Looseness
As mentioned before, the fore end was loose so I decided to
bed it to the frame. I
added enough bedding compound at the rear of the fore end to
make it fit tightly against the receiver.
I drilled a few holes in the rear surface of the fore
end to help give the epoxy more gripping surface.
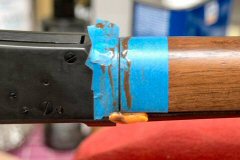
I taped the outside edges of the fore end and receiver
and put some clay plugs at the top of the fore end to act as a
dam. I then
sprayed the receiver, barrel and magazine tube, and outside of
the fore end with release agent.
I
put the rifle back together being careful not to get any
release agent on the rear face of the fore end.
I mixed my bedding compound that I purchased from Brownells
and poured it into the gap.
I kept turning the rifle over and wiping away the
excess. I added
more compound to the gap as needed.
In the photo above you can see the clay I used to make a
dam to prevent excess compound from running out.
Even so, you can see some epoxy did spill over.
After the epoxy hardened to the consistency of plastic I
removed the clay, tape, and the fore end.
A large quantity of epoxy had run into the magazine
tube channel, which I had to remove with a sharp knife.
I also had to cut away excess epoxy from other places
around the fore end. This
was an easy task thanks to coating the areas with release
agent. I then let
the epoxy set for 24 hours.
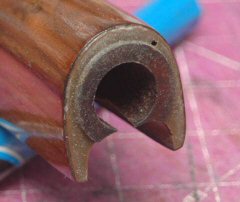
The photo
above shows the result. The
tiny hole in the upper right corner is one of my drilled holes
that did not get filled with epoxy.
Once the
epoxy cured, I removed the old oil finish with oven cleaner
and commercial finish remover.
I sanded it lightly with 320-grit, then 600-grit sand
paper. I steamed
up the grain and dents by putting a wet cotton T-shirt over
the wood then running a hot iron over the wet shirt.
I did this three times, and lightly sanded with
600-grit sandpaper after each time.
Finally, I coated the wood with three coats of
Birchwood Casey Tru-Oil. You
can see the result in the above photos.
Replace
and Install New Sights
I purchased a Marbles 45W 1/16 gold bead front, and a Marbles
#67 long semi-buckhorn rear from Midway USA to replace the
buggered-up sights. These
sights were just a bit
wider than the dovetail slots
in the barrel so I took my 60-degree dovetail file and started
to remove metal from one side of the sight a little at a time.
I took off just enough metal so I could start the sight
by hand on the left side of the rifle.
I then took my homemade sight punch and tapped the
sight in place. I
do not like to use steel or brass punches to drift sights
because brass leaves marks, and steel can mar the sight.
I take a steel punch and wrap thin leather around the
front to protect the sight as shown in the top photo.
The bottom photo shows the new sight installed.
Fill
Chips in Butt Stock.
I took some leftover epoxy from bedding the fore end and
filled the chips in the butt stock as you can see in the above
photo. When the epoxy
was hard enough I cut along the edge and removed the butt
plate to allow the epoxy to fully cure.
I sanded the epoxy ball in the process of fitting the
new butt plate.

Replace
and Fit New Butt Plate
As with most of the rest of this rifle, the original Sears
butt plate had pits, dings, dents, and scars and was very
unsightly, which you can see in the photo above.
I purchased a
Winchester
butt plate model W52 from Vintage
Gun Grips. This
butt plate fit the stock much better than the old Sears butt
plate, but the original screw holes did not line up.
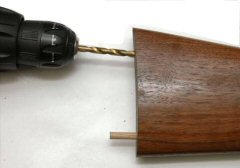
I
drilled out the old screw holes with a 1/4-inch drill bit,
then glued in a piece of 1/4-inch hardwood dowel. I
carefully measured where to mount the new butt plate, marked,
and drilled the new holes.
I then mounted the butt plate to the butt stock.
I used my belt sander mounted in a vise to carefully
sand the edges even with the butt stock.
I sanded the edges with 600-grit sand paper, then
finished them with fine polishing grit and a felt Dremel pad.
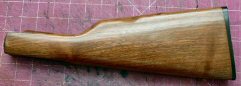
Refinish Butt
Stock.
I removed the old finish with oven cleaner and a commercial
stripper. I
completely sanded the stock, then steamed out the dents and
raised the grain three times, as I did with the fore end.
Walnut has many gaps in the grain so after raising the
grain the third time, I went over the entire stock with a
walnut-colored wood filler and sanded with 320-grit sandpaper.
I went over the entire butt stock with 600-grit sand
paper to ensure it was nice and smooth. I
finished the butt stock with three coats of Tru-Oil, lightly
buffing with 000 steel wool between each coat.
Add
a Saddle Ring
I
have always like the looks of a saddle ring on a lever-action
rifle, so I decided to add one.
I found a photo on the internet that clearly shows the
location of the saddle ring hole in relation to the hammer and
carrier screws. In
Figure 31 above, the carrier screw is on the left, and the
hammer screw is on the right.
The distance between these two screws, measured on my
rifle with calipers, was 0.96 inches.
I imported the photo into Corel Draw and sized it until
the screws on the photo were 0.96 inches apart.
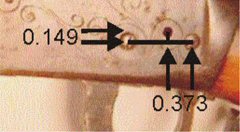
I drew a line from the center of the saddle ring hole
to the line between the two screws, which measured 0.149
inches. I then
drew a horizontal line from that vertical line to the center
of the hammer screw, which measured 0.373 inches.
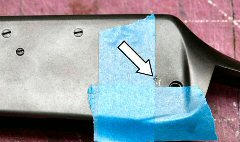
I
carefully measured on my receiver and made a mark with a
center punch as shown in Figure 32.
I protected the receiver with tape and put it in my
machinists vise in my mill/drill.
The saddle ring I purchased had a 10-32 stud, so I
drilled the hole using a #21 drill bit.
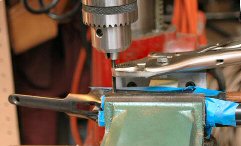
After
I drilled the hole, I removed the drill bit and inserted the
10-32 tap.
I left the chuck loose so the tap would spin freely and
used vise-grips to turn the tap as shown in the above photo.
This method ensures that the tap starts straight.
I removed the receiver from the vise and finished
tapping the hole with a tap handle.
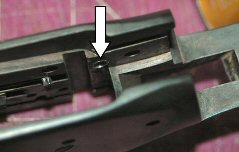
In
the photo above you can clearly see the new hole.
It is in a thick part of the receiver away from any
moving parts. However,
the drilling and tapping process raised a burr.
I took a flat jeweler’s file and filed the burr
flush. There was
also a raised burr on the outside of the receiver, which I
removed with a 3/8 round end mill bit.
I turned the bit by hand until the burr was removed and
a slight chamfer was left. This chamfer was going to be
covered by the stud so it didn't matter that it was there.
I
cleaned out the newly tapped hole and the receiver with brake
parts cleaner, then coated with Breakfree CLP.
The saddle ring stud must have had a tapered thread
because it got harder to turn as the shoulder of the stud got
closer to the receiver.
I had to use a hardwood dowel through the ring to get
the stud seated.
Inlet
a Morgan Silver Dollar into the Butt Stock
When I started cowboy shooting I selected a gambler as my
character. I
wanted a money theme for my character, so I decorated my
leather with Morgan silver dollars from the 1880 decade, and I
selected “Eight Bits” (as in a dollar) for my alias.
I wanted to carry this theme into my rifle so I decided
to inlet a Morgan silver dollar into the butt stock.
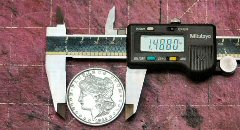
I
went to my local flea market and found a beautiful, sharp,
1882-O Morgan silver dollar for $15.00.
It measured 1.488-inches in diameter by 0.11-inches
thick. In the
photo below you can see the CAD design for the inlet
hole. The blue
line is the actual 1.489 hole, one-thousandth over the size of
the coin. The red
line is the tool path for a 1/8” bit that will cut
0.11-inches deep. On
the right are the tool commands
for my hobby CNC mill.

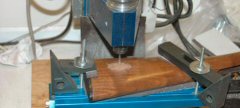
I removed the butt stock from
the rifle and clamped it onto the mill table.
I put foam between the stock, the table, and the clamps
so I did not damage the finish.
I adjusted the mill and ran the program, which you can
see in photo above. While
the program was running, I polished the dollar then coated it
with a clear lacquer so it would not tarnish.
I discovered that the hole being 1.489-inches was too
narrow so I had to open it up a couple of thousandths to get
the dollar
to fit.
After the milling was
completed, I took some 600-grit sandpaper to gently sand off
the feathers of wood that were left around the edge of the
hole. I then
coated the inside with Tru-Oil to protect it from moisture.
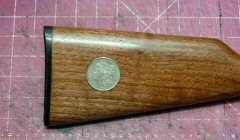
I put a few drops of epoxy to hold the dollar in place
and pressed it into the hole.
The result is shown in the above photo.

Here
is how the rifle looks in the scabbard. Ok, so far I am
very pleased with the result.
The action is fairly smooth for a ’94, the wood and
metal look very nice, and I tested the function with some
.30-30 dummy rounds and it works perfectly.
My shooting buddy, Dave,
purchased a used Winchester 94 .30-30 that came with a
side-mounted scope for the great price of only $130.00 (can
you say great deal!) and I could not help but compare them.
Obviously, mine was the cheaper of the two.
His action was as smooth as mine was with no
modifications, and his trigger broke at 4 pounds with just a
hint of creep. A
little polishing of the sear would take care of this.
We took our rifles to the
range to try them out. I
had some 150-grain Remington® Express® Core-Lokt® and he
was shooting the same but with 170-grain bullets.
I could not get my rifle to sight-in at 100 yards using
the 150-grain bullets, but I was able to sight-in with the
170-grain. Once
sighted-in with the 170s it seemed the 150s were shooting 30
inches high. I
tried to justify that with my ballistic software, but could
not get it to work. So,
if I decide to use factory, or reload, I’ll be using
170-grain bullets.
The rifle functioned
perfectly with no misfires or failures to eject.
If I decide to use this rifle, it is definitely a
shooter. Dave was
able to use my rifle and put two shots next to each other at
100 yards using just the open sights.
I probably will not go to the trouble to fire-lap the
barrel since the accuracy is very acceptable for an
iron-sighted gun.
The bottom line here is that
I am proud of my restoration work, and the rifle functions
perfectly.
Addendum
4/8/2012
I recently
installed a Marbles tang peep sight to this rifle because I
find the peep sights easier to use with my old eyes, and
faster to acquire a sight picture.
170-grain bullets were now shooting about 18-inches
high at 100 yards with the peep sight at the lowest setting.
This meant I would have to install a taller front
sight.
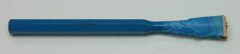
I
calculated how much taller the front sight had to be and used
my hobby CNC mill to fabricate a front sight similar to the
one I made for my Marlin 39A as detailed in my article Fabricating
a Custom Front Sight.
The white line really shows up.
While
cleaning the rifle after sighting it in I discovered I had
some copper fouling. This
is normally caused by a rough bore stripping copper from the
bullet jacket. This
copper is exposed to the expanding hot gas which turns the
copper into plasma and deposits it in the bore causing copper
fouling.
I decided I
wanted to polish the bore by fire-lapping, but didn’t want
to use the aggressive method of impregnating a bullet with
lapping compound. Traditional
fire-lapping drives bullets impregnated with lapping compound
through the bore at very low velocities.
Cases used for fire-lapping have to be thrown away
because the brass case neck gets contaminated with the lapping
media. Although
this method does wonders for the bore, it also lengthens the
barrel throat which can reduce barrel life.
My method polishes the throat without increasing its
length, laps the bore and I don’t have to throw away the
cases!
First I
loaded 15 rounds of .30-30 with 5.0 grains of Red Dot behind a
150 grain FMJ boat tail .308 bullet and a large rifle magnum
primer. I used
magnum primers because there is so little powder in the case,
and anything less than 5.0 grains of powder will cause the
bullet to get stuck in the bore.
I used spire-pointed bullets because I had a bulk
supply of them, and wasn’t going to load them in the tubular
magazine.
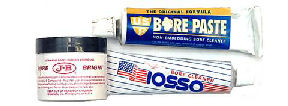
I put a
fired case in the chamber to prevent the lap from depositing
compound in the chamber. I
wrapped a .45 cleaning patch around a 25-caliber bore brush,
and then impregnated the patch with USP
Bore Paste™ that
I purchased from Midway
USA #
257358. I ran
the tight-fitting patch back and forth through the entire
length of the bore 20 times being careful not to allow the lap
to come all the way out of the muzzle, or all the way into the
chamber. This
performed the hand lapping part of the process and left a
small amount of compound in the bore.
For this first hand lapping the patch felt tight for
all 20 passes. This
indicated a rough bore.
I removed
the empty case from the chamber and fired one low-velocity
round through the barrel which performed the fire-lapping.
I inserted the empty case into the chamber, then again
using USP Bore Paste™ ran an impregnated tightly fitting
patch back and forth through the bore 20 times.
This cleaned any powder residue and fouling from the
bore and prepared it for a second low-velocity lapping shot.
This time, after only 2 back and forth passes the patch
felt much smoother and required less pressure to push and pull
it through the bore indicating the bore is becoming much
smoother.
After
performing the lap/shoot process for 5 shots, I thoroughly
cleaned the barrel using solvent and dry patches.
This removed any residual lapping compound in
preparation for the next finer compound.

The photo
above shows a recovered lapping bullet.
You can see the dark areas caused by lapping the lands
and grooves in the bore.
I threw
away the first empty case and inserted a clean, empty case
into the chamber. Now
I impregnated a clean patch with J-B® Bore Bright #083-065-100
that I purchased from Brownells which has a finer grit and
performed the hand lap/fire lap sequence another five times as
before, then thoroughly cleaned the bore again with solvent
and patches.
Finally, I
performed the same hand lap/fire lap process another five
times using ISSO bore cleaner
#073-000-002
that I also purchased from Brownells which has the finest
grit. This process
performed the final polish of the chamber throat and bore.
The bore was mirror bright and smooth and was now ready
for full pressure loads. This
should eliminate most, if not all, copper fouling and make the
bore easier to clean.
|