Installing
a Half-Cock Hammer in an Old Model Ruger® Vaquero®
by Roy Seifert
Click here to purchase a
CD with this and all Kitchen Table Gunsmith Articles.
Disclaimer:
This article is for entertainment only and is not to
be used in lieu of a qualified gunsmith.
Please defer all firearms work to a qualified
gunsmith. Any loads
mentioned in this article are my loads for my guns and have
been carefully worked up using established guidelines and
special tools. The
author assumes no responsibility or liability for use of
these loads, or use or misuse of this article.
Please note that I am not a professional gunsmith,
just a shooting enthusiast and hobbyist, as well as a
tinkerer. This
article explains work that I performed to my guns without
the assistance of a qualified gunsmith.
Some procedures described in this article require
special tools and cannot/should not be performed without
them.
Warning:
Disassembling and tinkering with your firearm may
void the warranty. I
claim no responsibility for use or misuse of this article.
Again, this article is for entertainment purposes
only!
Tools
and firearms are the trademark/service mark or registered trademark
of their respective manufacturers.
Introduction
It’s probably been over seven years since I’ve
participated in a Cowboy
Action Shooting™ match.
Being laid-off from work and gaining enough weight that
my outfits and leather no longer fit certainly had something
to do with it. I
also lost my long-time shooting partners; one moved 100 miles
away, another one only shoots IPSC now, and the third had some
serious financial setbacks that caused him to have to sell all
of his guns!
Well,
I’ve been gainfully employed for over five years now, I’m
starting to lose weight, and my friend who moved away, Lone
Star, is now retired and wants to start cowboy shooting again.
(If only the price of gas would come down!)
So it’s time to dust off the ol’ shootin’ irons
and get back into the game.
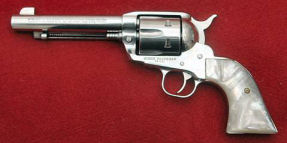
I have two
stainless steel old-model, large-frame Ruger Vaqueros in .45
Long Colt with 5 1/2“ barrels that I decided to modify as
follows to make them more cowboy match friendly:
- Install
a free-spin pawl – this allows the cylinder to rotate
freely forward or backward which makes loading and
reloading quick and easy.
- Install
a half-cock hammer – this allows the chambers in the
cylinder to align properly with the loading gate, allows
recovery from the dreaded skipped round if the hammer
misses the full cock position, and gives the cool extra click when cocking the
hammer similar to a Colt single-action revolver.
These
“improvements” required installing one new part, the
half-cock hammer, and modifying three factory parts, pawl,
trigger, and transfer bar, in order to function correctly
The
Dreaded Skipped Round
The dreaded skipped round is caused by the following sequence
of events:
- The
shooter cocks the hammer with the off hand.
- When
the gun fires recoil causes the “plow-share” grip to
rotate in the shooting hand.
The heavier the load, the more pronounced is the
rotation.
- Eventually
the gun rotates enough so the web of the shooting hand
prevents the hammer from locking back into the fully
cocked position. However,
the cylinder has already rotated so the next live round is
in firing position.
- The
cocking thumb releases the hammer, but because it did not
lock back into the fully cocked position it moves forward
with not quite enough force to fire the round.
Because the hammer falls completely forward it
resets the action.
- The
shooter repositions the shooting hand so the hammer can be
fully cocked. Because
the action was reset by the slipped hammer, cocking the
hammer rotates the live round that did not get fired out
of position and the next live round moves into firing
position. The
shooter just skipped a round.
- The
shooter now has to cycle the action five times to find and
fire the missed round causing a delay “on the clock”.
I
eliminated this problem by training myself to hold the gun
with my little finger hanging below the grip.
This prevented the gun from rotating in my hand under
recoil and avoided the skipped round problem. Installing
a hammer with a half-cock notch would not eliminate this
problem, but it would prevent skipping a round because if the
hammer slipped it would fall on the half-cock notch instead of
completely forward so the action would not be reset.
If I cocked the hammer again it would not bypass the
live round. By the
way, this only works if I don’t keep the trigger pressed,
which I don’t.
Speaking
with the Grand Master Himself
When the new hammers arrived I found they were incorrectly
packaged with instructions for a Ruger 10/22 trigger guard so
I called Power Custom Inc. to see if I could get the correct
instructions faxed or emailed out to me.
I called on a Saturday and lo and behold, I spoke with
Ron Power himself. I
already knew what had to be done for modifications, but Ron
gave me some additional tips:
- Be
sure to mill the top of the trigger sear engagement
surface, not
the bottom. Also
be sure the trigger fits into the half-cock notch or it
will break off the front of the notch.
- Lengthen
the notch in the transfer bar by 0.090 – 0.100”, I
chose the middle of 0.095”.
He said to use a file, but that a carbide mill
would work.
- Once
the gun is reassembled make sure I can fully cock the gun
for all six chambers using a gentle pull of the hammer.
If not, I would need to shorten the bottom tooth of
the pawl until I could perform this.
His suggestion for filing this tooth was to remove
the cylinder, cock the gun so the pawl is protruding into
the frame, then place a punch behind the pawl to hold it
in place.
- His
last suggestion was to ensure the hammer plunger slipped
off of the cylinder latch with the hammer about 1/8“ away from the
frame. Adjust
this by filing the rear of the cylinder latch.
Complete
Disassembly and Cleaning
Before beginning this project I made sure my revolvers were
unloaded and completely disassembled each gun.
Refer to my article Ruger®
Single-Action Revolver Disassembly/Reassembly and Spring
Replacement. I
did one revolver at a time so I wouldn’t get the parts mixed
up. I used Q-tips
and cleaning solvent to get soot out of all the nooks and
crannies inside the frame.
You’d be amazed how much soot gets into the internals
of the revolver! I
shoot light loads which don’t allow the brass cartridge case
to expand to completely seal the chamber which causes some
blowback of burning gasses.
When I decided not to shoot cowboy matches for awhile I
disassembled and thoroughly cleaned each revolver before
putting it away, so my revolvers were already clean, but it
doesn’t hurt to go over everything again.
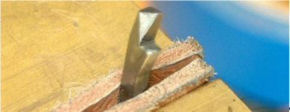
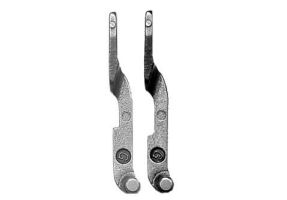
Making
a Free Spin Pawl
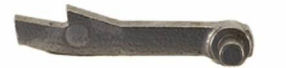
The pawl is
the small arm that is connected to the hammer and has two
teeth; one at the top and one in the middle.
The pawl is held against the cylinder ratchet by the
pawl spring and plunger. When
the loading gate is open the top tooth of the pawl allows the
cylinder to rotate in only one direction.
When the cylinder is rotated clockwise the top tooth
slips over each tooth of the cylinder ratchet giving the
audible click.
If the
cylinder is rotated counter-clockwise a tooth of the cylinder
ratchet presses against the top tooth of the pawl and prevents
the cylinder from rotating backwards any farther.
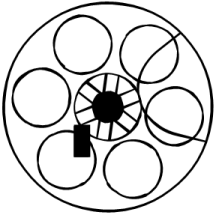
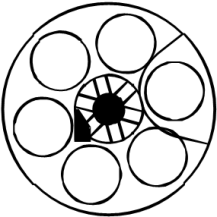
Unfortunately, with the old-model Vaquero, when the
cylinder is stopped against the pawl a chamber is not properly
aligned with the loading gate for loading and unloading as you
can see in the above figure.
As the
hammer is pulled to the rear the cylinder latch (other
manufacturers call this the bolt) drops down into the frame
thereby unlocking the cylinder and allowing it to rotate. The
cylinder latch is the flat, half-round piece of metal that
protrudes from the inside bottom of the frame.
It mates with a notch cut into the cylinder and
prevents the cylinder from rotating when the gun is fired.
The top tooth of the pawl engages a tooth on the
cylinder ratchet and causes the cylinder to start to rotate.
When the cylinder begins to rotate the cylinder latch
moves back into the raised position and drags against the
cylinder causing what some consider to be the unsightly
“drag ring” on the cylinder.
As the cylinder rotates the bottom tooth of the pawl
engages the next tooth on the ratchet and allows the cylinder
to continue rotation until the cylinder latch locks the
cylinder in place. The
teeth on the pawl control the timing of the cylinder and are
fitted at the factory.
Before
modifying the factory pawls on my two Vaqueros I wanted to
test to make sure the half-cock hammer would function with the
modified pawl. I
have a Ruger Bisley Blackhawk® that has my modified free-spin
pawl. With the
loading gate closed (you can’t cock the hammer if the
loading gate is open) I pulled the hammer back just enough so
the cylinder latch dropped down into the frame thereby
unlocking the cylinder. With
the hammer partially pulled back and the cylinder latch in the
down position I was able to rotate the cylinder in only one
direction as indicated by the audible clicks of the hand
slipping over the ratchet.
When I rotated the cylinder backwards against the pawl
I noticed that a chamber was properly aligned with the loading
gate as it would be if the half-cock hammer was installed.
Ok, because this functioned properly I can modify my
factory pawls.
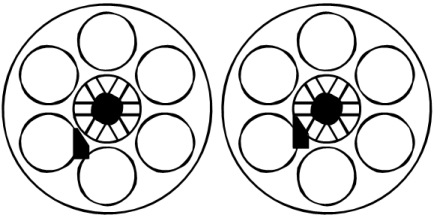
After
further analysis I determined that the modified pawl had to
function correctly or the gun wouldn’t cycle!
The modified pawl does not contact the cylinder ratchet
when the hammer is down, but it still has to contact the
ratchet to start the cylinder rotating during the cocking
cycle; refer to the above figure.
I marked
the top of the pawl with a blue marker and with the hammer
down and loading gate open, rotated the cylinder
counter-clockwise a few times until it was stopped by the
pawl. This left a
mark on the top of the pawl which told me how much metal to
remove.
By filing
the top tooth at an angle it no longer contacted the cylinder
ratchet and allowed the cylinder to rotate freely in either
direction. I made
sure I removed just enough metal so the cylinder ratchet no
longer made contact with the pawl.
If I removed too much metal the cylinder may not
rotate, and/or may not contact the ratchet with the new hammer
in the half-cock position.
Because I left about 1/16” it still functioned
correctly when the hammer was cocked.
Refer to my article Making a Free Spin
Pawl for a Ruger® Single-Action Revolver.
I have successfully performed this modification to a
number of Ruger single-action revolvers.
Once I
installed the half-cock hammer, with the hammer in the
half-cock position, the free spin pawl was raised just enough
so that if I moved the cylinder backwards, it caught on the
top tooth of the pawl with a chamber properly aligned with the
loading gate as seen in the above figure.
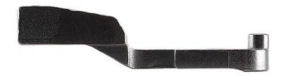
Modifying
the Trigger
Power Custom sells the entire drop-in half-cock hammer kit
that includes the half-cock hammer, modified trigger, and
Wolff spring kit. This
kit is available from MidwayUSA as product # 345935.
Both of my Vaqueros already had a Wolff spring kit
installed, and I knew I could successfully modify the trigger
myself with my mill, so I decided just to purchase the
half-cock hammer from MidwayUSA product # 439111.
MidwayUSA doesn’t stock this part so they
special-ordered it for me.
This not only saved me some money, but gave me some
additional gunsmithing work to perform.
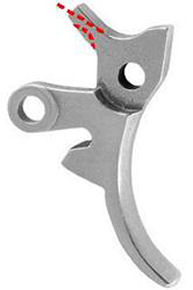
The factory
trigger comes with a very large sear engagement surface; too
large to fit into the half-cock notch of the new hammer.
The half-cock notch measured a little over 0.050” so
I would need to leave that much or a little less.
I not only needed to remove the top of the engagement
surface, but I also needed to grind a little metal off of the
bottom to allow the trigger to fit around the curve of the new
hammer and seat into the half-cock notch as shown in the above
figure.
I placed
the trigger in my milling vise at the proper angle and used a
1/4” square end bit to remove the metal.
I could have used a file to remove the metal, but the
milling machine insured my work was flat and square.
Then I took a small grinding stone and my high-speed
rotary tool and ground a slight radius on the bottom; just
enough so the trigger would fit into the half-cock notch.
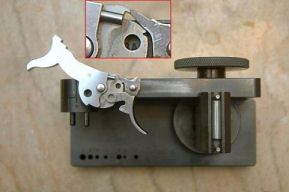
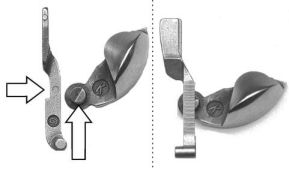
The Power
Custom Series 1 Stoning Fixture that I purchased from
MidwayUSA product # 743549
has two holes in the top where I can set the hammer and
trigger pins and see the relationship of the hammer to the
trigger. This is
how I discovered that I needed to grind a radius in the bottom
of the trigger. Notice
the inset in the above figure; the trigger is blocked from
seating completely into the half-cock notch by the rounded
shape of the full-cock notch.
By grinding a radius in the trigger where the hammer is
touching the trigger will seat fully into the half-cock notch.
After I
finished milling and grinding I removed any burrs and polished
the surfaces. I
then installed the RSA adaptor I purchased from MidwayUSA
product #765339
into my Power Custom Series 1 Stoning Fixture and honed the
sear engagement surface. I
used ceramic sticks to polish the engagement surface that I
purchased from Brownells,
stock #080-721-621WB,
the black one for coarse polishing, and the white one for
final polishing. Ceramic
stones use water as the cutting agent, not oil.
I marked the engagement surface with a blue marker to
ensure I was polishing it square and flat.
Modifying
the Transfer Bar
The
transfer bar is a safety feature of the Ruger single-action
revolvers which allows the gun to be carried safely with all
six chambers loaded. With
the hammer down, the transfer bar sits down out of the way of
the hammer and firing pin.
When the hammer is cocked the trigger moves to the rear
lifting the transfer bar up to cover the firing pin.
When the trigger is pulled to the rear the transfer bar
stays in the up position, the hammer falls striking the
transfer bar which transfers the hammer’s energy to the
firing pin and ignites the primer of the loaded cartridge.
The
transfer bar has a notch cut into it.
When the loading gate is open the half-round protrusion
at the end of the pivot pin rotates into that notch and blocks
the transfer bar which prevents the hammer from being cocked.
This defeats the purpose of the half-cock hammer!
I followed Ron Power's instructions to modify the
transfer bar to increase the length of the notch.
Now the hammer would not be blocked and could be placed
in the half-cock position with the loading gate open.
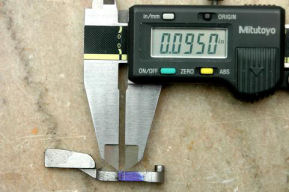
Following
Ron’s suggestions I marked the factory transfer bar with a
blue marker, set my calipers to 0.095” as shown in the above
figure, then scored the transfer bar to show where I needed to
mill.
I put the
transfer bar into my milling vise and used a 3/32” ball-end
bit to remove the metal. The
ball-end bit left a radiused corner at the base of the cut
which should prevent cracking.
A square-end bit would leave a sharp corner which could
crack over time.
Installing
the Half-Cock Hammer
Installing
the new half-cock hammer was a simple matter of replacing the
factory hammer, and reassembling the gun.
I made sure everything was properly lubricated before
reassembly.
First I
tested the free-spin pawl by opening the loading gate and
spinning the cylinder in both directions.
Then I closed the loading gate and fully cocked the
hammer. The extra
click I heard as the trigger passed over the half-cock notch
did sound pretty cool! I
measured trigger pull at 2 1/2 pounds, and let off was crisp
and clean with no creep or drag.
All 6
chambers locked up, but the hammer was a bit tight.
I wanted just a little bit of play, so again following
Ron’s directions, I removed a few thousandths from the
bottom tooth until there was just a small amount of forward
and backward play in the hammer when fully cocked.
Next I
pulled the hammer back into the half-cock position and opened
the loading gate. I
rotated the cylinder forward (clockwise) and heard the
familiar clicks as the cylinder ratchet moved over the top
tooth of the pawl. I
moved the cylinder backwards (counter-clockwise) until it
stopped and sure enough a chamber was aligned with the loading
notch in the frame.
Finally, I
wanted to simulate the dreaded skipped round.
With my shooting hand held high on the grip and my
finger off the trigger I pulled the hammer back until it hit
the web of my hand and wouldn’t go any farther.
I let the hammer slip off my thumb and the half-cock
notch caught it, but since the hammer didn’t completely
fall, the action didn’t reset.
I was able to re-cock the hammer and the cylinder did
not rotate so I didn’t bypass the chamber.
Even though I grip the gun with my little finger below
the grip, it’s nice to have this feature as a backup.
Accurizing
While I had both revolvers apart I slugged the barrel and
measured the chamber throats in the cylinders.
Both revolvers suffered from the typical Ruger big-bore
problems:
- The
barrels slugged 0.451” but each had a constriction under
the barrel threads
- The
chamber throats measured 0.4495” – 0.450”
Essentially
I would have had a 0.452” bullet swaged down to 0.450” or
less depending on the amount of barrel constriction, wobbling
down a 0.451” barrel; not exactly a great recipe for
accuracy! I opened
up the chamber throats to 0.452” and removed the
constriction by hand-lapping the barrel.
Refer to my article Accurizing
the Ruger® Single-Action Revolver.
Summary
So now the question is; which method do I use to load and
unload the revolver? I
put the hammer in the half-cock position for normal loading
and unloading. I
do the Colt loading sequence of load one chamber, skip one
chamber, and then load the other four.
After loading the fifth round I close the loading gate,
pull the hammer all the way back, then carefully drop the
hammer over the empty chamber.
When
loading under the clock I open the loading gate allowing the
cylinder to free spin, load one round, rotate the cylinder
counter-clockwise 2 chamber positions, then close the loading
gate. When I cock
the hammer the loaded round moves into the firing position.
So why
didn’t I just mill a half-cock notch into the existing
hammer? There is
not enough metal on the front of the factory hammer to mill
out the notch. I
would either have had to add metal to the front of the hammer
and then mill the notch, or purchase a new hammer which was
the better solution for me.
A special
thanks to Ron Power for his suggestions to ensure my
installation of his half-cock hammers went smoothly.
Thanks to him both of my Vaqueros are ready for competition.
|
