Modifying
a Winchester 97 for Competition
by Roy Seifert
Click here to purchase a
CD with this and all Kitchen Table Gunsmith Articles.
Disclaimer:
This article is for entertainment only and is not to
be used in lieu of a qualified gunsmith.
Please defer all firearms work to a qualified
gunsmith. Any loads
mentioned in this article are my loads for my guns and have
been carefully worked up using established guidelines and
special tools. The
author assumes no responsibility or liability for use of
these loads, or use or misuse of this article.
Please note that I am not a professional gunsmith,
just a shooting enthusiast and hobbyist, as well as a
tinkerer. This
article explains work that I performed to my guns without
the assistance of a qualified gunsmith.
Some procedures described in this article require
special tools and cannot/should not be performed without
them.
Warning:
Disassembling and tinkering with your firearm may
void the warranty. I
claim no responsibility for use or misuse of this article.
Again, this article is for entertainment purposes
only!
Tools
and firearms are the trademark/service mark or registered trademark
of their respective manufacturers.

Introduction
The Winchester Model 1897 (or just Winchester 97) was designed
by John Moses Browning, one of the most famous American
firearms inventors. The
Winchester 97 was first listed for sale by
Winchester
in 1897 as a 12 gauge solid frame model. The
12 gauge takedown was offered in 1898, and the 16 gauge
takedown in 1900. The
97 was produced as an improved, stronger version of the
Winchester
1893 and was designed for use with smokeless powder shells.
Many
cowboy action shooters use a Winchester 97 pump-action shotgun
or similar replica for their main match gun.
I never got the hang of loading one shell and cycling
the action. Some
shooters practice until they get really fast, but after trying
and fumbling, I went back to a double-barrel.
Grab two shells, load two shells, middle finger on the
rear trigger, first finger on the front trigger, bang, bang,
open, jerk out the empties, and I’m ready to go again.
However, now that I own one I may just use it for
cowboy matches.
Often
times, however, my club has a Wild Bunch side match based on
Sam Peckinpah’s movie The
Wild Bunch. In
that movie you see the characters use such iconic guns as the
Colt 1911 .45 ACP, Winchester 97 pump shotgun, and Strother
Martin uses a
Springfield
1903 .30-06. Wild
Bunch side matches require the use of a
Winchester
model 97 or model 12 shotgun, a 1911 .45, and a pistol-caliber
lever-action rifle. I
own two .1911 45s, and a Marlin 1894 in .45 LC, but I didn’t
have the shotgun.
I found a
vintage Winchester 97 on Gunbroker.com
for $280.00; what a steal! By
the time I paid shipping and transfer the price came to
$332.00, still a great deal.
Since cowboy action shooting is becoming so popular,
and the
U.S.
no longer allows Chinese imports of firearms, these old
Winchesters just keep climbing in price.
The serial number indicated that it was manufactured in
1907 so I am now the proud owner of a 100 year old gun.
However, this gun is a shooter, not a wall-hanger.
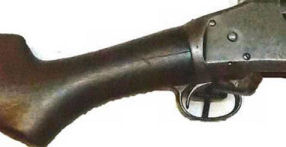
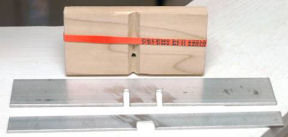
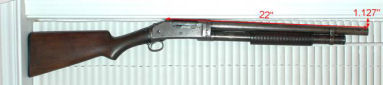
This
shotgun came in 12-gauge with a 28” full-choke barrel, and
was the takedown model. There
is something about a takedown gun that has always appealed to
me. It also had a
cracked stock as you can see in the above photo, which was
fully disclosed by the seller.
I
thoroughly inspected the gun and found the butt stock was also
cracked on the other side in the same place.
Also, a large piece had feathered off the left side and
was re-glued in place.
Improvement
Plan
Once the shotgun arrived I disassembled it and gave it a
thorough inspection and cleaning.
I wanted to avoid buying additional parts; otherwise
this gun wouldn’t be such a great deal!
I wanted to perform the following:
- Repair
the cracked stock
- Cut
the barrel to 18 1/2” – 18” is the minimum legal
barrel length for a shotgun.
This is not a collectable gun, for me it’s a
shooter and I want to be able to use it for both cowboy
and wild bunch matches.
- Ream
and tap the barrel for internal choke tubes
- Install
a flush improved cylinder choke tube
- Install
a new bead behind the end of the choke tube
- Cut
down the butt stock to adjust length of pull – the
length of pull was way too long for me
- Install
a recoil pad to the butt stock
- Install
an Evil Roy magazine 6-round conversion kit
Rust!
One area
that is often ignored and not well taken care of by firearms
owners is the magazine tube, and this shotgun was no
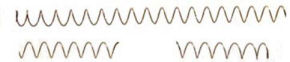
exception. Due to
years of neglect and lack of cleaning, the inside of the
magazine tube had rusted and caused the magazine spring to
also rust and break in two places.
The inside of the tube was pitted, but luckily it had
not rusted through. Case
in point here, if you have rifles or shotguns with magazine
tubes, take a few minutes to remove the plug, magazine spring
and follower and run an oiled cleaning patch through it.
This will save problems sometime down the road.
I have a Marlin 1895 Cowboy in .45 LC that the magazine
tube got so dirty the follower jammed during a cowboy match!
I now clean the magazine tube as part of my normal
cleaning routine after every match.

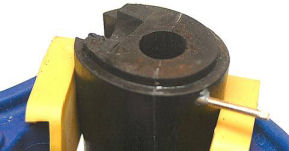
I unscrewed
the action slide sleeve screw cap and removed the action slide
from the magazine tube. To
remove all of the rust I used electrolysis (refer to my
article Rust Removal via
Electrolysis). I
made up five gallons of electrolysis solution mixing 1
tablespoon of Arm and Hammer Washing Soda (not baking soda) to
each gallon of regular tap water.
I took a
steel rod (not stainless steel; stainless steel produces
harmful byproducts) and placed a rubber cork at either end and
inserted it into the magazine tube.
This steel rod is the anode which I connected to the
positive (+) side of my battery charger.
The negative (-) battery charger lead I connected to
the magazine tube making sure I had a good electrical contact.
I immersed the tube into the solution, connected the
battery charger leads as explained above, and plugged in the
charger. I
immediately began to see bubbles appear, which were caused by
the water breaking down into oxygen and hydrogen.
I left the tube in the solution with the battery
charger connected for 3 hours.
I unplugged the charger, removed the tube from the
solution, and thoroughly dried it in preparation for cold
bluing.
Once the
tube was dry I immersed it into Shooter Solutions™ Rugged
Gun Blue which has become my favorite cold bluing solution
(refer to my article Shooter
Solutions™ Rugged Gun Blue).
This put a protective layer of bluing on the exposed
metal. I washed
the tube in running water to remove any traces of cold blue
solution, then thoroughly oiled the tube.
I reassembled the action slide onto the magazine tube
and made sure everything was smooth and well lubricated.
I ordered a
replacement magazine tube spring and follower from Numrich
for a total of $11.00 plus shipping.
Even though I plan to install the Evil Roy 6-round
conversion I wanted to have the original parts on hand.
Disassembly,
Cleaning, and Lubricating
I completely disassembled the gun and found a few spots of
rust inside, but the internals were in good shape.
However, they were very dry and dusty.
I cleaned all parts with solvent (Ed’s
Red) and a nylon bristle brush, sprayed them with brake
parts cleaner to remove all traces of solvent, then oiled them
with Break-Free®
CLP. I put
Brownells Action Lube Plus® #083-050-002
on the bolt rails and the action slide groove in the carrier
and reassembled everything.
Before disassembly the action was stiff, especially
when moving the action slide forward.
Now everything was light and smooth with no hitches or
binding anywhere in the action cycle.
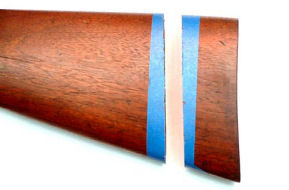
Repairing
Butt Stock
The butt stock was cracked on both sides of the wrist so I
decided to try my hand at repairing the butt stock.
I took a tapered wooden plug and forced it into the
round opening at the front of the wrist to open the cracks
just a little; about the thickness of a business card.
I mixed some JB Weld epoxy and forced it into the
cracks with the edge of a business card.
I removed the plug and clamped the wrist to hold it
tightly closed. As
the epoxy was forced out of the crack I wiped off the excess.
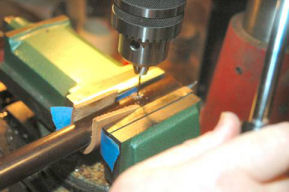
Since the
stock was cracked in two places I wanted to install two
reinforcing pins to keep the crack from spreading.
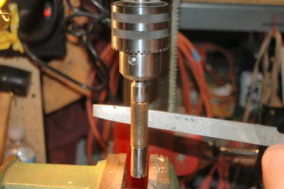
I threaded a piece of 1/16” brass rod with a 4-32
tap. I drilled a
hole with a #44 drill bit from the top of the wrist through
each crack.
I cut
enough threaded rod so it would fit into the hole I drilled,
and into the chuck of my drill.
I coated the threads with epoxy and used the slow speed
of my drill to screw the pin into the hole.
I removed the pin from the chuck and cut it flush with
the stock. I filed
the end of the pin so it was flush with the stock.
Many
military surplus stocks are pinned in this manner.
I could have cut each pin short, cut a notch in the
end, screwed it below the surface of the stock, then filled
the hole with epoxy and wood dust to completely cover it up,
but I like the fact that the pins are visible.
All of my shooting friends tell me this gives the gun
character, and I got to keep the 100-year old stock.
Re-Bluing
the Butt Stock Screw
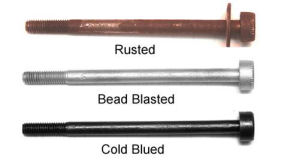
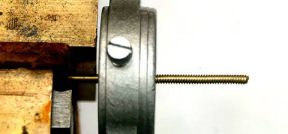
The butt
stock screw and washer were heavily encrusted with rust.
When I removed them to remove the butt stock the screw
was loose, which is probably why the butt stock cracked.
This screw had probably never been removed and became
loose over time. I
bead blasted the screw and washer with glass bead media which
removed all the rust and put a matt finish on the parts.
Because rust is corrosive you can see how pitted the
screw was after the rust was removed.
I dipped the screw and washer in Shooter Solutions™
Rugged Gun Blue, washed off the excess solution, then coated
it with Hoppes® gun oil.
The photo above shows the process and the results.
Reaming
and Threading the Barrel for Internal Choke Tubes
My long-time shooting buddy, Jon (a.k.a. “Lone Star”) also
purchased an original Winchester 97 12-gauge shotgun with a
32-inch full-choke barrel for a very reasonable price at a
local gun show. The
price was reasonable because the barrel was dented.
He wanted to make the same modifications to his gun
that I wanted to make to mine so he came over to use my shop
and my tools. He
also wanted to cut the barrel down to 18 1/2“ and ream and
thread it for internal choke tubes.
The rules of Cowboy Action Shooting™ allow shotguns
with interchangeable choke tubes so long as they do not
protrude beyond the end of the barrel, i.e. internal choke
tubes only. I
already had the tooling from adding internal choke tubes to my
Winchester
1300 Defender (refer to my article “Threading
a Shotgun Barrel for Choke Tubes”).
The process described below was for Jon’s gun, but I
did the same thing to mine.
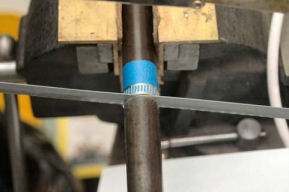
We removed
the barrel from the receiver and removed the magazine tube
from the barrel. We
marked the barrel at 18 1/2“ plus 1/16”, then placed some
blue painters tape and a hose clamp at that point.
The hose clamp acted as a guide so the cut would be
fairly straight. The
cut was just a bit at an angle because the hacksaw blade
actually cut into the hose clamp.
Not a problem because the barrel reamer squares the
muzzle face anyway.
Next we
reamed and threaded the barrel to accept Win-Choke type of
internal choke tubes. According
to the instructions that came with the tools, the barrel
needed to be at least 0.845” diameter and ours measured
0.849”.
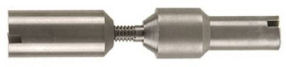
The barrel
bushing was too large to fit into the barrel but I don’t
have a lathe to turn it down.
Instead I installed the bushing onto a 1911 barrel
bushing mandrel that I purchased from MidwayUSA #749359
and used my mill/drill and a bastard file to turn it down
until it just fit into the barrel.
As the bushing was turning I coated it with a blue
marker to help keep the file straight and turn it down evenly.
After 3 or 4 passes with the file we tested the bushing
for fit in the cutoff portion of the barrel.
We continued to file and fit until the bushing fit
snugly into the barrel.
Reaming
the Barrel
Threading a shotgun barrel to accept internal choke tubes is a
two-step process. First
we had to ream the barrel so it had the proper internal
profile to accept the choke tubes.
A professional gunsmith would use a lathe to perform
the barrel reaming, but again, I don’t have a lathe so we
reamed the barrel by hand.
We installed the barrel vertically in a padded vise,
installed the barrel bushing onto the reamer, lubricated the
reamer and bushing with cutting oil, and inserted it into the
barrel. Using a
large tap wrench to ensure we applied equal pressure we began
the long process of reaming the barrel by turning the cutter
clockwise.
We both
became tired pretty quickly and developed blisters on our
hands. We realized
we would be here a long time so I devised a method of applying
pressure to the reamer with minimum exertion on our part.

I placed a
4” x 4” steel plate on top of the tap wrench, and then set
three boxes of bullets on top of the steel plate.
There was probably close to 50 pounds or more of
bullets applying downward pressure on the reamer.
One of us kept the boxes square and balanced while the
other one turned the tap handle.
Each time we removed the reamer to clean metal chips we
switched places. We
stopped when the rear of the reamer squared off the muzzle
face.
The second
time I did this I made sure the barrel was vertical by placing
a level on top of the steel plate before adding any bullets.
I also put a second steel plate on top of the brown box
shown in the photo above.
With the leveled barrel and extra steel plate I was
able to turn the tap wrench by myself without any additional
assistance. It
took about 90 minutes to ream each barrel using this weighted
method.
Threading
the Barrel
We removed
the brass bushing from the reamer and installed it onto the
tap. We again
applied cutting oil to the bushing and the tap threads and
started cutting the threads.
A little downward pressure got the tap started.
After every half turn we backed off the tap to cut the
chips. We didn’t
have to apply any weight to the tap handle because once the
threads were started the tap pretty much fed itself into the
barrel. After the
tap bottomed out we removed it and thoroughly cleaned out all
remaining oil and metal chips from inside the barrel, then
coated the inside with gun oil.
I had a few
spare flush-mount choke tubes lying around the shop so we
installed an improved cylinder choke into the barrel.
I used some choke tube lube to lubricate the threads
before installing the choke tube.
If I didn’t use the choke tube lube the choke tube
would be very difficult to remove after the barrel and tube
heated up from repeated firings.
Installing
a New Bead
Typically a shotgun bead is mounted 1/2“ to 1” behind the
end of the barrel, but that area would be either
too thin because I reamed it to accept choke tubes, or
would be in the threaded part of the barrel.
I marked the barrel 1 3/4“ back from the end of the
barrel which is behind the choke tube in a thick part of the
barrel.
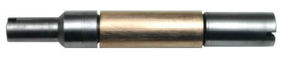
Finding the
top center line of a round barrel is not always easy.
It’s easy to find the center of the barrel, but if
the barrel is canted the center may not be in line with your
line of sight. There
are a couple of ways to find the center line but I devised a
tool to help with this.
I took a
scrap piece of 1” x 4” wood and milled a V-groove down the
center. Then I
drilled a hole in the center of the groove with a #12 drill
bit. I placed this
on the top end of the barrel with the hole positioned over the
spot where I wanted to mount the bead and held it in place
with a rubber band.
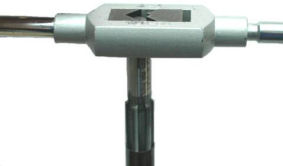
I placed a
3/4“ x 12” aluminum bar on top of the wood and placed a 1
1/2“ x 12” aluminum bar over the sight notch in the
receiver. I
rotated the wood block until the two bars were parallel.
The two aluminum bars were actually my homemade M1
Garand barrel indexing tool (refer to my article Rebarreling
Two M1 Garands). I
inserted the largest hole center punch I purchased from
Brownells #080-732-000
into the hole in the wood block and marked the barrel.
Just to make sure it was correct I taped a piece of
string from the center of the sight notch to the center of the
muzzle and the string fell perfectly across the mark.
I drilled
the bead hole using a #33 drill bit and tapped the hole with
the 6-48 tap. I
made sure there were no burrs left inside the barrel.
The barrel is now ready to receive a bead.
I decided
to make my own bead. Modern
beads are a round ball with a threaded stem, but older beads
were more flat. I
took a 1/8” brass rod and threaded it with a 6-48 die I
purchased from MidwayUSA #136898.
I cut the rod 1/8” above the end of the threads and
dressed the top so that it was flat and the sharp edges were
slightly beveled. I
installed my homemade bead into the bead hole and found that
the threads protruded into the barrel so I used a cutoff wheel
on my high speed rotary tool to trim the threaded end.
I used a little blue Locktite® on the threads to hold
it in place.
Extending
the Forcing Cone
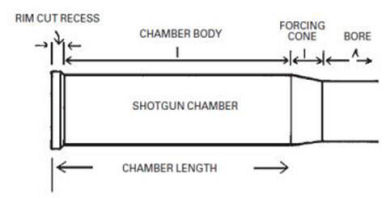
The
forcing cone in a shotgun barrel is the transition from the
wider chamber to the narrower bore. Typically the chamber
is long enough to allow the plastic hull to open completely
so the wad and shot can exit the hull with a minimum of
resistance. The Winchester 97 was originally designed to
shoot 2 3/4” roll-crimp shells. If the forcing cone was too
short for 2 3/4” star-crimp shells the hull would not open
completely which would form a constriction and could cause
an unsafe increase in pressure for a 100-year old gun. This
can also cause a decrease in accuracy due to shot
deformation. I purchased a 12-gauge chamber gauge
#080-546-012 and a long forcing cone reamer
#080-661-012 both from Brownells.
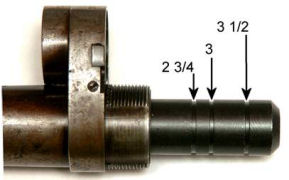
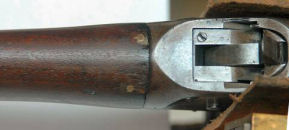
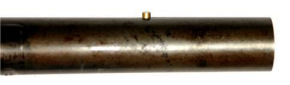
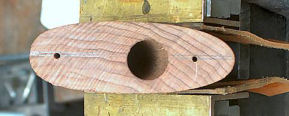
I
measured the chamber and found it to be very short. The end
of the chamber should be even with the first groove in the
gauge to accommodate 2 3/4“ shells. As you can see from the
above photo, the chamber was very short. Because this gun
was manufactured in 1907 the chamber was probably cut for 2
3/4” roll-crimp paper shells. Roll-crimp paper shells don’t
open as far as plastic star-crimp shells, so if the previous
owner was shooting 2 3/4“ shells in this barrel, the star
crimp would not be able to open completely causing a
constriction and the pressure would have been increased.
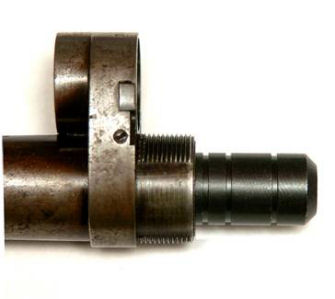
I used
the long forcing cone reamer to lengthen the forcing cone
until the gauge was 0.100” away from the first groove as
shown in the above photo. In a Winchester 97 shot shells
headspace on the headspace ring inside the receiver which is
0.100” thick, so I left the 2 3/4“ groove 0.100” back from
the face of the barrel. Now 2 3/4“ shells will be able to
open completely with no constriction.
(Note:
When I originally performed the work I lengthened the
chamber so the gauge fit up to the 2 3/4“ groove. A reader
of the Kitchen Table Gunsmith pointed out to me that this
would be incorrect and the chamber would be too long so I
have corrected this article. 5/8/2015)
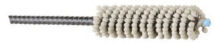
To finish
the job I polished the chamber and new forcing cone with a
12-gauge chamber Flex-Hone® I purchased from Brownells #080-608-512.
This tool is a wire brush with abrasive balls on the
ends of the bristles and comes with a 9-inch shaft.
It requires the use of Brownells Flex-Hone® Oil #080-008-609
to ensure the polishing is performed correctly.
I attached the hone to my drill and applied the oil to
the hone. I
polished the chamber, forcing cone, and barrel by running the
drill at a slow speed (<750 RPM) and moving it in and out.
Since the tool could only polish half of the barrel, I
installed a cylinder choke and polished the front half of the
barrel by inserting the hone from the muzzle.
I flushed the barrel with brake parts cleaner, then
oiled it with CLP. Now
the bore is clean and polished smooth.
Cutting
the Butt Stock
The length of pull (LOP) of this gun just felt too long to me.
Plus, if I was to use it for Cowboy Action Shooting™
I wanted to try to load with my right hand and I really had to
stretch to reach the ejection port.
There are a number of methods for measuring LOP, but it
boils down to how it ultimately feels to the shooter.
With the gun mounted on my shoulder I measured from the
tip of my nose to the first knuckle of my thumb, which
measured exactly 2-inches.
For correct LOP this measurement should be between 1”
and 1 1/2“. To
facilitate loading with my right hand I wanted the stock to be
a little bit shorter so I decided to remove 1”, and since
the new recoil pad I was adding was 3/4“ I would have to
remove 1 3/4“ inches from the butt stock.
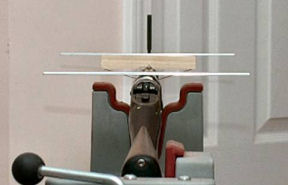
The other
measurement I needed to take into account was pitch.
Pitch can best be described as the angle of the butt in
relation to the receiver and barrel.
I set the butt flat on a window sill so the end of the
receiver was just touching the edge of the window frame.
As you can see in the above photo the barrel was angled
away from the window frame.
So this gun has up or positive pitch.
(Think of it this way, you have to climb up
hill from muzzle to receiver.)
You will almost never see neutral or down (negative)
pitch. Negative
pitch would have the heel of the stock (top) sticking out
farther from the toe (bottom) which would make it difficult to
mount and could cause bruising of the shoulder.
To find the
degrees of pitch I measured the distance from the window frame
to the tip of the barrel which was 1.127”.
The distance from the point where the receiver touched
the window frame to the end of the muzzle was 22” which
formed the hypotenuse of a right triangle.
So using the formula ARCSIN(1.127/22) gave me an angle
of 2.9 degrees of positive pitch.
I removed
the stock from the receiver and put a strip of masking tape
around the stock where I planned to cut.
I adjusted the fence on my table saw to cut 1 3/4”
and laid the butt against the fence.
I adjusted the miter gauge so it was in line with the
top of the stock at the 2.9-degree setting and cut the stock.
Installing
a Recoil Pad
I purchased a grind-to-fit Kick
Eez® recoil pad from MidwayUSA #926512
to add to the butt stock to help dampen some of the recoil.
The original butt stock measured 1 5/8” wide by 4
7/8” long; the new recoil pad measured 2” wide by 5 5/8”
long and 3/4“ thick so there was plenty of pad to grind off
and fit.
When I cut
the stock I also cut off both holes so I had to drill two new
holes. This is
much better than having to fill and re-drill an existing hole.
I marked the center of the butt stock and marked where
I wanted to drill the first hole.
There are two pencil lines in the above photo, my first
line was not in the center.
I used a #28 drill bit to drill the first hole, then
drove the screw into the hole to cut the threads.
I mounted the recoil pad onto the butt stock with the
first screw and inserted the second screw.
I rotated the pad so the second screw would leave a
mark; where that mark intersected the pencil line I drilled
the second hole.
I mounted
the oversized recoil pad onto the butt stock and scribed a
line around the outer edge of the butt stock.
I removed the recoil pad and used an 80-grit sanding
belt on my belt sander to grind the pad down to the scribe
line. I did this
in three stages:
Stage
1: I ground the
sides and the top of the recoil pad flat up to the scribe
line.
Stage
2: I mounted the
recoil pan onto the butt stock and ground the toe at the same
angle as the stock again, up to the scribe line.
Stage
3: I remove the
recoil pad and finished grinding the bottom sides to the
scribe line
I took some
220-grit sand paper and rounded the sharp edges on the soft
surface of the recoil pad that were left from the grinding.
I also sanded the newly ground sides to smooth down the
surfaces. I
finished by coating all surfaces with paste wax.
I installed
the butt stock onto the receiver, then installed the recoil
pad onto the butt stock. I
was really quite pleased with the results.
The length of pull is now much better for me and the
gun fits my shoulder perfectly.
I can reach the ejection port much more easily with my
right hand for loading single shells for cowboy matches.
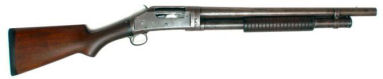
With the
shortened barrel, shortened butt stock, and new magazine tube
spring and follower I loaded five 2 3/4“ dummy shells into
the magazine and tested all of the functions.
The shotgun functioned perfectly and all shells fed and
ejected as they should. So
now my 100-year old great deal is ready for 21st
century competition.
I already
had most of the tools mentioned in this article.
I purchased the chamber gauge and a forend retaining
nut wrench #080-548-012
from Brownells. New
parts and tools cost me a little over $60.00 which still made
this gun a great deal.
Addendum
10/17/2014
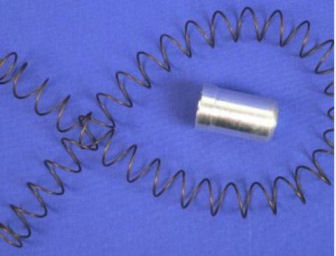
Photo Courtesy The Online
Outpost
As
mentioned before this gun was originally designed to hold
six 2 5/8” shells, but would only hold five 2 3/4“ shells.
I purchased a 6-round conversion kit from
The Online Outpost which consists of a new, aluminum
follower and a shorter magazine tube spring. It works
because when the shorter spring collapses it allows more
room in the tube for a full six rounds.
Wild
Bunch Match October 25, 2014
Finally, after almost a year of preparation, I attended my
first Wild Bunch match sponsored by the
Walnut Grove Rangers in Ellenboro, NC. We fired 25
shotgun rounds spread over six stages. My modified
Winchester 97 functioned flawlessly! I did not have any
jams, failure to feed or failure to eject malfunctions.
Other shooters had problems with their 97’s but mine worked
perfectly. While working on this gun I discovered that I
could not “short-stroke” it; it needed to be pumped fully to
the rear, and fully to the front. If I didn’t use complete,
full strokes the gun would jam up and I would have to finish
the full stroke. So I practiced working the gun at home
using dummy rounds.
Since I
had never fired the gun prior to the match, the match
officials allowed me to try it out before the match
started. I loaded six shells in the magazine and pumped and
fired them as quickly as I could. Since I had no problems I
felt the gun was ready for competition.
Believe
it or not, I had two stages where I missed a shotgun
target! Well, as they say, there is no target big enough,
or close enough that you can’t miss. Now if I can only get
the hang of loading one shell at a time for cowboy
shooting.
|