Mini 14/30 Action Job
by Roy
Seifert
Click here to purchase a zip file with this and
all Kitchen Table Gunsmith Articles.
Disclaimer: This
article is for entertainment only and is not to be used in lieu of a
qualified gunsmith. Please
defer all firearms work to a qualified gunsmith.
Any loads mentioned in this article are my loads for my
guns and have been carefully worked up using established guidelines and
special tools. The
author assumes no responsibility or liability for use of these loads,
or use or misuse of this article.
Please note that I am not a
professional gunsmith, just a shooting enthusiast and hobbyist, as well
as a tinkerer. This
article explains work that I performed to my guns without the
assistance of a qualified gunsmith.
Some procedures described in this
article require special tools and cannot/should not be performed
without them.
Warning: Disassembling
and tinkering with your firearm may void the warranty.
I claim no responsibility for use
or misuse of this article. Again,
this article is for entertainment purposes only!
Tools
and firearms are the trademark/service mark or registered trademark of
their respective manufacturers. Click on any
blue text to go to a
product/seller web site.

Introduction
Many years ago, I purchased a used Ruger Mini Thirty.
I added an M1 Carbine rear sight
because it was easier to adjust than the original factory rear sight (refer
to my article
Installing a M1 Carbine Rear Sight on a Ruger® Mini Thirty).
Now I wanted to perform an action job on this rifle.
There are many videos on YouTube showing how to perform an action
job, but I think the best and easiest is from GunBlue490.
He is a trained Ruger armorer so he knows what he is doing.
https://www.youtube.com/watch?v=qLg9GdWutL8
The Ruger Mini 14 and Mini Thirty use the same trigger group so this article
applies to both. Their trigger
group is almost the same as the M1 Garand and M14/M1A.
In fact, the M14/M1A was the inspiration for the Ruger Mini rifles.
The Mini Thirty is chambered for the 7.62 x 39 mm cartridge; the same
cartridge as the AK47 and SKS rifles.
Ruger built the Mini Thirty to compete with the Aks and SKSs being
imported into this country. And
being built on the successful Mini 14 platform, it is a reliable,
lightweight, handy rifle.
Tools
and Parts
I had to purchase some tools and parts for this project.
I never complain about purchasing tools because I can use them for
another project, and the money I save by doing the job myself usually pays for
the tools.
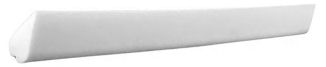
I
purchased a triangular ceramic stone from MidwayUSA.com
#371794.
Ceramic stones use water as the cleaning/cutting agent.

I
purchased a #29 carbide drill bit from Suncoast Precision Tools
#450301360. Carbide makes
drilling into hardened parts much easier.

I also
purchased a replacement secondary sear spring from MidwayUSA.com
#410248.
Because I was going to cut the original factory spring, I wanted to have
a spare just in case.
This
spring is very heavy and causes the trigger pull to be heavy.
When the trigger is depressed the secondary sear rubs against the hammer
and the trigger sear begins to release.
This is the first or take-up stage of the two-stage trigger.
Continuing to press the trigger causes the secondary sear spring to
compress which adds weight to the trigger pull and the sear eventually releases
the hammer. Cutting some coils off
this spring reduces the trigger pull, but the disconnect still functions
correctly.

Many
years ago I purchased a 2-ounce jar of Action Lube Plus from Brownells
#083050002. This is a grease
that I have been using for years on the triggers and sears on all of my
firearms. I use so little on a
hammer and sear that this jar will probably outlive me.
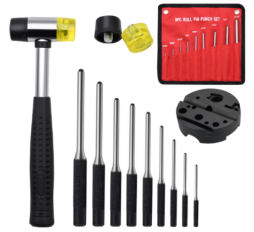
Amazon.com sells a nice punch set that comes with a mallet and bench block.
The bench block is great for pushing
pivot pins through an assembly without losing the pin.
Punches are a necessary tool for working on guns.
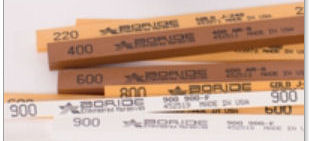
In my
collection of gunsmithing tools I have a set of gunsmithing action stones I
purchased from Boride Engineered Abrasives
#028964. This set contains
various sizes and grits of polishing stones that I use to polish surfaces.
These abrasive stones use oil as the cutting and cleaning agent.
I have used these stones on many firearms for many different purposes.
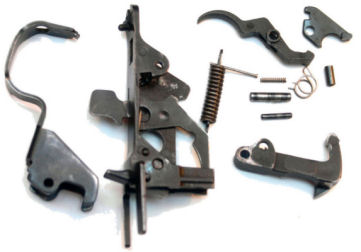
Disassembly
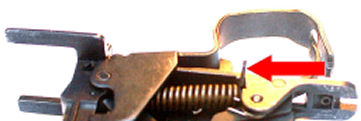
I
disassembled the trigger group down to its component parts.
With the hammer cocked, I put a pin in the hammer strut hole and pulled
the trigger. The pin prevented the
hammer spring from expanding so I could remove the hammer strut and spring as
one unit.
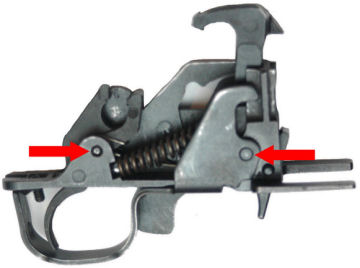
Next,
I removed the trigger pivot pin by pushing it through with a 1/8 punch.
This allowed me to remove the trigger and secondary sear assembly.
I pushed through the hammer pivot pin so I could remove the hammer and
trigger guard. All I have left is
the trigger housing with the safety and safety spring still installed.
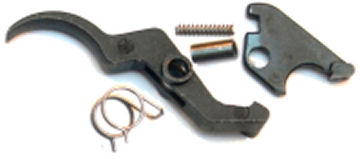
I
disassembled the trigger assembly by first removing the trigger return spring,
then using the 1/8 punch to push through the trigger bushing.
I was careful to hold the secondary sear to prevent it from flying away
because it is under spring tension.
Action
Job
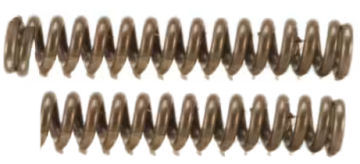
I used
my Dremel tool with a cutoff disk to remove two coils from the secondary sear
spring. I was very careful not to
nick the coil below the cut. I
flattened the cut off coil by pressing it against the cutoff disk.
This made the trigger assembly much easier to reassemble.
GunBlue490 used wire cutters to clip coils off the spring.
Both the cutoff disk or wire cutters will work.
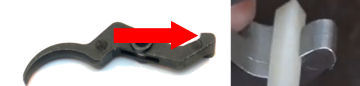
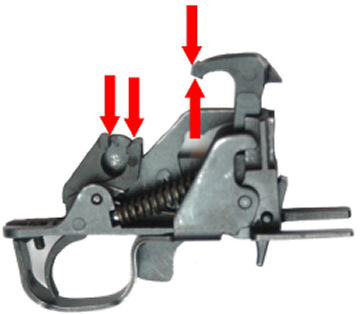
I used
the triangular ceramic stone to polish the sear hook on the trigger.
This surface was very rough as it came from the factory, I could see the
leftover tooling marks, but I was able to polish it mirror smooth with the
stone. It was very easy to see when
I was polishing the notch flat because I could see the dark area on the edge of
the stone. When the edge of the
stone became dark, I cleaned it with water and a paper towel.
I also gently broke the sharp front edge of the sear surface on the
hammer as shown by GunBlue490.
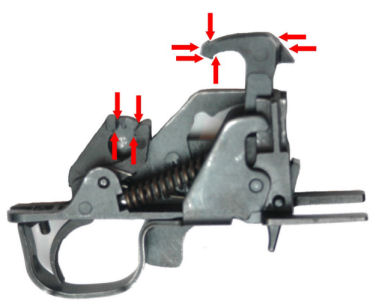
I took
a 400-grit stone and polished the front of the hammer, the front of the trigger
sear and front of the secondary sear.
These surfaces rub together and should be smooth.
I
reassembled the trigger assembly and trigger group.
I added a drop of oil to each pivot pin before I pushed it in place.
I also added a drop of oil to the trigger bushing as I reassembled the
trigger assembly.
After
the trigger group was reassembled and before I cocked the hammer, I used a
toothpick to apply some Action Lube Plus to the sear hooks on the hammer and
trigger, and the secondary sear hook.
I also applied a thin layer of grease to the rear of the hammer above the
hooks, trigger sear, and secondary sear.
I applied grease to the front of the hammer where the bolt rides.
I reinstalled the trigger group in my rifle and the trigger pull was
smooth and measured a consistent 3 pounds 11 ounces.
Installing a Trigger Overtravel Stop Screw
NutNFancy has a YouTube video where Terry Gardner performs a trigger job on a
Mini 14
https://www.youtube.com/watch?v=cuSRX92q-sI&t=0s.
Terry installed a trigger overtravel stop screw so I decided to follow
his example.
I
drilled a hole in the floor of the trigger group housing behind the trigger with
a #29 carbide drill bit and tapped the hole for an 8-32 x 3/8 set screw.
I installed the set screw with Loctite blue and adjusted it so the
trigger travels rearward just enough so the sear breaks.
After
I completed the action job, I tested the rifle to ensure the disconnector and
trigger worked as they should. I am
very pleased how this job came out.
Thanks to GunBlue490 and NutNFancy for their excellent videos.
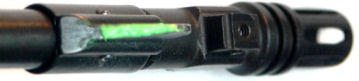
Front
Sight
The
early Mini 14 and Mini Thirty both have a large flat blade front sight.
Because my rifle is blued, that black front sight disappears against a
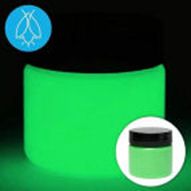
black background. I tried to paint
the front sight with green fluorescent paint, but the paint was too thick and
did not apply to the sight smoothly, and it did not stick.
Over
the years I discovered that yellow works best for my eyes.
It shows up brighter against all light and dark backgrounds.
I purchased a yellow paint pen from.
I didn’t want a permanent fix like a colored sight insert in case I
wanted to sell the rifle.

I
painted the front sight with the yellow paint pen.
This paint can be easily removed, and if it chips or wears off, it is
very easy to repair.
|

