Adding a Tang Peep Sight to a Lever-Action Rifle
by Roy Seifert
Click here to purchase a
CD with this and all Kitchen Table Gunsmith Articles.
Disclaimer:
This article is for entertainment only and is not to
be used in lieu of a qualified gunsmith.
Please defer all firearms work to a qualified
gunsmith. Any loads
mentioned in this article are my loads for my guns and have
been carefully worked up using established guidelines and
special tools. The
author assumes no responsibility or liability for use of
these loads, or use or misuse of this article.
Please note that I am not a professional gunsmith,
just a shooting enthusiast and hobbyist, as well as a
tinkerer. This
article explains work that I performed to my guns without
the assistance of a qualified gunsmith.
Some procedures described in this article require
special tools and cannot/should not be performed without
them.
Warning:
Disassembling and tinkering with your firearm may
void the warranty. I
claim no responsibility for use or misuse of this article.
Again, this article is for entertainment purposes
only!
Tools
and firearms are the trademark/service mark or registered trademark
of their respective manufacturers.
I
have always preferred a peep sight to an open sight.
All of my lever-action rifles have one mounted on the
tang. For cowboy
shooting competition, I remove the aperture and use the
resulting large ring as a ghost ring.
I find I can acquire the target quicker with a peep
sight than with open sights. And,
because the eye automatically lines up the front post into
the center of the ring, literally wherever I place the front
post on the target, that is where the bullet will hit.
I
recently purchased and restored a Ted Williams model 100
.30-30
Winchester
(refer to my article Restoring
a Ted Williams (Sears) Model 100 .30-30).
This rifle is really a cheaper model ’94 made by Winchester
for Sears. I had
to do a lot of smoothing and polishing to make the action
somewhat smooth, but a friend of mine purchased a real
Winchester ’94 .30-30 which was a heck of a lot smoother
than the Ted Williams model!
Although I replaced the rear sight during the
restoration process, I really wanted to put a tang peep
sight on it.
There
are three popular models of rear peep sights available for
lever-action rifles:
- Williams
Receiver Sight – made to be mounted on the receiver
and is adjustable for both windage and elevation.
However, I would not be able to fit the rifle
into my saddle scabbard so I chose not to use this one.
- Lyman
#2 tang peep sight – made to be mounted on the
receiver tang, this sight is not adjustable for windage,
only elevation. You
have to drift the front sight the opposite
direction you want the bullet to move.
However, this sight costs almost $50 less than
the Marbles sight.
- Marbles
tang peep sight - made to be mounted on the receiver
tang, this sight is adjustable for both windage and
elevation. Although
more expensive than the Lyman, I wanted the ability to
adjust windage without having to use a mallet and punch.
Marbles has been manufacturing tang peep sights
for over 100 years.
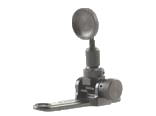
I
ordered item 174097 Marble's
Tang Peep Sight
Winchester
53, 55, 64, 65, 1892, 1894 Steel Blue and item 735034 Marble's Improved Tang Peep Sight Screw Set #3 Blue from Midwayusa.
A few years ago I purchased the same sight for my Rossi
’92 and it came with the screws.
Apparently, Marbles decided to sell just the sight, and
sell the rifle-specific screws separately.
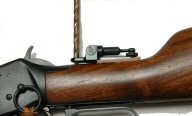 The
base of the tang sight comes with two holes; one will align
with the original hole in the tang that holds the butt stock
in place. I will
have to drill and tap the tang for the front hole in the sight
base. First, I
made sure my rifle was unloaded, then I removed the tang
screw. I installed
the peep sight and new, longer tang screw with a piece of
leather used as a shim. This
raised the sight above the tang, which helped me to mark the
center of the tang for the new hole.
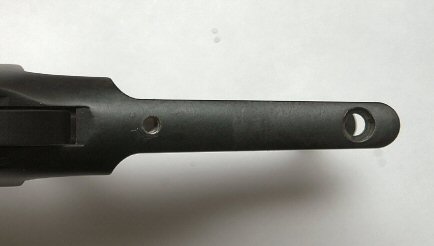
I placed a letter ‘C’ drill bit through the front
hole in the sight base and turned it with my
hand to mark where to drill.
Just to make sure I was in the center of the tang, I
measured the width of the tang at the point I made the mark,
then divided by two; the result was 0.276”.
I used the calipers to make a line on the tang, then
used a center punch to mark where the line and drill mark came
together. The
base of the tang sight comes with two holes; one will align
with the original hole in the tang that holds the butt stock
in place. I will
have to drill and tap the tang for the front hole in the sight
base. First, I
made sure my rifle was unloaded, then I removed the tang
screw. I installed
the peep sight and new, longer tang screw with a piece of
leather used as a shim. This
raised the sight above the tang, which helped me to mark the
center of the tang for the new hole.
I placed a letter ‘C’ drill bit through the front
hole in the sight base and turned it with my
hand to mark where to drill.
Just to make sure I was in the center of the tang, I
measured the width of the tang at the point I made the mark,
then divided by two; the result was 0.276”.
I used the calipers to make a line on the tang, then
used a center punch to mark where the line and drill mark came
together.

 I
completely disassembled the rifle, including removing the
magazine tube. I
placed the tang in my machinist’s vise, then used a #21
drill bit to drill the hole in the tang. The
screw kit came with two screws; 10-32 and 10-36.
Since I had a 10-32 tap, this is what I used to tap the
hole. To ensure I
started the hole straight, I brought the quill of my
mill/drill down to where the shank of the tap was inside the
chuck, then tightened the chuck to where the tap would still
turn. I clamped
vise-grips on the tap and started to turn it. Once
the tap was started, I finished tapping the hole with a tap
wrench. I
completely disassembled the rifle, including removing the
magazine tube. I
placed the tang in my machinist’s vise, then used a #21
drill bit to drill the hole in the tang. The
screw kit came with two screws; 10-32 and 10-36.
Since I had a 10-32 tap, this is what I used to tap the
hole. To ensure I
started the hole straight, I brought the quill of my
mill/drill down to where the shank of the tap was inside the
chuck, then tightened the chuck to where the tap would still
turn. I clamped
vise-grips on the tap and started to turn it. Once
the tap was started, I finished tapping the hole with a tap
wrench.
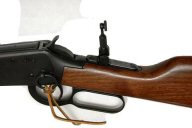 I
cleaned out the hole with brake parts cleaner, then oiled and
reassembled the rifle. I
installed the new tang sight using blue thread locker on the
screws. Finally, I
tapped out the new front sight and replaced it with a dovetail
sight blank. Now
my rifle is ready to be sighted-in. I
cleaned out the hole with brake parts cleaner, then oiled and
reassembled the rifle. I
installed the new tang sight using blue thread locker on the
screws. Finally, I
tapped out the new front sight and replaced it with a dovetail
sight blank. Now
my rifle is ready to be sighted-in.
This
project is fairly easy, even if all you have is a hand drill. The
secret is to make sure you have the front hole properly
centered on the tang. Receivers
are usually made out of softer steel so they’re easy to
drill and tap. And,
even if your drill is not perfectly straight, or the tap is
not started perfectly straight, the front screw will still
hold the sight in place.
|