Polishing
a Rifle Chamber
by Roy Seifert
Click here to purchase a
CD with this and all Kitchen Table Gunsmith Articles.
Disclaimer:
This article is for entertainment only and is not to
be used in lieu of a qualified gunsmith.
Please defer all firearms work to a qualified
gunsmith. Any loads
mentioned in this article are my loads for my guns and have
been carefully worked up using established guidelines and
special tools. The
author assumes no responsibility or liability for use of
these loads, or use or misuse of this article.
Please note that I am not a professional gunsmith,
just a shooting enthusiast and hobbyist, as well as a
tinkerer. This
article explains work that I performed to my guns without
the assistance of a qualified gunsmith.
Some procedures described in this article require
special tools and cannot/should not be performed without
them.
Warning:
Disassembling and tinkering with your firearm may
void the warranty. I
claim no responsibility for use or misuse of this article.
Again, this article is for entertainment purposes
only!
Tools
and firearms are the trademark/service mark or registered trademark
of their respective manufacturers.
I recently
replaced the barrel on my son’s M1 Garand using a used
barrel. That
barrel came off of a
Springfield
receiver after having gone through an arsenal rebuild.
I never had any problems with that barrel when it was
attached to the Springfield receiver.
However, after
swapping that barrel to my son’s Garand, fired cartridge
cases would stick in the chamber and could not be extracted.
In fact, the extractor was shearing off the rim of the
case. We could
only remove the stuck case by driving a rod through the
barrel. This was caused by the
thread-locker I used to install the barrel
(refer to my article Rebarreling
Two M1 Garands), which ran into the chamber
and hardened causing a rough spot.
Time to polish out that rough spot.
There are a
number of methods for polishing a rifle chamber, and all work
very well. The
goal here is to just polish, not change any of the chamber
dimensions. I
wanted to remove any burrs or imperfections; in my case dried
thread-locker. One
method is to drill out the flash hole from a spent cartridge
case so a cleaning rod attachment can fit through the hole and
be used as a nut to hold the cartridge case on the end of the
cleaning rod. Then
cut a slot lengthwise in the cartridge case, insert a strip of
600-800 grit wet/dry paper into the slot and wrap it around
the case so it does not overlap itself, coat it with gun oil,
then pull it into the chamber.
Rotate the case with the paper to polish the chamber.
This can be done by hand or with a drill turning
slowly. A little
goes a long way here.

Many years
ago I purchased a Flex-Hone
from Brownells.
I have used this to polish the .45 LC chambers in my
single-action revolvers (refer to my article Polishing
Revolver Cylinder Chambers).
This is a better tool for polishing chambers and
consists of small balls of polishing grit on the ends of a
spiral wire brush. The
Flex-Hone comes in two different grits, medium and fine.
The medium-grit hone is used to polish-out the tooling
marks, and the fine-grit hone is used to final-polish the
chamber. Brownells
states that you should only use Flex-Hone Oil as the
cutting/lubricating agent, and that you should not spin the
hone any faster than 750 RPM.
This is well within the slow speed of my cordless
drill.
A word of
caution here; I do not want to polish the chambers mirror or
bearing smooth. When
the cartridge case expands, it needs something to grip
against; otherwise I could get excessive pressure, so I
decided to use only the fine hone.
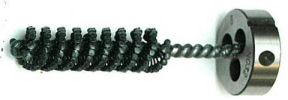
The
Flex-Hone for revolver chambers comes with a shank that is
only 1 1/4-inches long. Brownells
also sells a Flex-Hone for rifle chambers with a 14-inch
shank, but I didn’t want to spend the money.
My rifle cleaning rod takes an 8-32 attachment so I
thought if I cut 8-32 threads on the end of the shank it would
fit my cleaning rod which I could pull through the bore.
Using an 8-32 die I cut threads on the first 1/4-inch
of the shank. After
cutting the threads the hone fit perfectly onto my cleaning
rod.
I
disassembled the M1 Garand and removed the action from the
stock. I also
removed the operating rod spring and follower rod, operating
rod, follower arm pin, operating rod catch, bullet guide,
follower arm, follower and slide assembly, and the bolt from
the receiver. I
mounted the receiver in a padded vise so I wouldn’t scratch
the finish. I used
a bore guide and pushed two sections of a cleaning rod without
the handle through the bore until the accessory end appeared
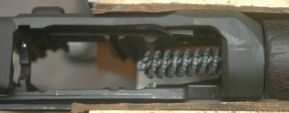
in the receiver. I
screwed the hone onto the end of the cleaning rod and attached
the other end to my cordless drill.
I liberally coated the hone with Flex-Hone oil, pulled
the hone into the chamber, then ran the drill at a slow speed
for about 2 minutes. As
the hone turned I pushed it in and out of the chamber.
When the
2-minutes were up I unscrewed the hone from the rod and
removed the rod from the bore.
I cleaned the chamber and bore with brake parts
cleaner, then thoroughly dried and lightly lubricated the
chamber and bore with gun oil.
I examined the chamber with a good bore light and
couldn’t find any burrs or blemishes, but I could see the
cross-hatch pattern left by the hone.
This time
cartridge cases did not stick and ejected the way they should.
This method for polishing a rifle chamber helps to ease
case extraction without damaging the chamber.
|
